项目简介 项目功能点 本项目分为了 后台管理系统 和 前台用户系统
1.登录模块,实现对登录者ip和登录地址的显示
2.权限管理模块(基于SpringSecurity框架实现)
①后台权限列表管理:后台管理列表的增删改查
②角色管理:后台管理系统角色的增删改查以及对不同的角色赋于不同查看后台管理列表的权限
③用户管理:登录该系统的用户的增删改查以及为不同用户分配不同角色
3.讲师管理模块
①讲师列表常规的分页查询、模糊查询、添加、删除、修改等操作
4.课程分类模块
①课程分类的添加(通过easyExcel读取上传的excel表中数据实现)
②使用树形结构展示课程分类的列表以及搜索当前存在的课程分类
5.课程管理模块
①课程列表常规的分页展示、特定查询、添加、删除、修改等操作
②添加课程,通过以下步骤完成:填写课程信息 –> 添加课程大纲 –> 课程信息确认 –> 最终发布
③课程图片和视频添加功能,可以添加课程图片和视频(基于阿里云oss和视频点播实现)
6.统计分析模块
①统计数据生成
②统计数据展示(基于ECharts实现)
7.banner管理模块
①前台banner轮播图列表常规的分页查询、模糊搜索、添加、删除、修改等操作
8.评论管理模块
①所有评论的展示和删除,支持对某一用户、某个讲师、某个课程的评论特定查询
②对被举报评论进行特定处理,可根据评论内容决定删除或置为正常评论
9.订单管理模块
支持对某一用户、某个讲师、某个课程订单的特定查询
①对所有已支付订单的查看
②对所有尚未支付订单的查看
1.首页模块
①轮播图显示 (根据添加时间进行排序)
②显示热门课程(根据点击次数进行排序)
③显示著名讲师(根据排序值间进行排序)
④根据课程名进行模糊搜索
2.注册功能(接入阿里云短信服务以及微信扫码注册)
3.登录功能
①手机登录
使用了SSO单点登录,通过JWT框架生成token字符串实现,JWT字符串分为了头信息、有效载荷、签名哈希
②微信扫码登录
通过微信提供的接口获取类似临时票据,通过临时票据再访问微信提供的地址获取访问凭证和扫描人的唯一
标识,根据这两个值最终访问另一个微信提供的接口即可获取扫描人的全部信息
4.名师模块
①名师列表功能
②名师详情功能
5.课程模块
①课程列表功能(包含常规的分页查询)
②课程详情功能(包含课程所有的基本信息以及判断课程是否收费)
③课程视频在线播放(基于阿里云视频点播实现)
④课程购买功能(通过微信支付实现)
⑤课程评论功能
6.用户个人中心模块
①用户可通过已支付订单和未支付订单功能查询账户订单
②个人资料功能和上传头像功能支持用户对自己资料的修改
③通过修改密码功能对密码进行修改
④退出登录功能
项目技术点 本项目采用微服务架构,前后端分离开发
Vue Element-UI Node.js(JavaScript运行时环境) Npm(依赖管理器)
Babel(转码器) 前端模块化技术 Nuxt框架(服务端渲染技术,基于vue实现)
Echarts(图表显示工具)
SpringBoot SpringCloud MyBatisPlus EasyExcel SpringSecurity Redis Jwt
阿里云oss 阿里云视频点播服务 阿里云短信服务 微信支付和登录
环境搭建
1 CREATE DATABASE IF NOT EXISTS online_edu CHARSET 'utf8';
主要是需要修改父工程pom文件,具体内容在这不做展示
公共模块
在online_parent模块下创建子模块common_apis
整合Swagger
①生成在线接口文档 ②方便接口测试
①在子模块common_apis下创建service_base子模块
②在service_base子模块中创建swagger配置类
1
2
3
4
5
6
7
8
9
10
11
12
13
14
15
16
17
18
19
20
21
22
23
24
25
26
27
@Configuration @EnableSwagger2 public class SwaggerConfig { @Bean public Docket webApiConfig () { return new Docket (DocumentationType.SWAGGER_2) .groupName("webApi" ) .apiInfo(webApiInfo()) .select() .paths(Predicates.not(PathSelectors.regex("/admin/.*" ))) .paths(Predicates.not(PathSelectors.regex("/error.*" ))) .build(); } private ApiInfo webApiInfo () { return new ApiInfoBuilder () .title("网站-课程中心API文档" ) .description("本文档描述了课程中心微服务接口定义" ) .version("1.0" ) .contact(new Contact ("year21" , "http://year21.top" , "masicjokersic@gmail.com" )) .build(); } }
①在service模块下引入servie_base的坐标依赖
在servie模块引入了,在service_edu也能使用
1 2 3 4 5 6 <dependency > <groupId > top.year21.onlineedu</groupId > <artifactId > service_base</artifactId > <version > 1.0-SNAPSHOT</version > </dependency >
②在service_edu主启动类设置包扫描规则,因为默认只扫描主动类所在的包及其子包
1
2
3
4
5
6
7
@SpringBootApplication @ComponentScan(basePackages = {"top.year21.onlineedu"}) public class ServiceEduMain8001 { public static void main (String[] args) { SpringApplication.run(ServiceEduMain8001.class,args); } }
③进行访问测试,测试地址为:http://localhost:工程端口号/swagger-ui.html
统一结果返回
①在子模块common_apis下创建common_utils子模块
②common_utils子模块中创建返回统一结果的实体类
1
2
3
4
5
6
7
8
9
10
11
12
13
14
15
16
17
18
19
20
21
22
23
24
25
26
27
28
29
30
31
32
33
34
35
36
37
38
39
40
41
42
43
44
45
46
47
48
49
@Data @AllArgsConstructor @NoArgsConstructor public class JsonResult <E> { private static final Integer SUCCESS = 20000 ; private static final Integer ERROR = 30000 ; private Boolean result; private Integer code; private String message; private E data; public JsonResult (Boolean result,String message,E data) { if (result){ this .result = true ; this .code = SUCCESS; }else { this .result = false ; this .code = ERROR; } this .message = message; this .data = data; } public JsonResult (Boolean result) { if (result){ this .result = true ; this .code = SUCCESS; this .message = "处理成功" ; }else { this .result = false ; this .code = ERROR; this .message = "处理失败" ; } } public JsonResult (Boolean result,Integer code,String message) { if (result){ this .result = true ; this .code = code; }else { this .result = false ; this .code = code; } this .message = message; } }
①需要使用的工程pom文件中引入此模块依赖
1 2 3 4 5 6 <dependency > <groupId > top.year21.onlineedu</groupId > <artifactId > common_utils</artifactId > <version > 1.0-SNAPSHOT</version > </dependency >
②修改控制层返回结果测试
1 2 3 4 5 6 @PostMapping("/delTeacher/{id}") public JsonResult<Void> deleteTeacher (@PathVariable("id") Integer id) { boolean result = teacherService.removeById(id); return new JsonResult <>(result); }
统一异常处理 1.在service_base子模块创建一个用于异常处理类
1 2 3 4 5 6 7 8 9 10 11 12 13 14 15 16 17 18 19 20 21 22 23 24 25 26 @ControllerAdvice public class GlobalExceptionHandler { @ExceptionHandler(value = {Throwable.class}) @ResponseBody public JsonResult<String> globalExceptionHandle (Throwable e) { return new JsonResult <>(true ,"服务出现一点小异常,异常信息是" ,e.getMessage()); } @ExceptionHandler(value = {ArithmeticException.class}) @ResponseBody public JsonResult<String> specificExceptionHandle (Throwable e) { return new JsonResult <>(true ,"出现了特定异常,异常信息是" ,e.getMessage()); } @ExceptionHandler(value = {InsertException.class}) @ResponseBody public JsonResult<Void> customerExceptionHandle (InsertException e) { return new JsonResult <>(true ,e.getCode(),e.getMessage()); } }
①创建一个自定义异常类继承RuntimeException类
这里可以选择直接重写RuntimeException类的方法或者按照下方的方式来
另一种方式:
1
2
3
4
5
6
7
@Data @AllArgsConstructor @NoArgsConstructor public class InsertException extends RuntimeException { private Integer code; private String message; }
②在编写业务过程中只需要抛出这个异常即可
统一日志处理
日志级别:ERROR、WARN、INFO、DEBUG
yml设置日志级别
1 2 3 4 logging: level: root: info
logback日志工具(不仅可以把日志输出到控制台同时输出到文件中)
使用步骤
①删除yml中日志级别和mybatis的日志设置
②在resources文件夹下创建logback-spring.xml文件
后台系统 前端页面工程 1、使用vue提供的vue-admin-template-master模板文件
vue-admin-template-master模板是基于Vue+element-ui实现的
2、将模板文件解压到VSCode的工作区
3、通过集成终端键入npm install 根据package.json安装依赖
新功能开发 1.在router文件夹下的index.js添加路由
1
2
3
4
5
6
7
8
9
10
11
12
13
14
15
16
17
18
19
20
21
{ path : '/teacher' , component : Layout , redirect : '/teacher/list' , name : 'teacher' , meta : { title : '讲师管理' , icon : 'example' }, children : [ { path : 'list' , name : '讲师列表' , component : () => import ('@/views/edu/teacher/list' ), meta : { title : '讲师列表' , icon : 'eye' } }, { path : 'add' , name : '添加讲师' , component : () => import ('@/views/edu/teacher/add' ), meta : { title : '添加讲师' , icon : 'tree' } } ] },
2.在views文件下创建对应页面的vue文件,用于路由转发的引入
3.在api文件下创建定义需要调用的方法js文件,用于特定页面的调用
1
2
3
4
5
6
7
8
9
10
11
12
13
14
15
16
17
18
19
20
21
22
23
import request from '@/utils/request' export default { getTeacherList (pageNum,pageSize,voTeacher ){ return request ({ url : '/serviceedu/condition/' + pageNum +"/" + pageSize, method : 'post' , data : voTeacher }) }, addTeacher (voTeacher ){ return request ({ url : '/serviceedu/add' , method : 'post' , data : voTeacher }) } }
4.在views文件夹下对应的vue文件中引入上方定义的js文件,用于发送业务请求
1
2
3
4
5
6
7
8
9
10
11
12
13
14
15
16
17
18
19
20
21
22
23
24
25
26
27
28
29
30
31
32
<script> //引入需要调用的js文件 import teacher from '@/api/teacher/teacher.js' export default { name: 'list', data() { //定义变量和初始值 return { pageNum: 1, //当前页 pageSize: 5, //每页数量 voTeacher: { }, //值对象 list: [],//查询接口后返回的数据 } }, created(){ //在vue对象创建之后,数据转载之前执行,一般调用methods中定义的方法 this.getList(); }, methods:{ //创建具体的方法,调用teacher.js定义的方法 //查询讲师列表 getList(page = 1){ this.pageNum = page teacher.getTeacherList(this.pageNum,this.pageSize,this.voTeacher) .then(response => { this.list = response.data.records }) .catch(error => { console.log(error); }) }, } } </script>
5.最后通过element-ui组件库实现对数据的展示
1
2
3
4
5
6
7
8
9
10
11
12
13
14
15
16
17
18
19
20
21
22
23
24
25
26
27
28
29
30
31
32
33
34
35
36
37
<template> <div class="app-container"> 讲师列表 <!-- 数据展示 --> <el-table :data="list" border style="width: 100%"> <el-table-column sortable prop="id" label="id" width="180"> </el-table-column> <el-table-column prop="name" label="姓名" width="180"> </el-table-column> <el-table-column prop="intro" label="简介"> </el-table-column> <el-table-column prop="career" label="头衔"> <template slot-scope="scope"> <!-- slot-scope="scope" 可以获取数据--> {{scope.row.level === 1?'高級讲师':'首席讲师'}} </template> </el-table-column> <el-table-column prop="gmtCreate" label="添加时间"> </el-table-column> </el-table> </div> </template>
nginx反向代理 考虑到前端页面请求后端多个微服务,前端请求地址不可能固定某个微服务端口,使用nginx反向代理完成请求
①为了安全起见,没有选择监听80端口,选择监听9001端口
②添加转发规则
1
2
3
4
5
6
7
8
9
10
11
12
13
14
15
16
server { listen 9001; server_name localhost; location ~ /serviceedu/ { proxy_pass http://192.168.231.1:8001; } location ~ /serviceoss/ { proxy_pass http://192.168.231.1:8002; } location ~ /user { proxy_pass http://192.168.231.1:8001; } }
③修改前端页面请求地址为请求nginx
1
2
3
4
module .exports = merge (prodEnv, { NODE_ENV : '"development"' , BASE_API : '"http://192.168.231.134:9001"' , })
首页管理 登录显示 ①使用后端模拟浏览器发送post请求访问查询ip的接口,将返回的数据转为json传回前端
1
2
3
4
5
6
7
8
9
10
11
12
13
14
15
16
17
18
19
20
21
22
23
24
25
26
27
28
29
30
31
32
33
34
35
36
37
public class IpUtils { public static JSONObject getIpInfo () { try { String text = sendPost("http://pv.sohu.com/cityjson/" ); String info = text.substring(text.indexOf("=" ) + 1 ,text.lastIndexOf(";" )); return JSONObject.parseObject(info); } catch (IOException e) { e.printStackTrace(); } return null ; } public static String sendPost (String url) throws IOException { String result = "" ; HttpPost httpPost = new HttpPost (url); CloseableHttpClient httpClient = HttpClients.createDefault(); try { BasicResponseHandler handler = new BasicResponseHandler (); StringEntity entity = new StringEntity ("utf-8" ); entity.setContentEncoding("UTF-8" ); entity.setContentType("application/json" ); httpPost.setEntity(entity); result = httpClient.execute(httpPost, handler); return result; } catch (Exception e) { e.printStackTrace(); } finally { try { httpClient.close(); } catch (Exception e) { e.printStackTrace(); } } return result; } }
讲师管理 前端页面 讲师列表
分页条 ①通过element-ui的组件库修改模板
②修改一个getList方法
1 2 3 4 5 6 7 8 9 10 11 12 13 14 15 <el-pagination :current-page ="pageNum" :page-size ="pageSize" :total = "total" style ="padding: 30px 0; text-align:center;" layout ="total,prev, pager, next,jumper" @current-change ="getList" /> getList(page = 1){ //表示当不传值是pageNum是1 this.pageNum = page teacher.getTeacherList(this.pageNum,this.pageSize,this.voTeacher){..}
条件查询 ①定义一个封装查询属性的voteacher对象,使用v-mode将查询表单的属性value值中l绑定到voteacher对象中
②绑定查询按钮的点击事件,调用讲师列表中的可用于条件查询的方法
1 <el-button type ="primary" @click ="getList()" > 查询</el-button >
删除讲师 ①在每一行数据后面添加删除按钮、绑定点击事件、传递删除的id
②在api文件夹teacher.js文件中定义被调用的方法
1 2 3 4 5 6 7 delTacher (id ){ return request ({ url : `/serviceedu/delTeacher/${id} ` , method : 'post' }) }
③在list.vue页面进行调用
1
2
3
4
5
6
7
8
9
10
11
12
13
14
15
16
17
18
19
20
handleDelete (id ) { this .$confirm("此操作将永久删除该文件, 是否继续?" , "提示" , { confirmButtonText : "确定" , cancelButtonText : "取消" , type : "warning" , }) .then (() => { teacher.delTeacher (id) .then ((response ) => { this .$message({ type : "success" , message : "删除成功!" , }) this .getList (this .pageNum ); }) }) }
添加讲师 ①基于element-ui实现表单编写
②在api中的teacher.js中定义被调用的方法
1 2 3 4 5 6 7 8 addTeacher (teacher ){ return request ({ url : '/serviceedu/add' , method : 'post' , data : teacher, }) }
③在add.vue页面调用上方方法
1 2 3 4 5 6 7 8 9 10 11 12 13 addTeacher ( teacherApi.addTeacher (this .teacher ) .then (response => this .$message({ type :'success' , message :'添加成功' }); this .$router .push ({path :'/teacher/list' }) }) },
修改讲师 ①通过添加一个隐藏路由,实现携带id跳转到某个公共页面进行修改操作
1 2 3 4 5 6 7 8 { path : 'edit/:id' , name : '编辑讲师' , component : () => import ('@/views/edu/teacher/add' ), meta : { title : '编辑讲师' , noCache :true }, hidden : true }
1 2 3 <router-link :to ="'/teacher/edit/' + scope.row.id" > <el-button size ="mini" type ="primary" > 编辑</el-button > </router-link >
②在api文件夹teacher.js文件中定义被调用的方法
1 2 3 4 5 6 7 8 9 10 11 12 13 14 15 getTeacherInfo (id ){ return request ({ url : '/serviceedu/query/' + id, method : 'get' , }) } updateInfoById (teacher ){ return request ({ url : '/serviceedu//update/' + teacher.id , method : 'post' , data : teacher, }) }
③在add.vue页面进行调用
由于和save方法共同使用一个页面,因此必须判断地址url中是否有id值来决定使用哪个方法
在created()方法,即在数据装载之前执行
1
2
3
4
5
6
7
created ( if (this .$route .params && this .$route .params .id ) { const id = this .$route .params .id this .getTeacherInfo (id) } },
修改数据填充以及添加修改方法
1 2 3 4 5 6 7 8 9 10 11 12 13 14 15 16 17 18 19 20 getTeacherInfo (id ){ teacherApi.getTeacherInfo (id) .then (response => this .teacher = response.data }) }, updateInfoById (teacher ){ teacherApi.updateInfoById (teacher) .then (response => this .$message({ type :'success' , message :'修改成功' }); this .$router .push ({path :'/teacher/list' }) }) }
执行修改
1
2
3
4
5
6
7
8
9
10
11
12
methods : { addOrUpdate ( if (!this .teacher .id ){ this .addTeacher (); }else { this .updateInfoById (this .teacher ) } },
讲师头像
导入需要使用的组件,并在页面下方中进行变量赋初始值和局部注册
1
2
3
4
5
6
7
8
9
10
11
12
13
14
15
16
17
18
19
20
21
22
23
24
25
26
27
28
29
30
31
32
33
34
35
36
37
38
39
40
41
42
43
44
45
46
47
48
49
50
51
52
53
54
55
56
57
<!-- 头衔缩略图 --> <pan-thumb :image ="teacher.avatar" /> <!-- 文件上传按钮 --> <el-button type ="primary" icon ="el-icon-upload" @click ="imagecropperShow=true" > 更换头像</el-button > <!-- v-show:是否显示上传组件 :key:类似于id,如果一个页面多个图片上传控件,可以做区分 :url:后台上传的url地址 @close:关闭上传组件 @crop-upload-success:上传成功后的回调 --> <image-cropper v-show ="imagecropperShow" :width ="300" :height ="300" :key ="imagecropperKey" :url ="BASE_API+'/serviceoss/upload'" field ="file" @close ="close" @crop-upload-success ="cropSuccess" /> </el-form-item> export default { name :'add' , components :{ ImageCropper , PanThumb }, data ( return { teacher : {}, imagecropperShow : false , imagecropperKey : 0 , BASE_API : process.env .BASE_API , }, methods : { close ( this .imagecropperShow = false ; this .imagecropperKey += 1 }, cropSuccess (photo ){ this .teacher .avatar = photo this .imagecropperShow = false this .imagecropperKey += 1 },
后端接口
在父工程online_edu_parent下创建子模块service
主要是需要修改子模块service的pom文件
由于使用了MyBatis-Plus因此简单sql语句不再需要手写
1、在子模块service下再次创建子模块service_edu
2、修改pom文件
3、编写yml配置文件
1
2
3
4
5
6
7
8
9
10
11
12
13
14
15
server: port: 8001 spring: application: name: service-edu profiles: active: dev datasource: driver-class-name: com.mysql.cj.jdbc.Driver url: jdbc:mysql://localhost:3306/online_edu?characterEncoding=utf8&useSSL=false&serverTimezone=UTC&rewriteBatchedStatements=true username: root password: root mybatis-plus: configuration: log-impl: org.apache.ibatis.logging.slf4j.Slf4jImpl
4、业务类
使用mybatis-plus的代码生成器快速生成实体类、控制层、业务层、持久层
1
2
3
4
5
6
7
8
9
10
11
12
13
14
15
16
17
18
19
20
21
22
public class FastAutoGeneratorTest { public static void main (String[] args) { FastAutoGenerator.create("jdbc:mysql://localhost:3306/online_edu?serverTimezone=GMT%2B8&characterEncoding=utf-8&useSSL=false" , "root" , "root" ) .globalConfig(builder -> { builder.author("year21" ) .enableSwagger() .fileOverride() .outputDir("C://Users//hcxs1986//IdeaProjects//online_edu_parent//service//service_edu//src//main//java" ); }) .packageConfig(builder -> { builder.parent("top.year21.onlineedu" ) .moduleName("serviceedu" ) .pathInfo(Collections.singletonMap(OutputFile.mapperXml, "C://Users//hcxs1986//IdeaProjects//online_edu_parent//service//service_edu//src//main//resources//mybatis//mapper" )); }) .strategyConfig(builder -> { builder.addInclude("edu_teacher" ) .addTablePrefix("t_" , "c_" ); }).templateEngine(new FreemarkerTemplateEngine ()) .execute(); } }
5、主启动类
6、在控制层编写代码进行接口测试
删除讲师 1、在实体类isDeleted属性上添加@TableLogic注解
2、编写控制层方法
1 2 3 4 5 6 @PostMapping("/delTeacher/{id}") public JsonResult<Void> deleteTeacher (@PathVariable("id") Integer id) { boolean result = teacherService.removeById(id); return new JsonResult <>(result); }
查询讲师 1、配置分页插件
1 2 3 4 5 6 7 8 9 10 @Bean public MybatisPlusInterceptor mybatisPlusInterceptor () { MybatisPlusInterceptor interceptor = new MybatisPlusInterceptor (); interceptor.addInnerInterceptor(new PaginationInnerInterceptor (DbType.MYSQL)); return interceptor; }
2、编写控制层方法
1 2 3 4 5 6 7 8 @GetMapping("/pages/{pageNum}/{pageSize}") public JsonResult<Page> queryAllTeachersByPages (@PathVariable("pageNum") Integer pageNum, @PathVariable("pageSize") Integer pageSize) { Page<EduTeacher> page = new Page <>(pageNum, pageSize); teacherService.page(page,null ); return new JsonResult <>(true ,"查询成功" ,page); }
①一般使用一个值对象来封装查询条件参数
1
2
3
4
5
6
7
@Data public class VOTeacher { private String name; private Integer level; private String begin; private String end; }
②编写接口
1 2 3 4 5 6 7 8 9 10 11 12 13 14 15 16 17 18 19 20 21 22 23 24 25 26 27 28 29 30 31 32 @PostMapping("/condition/{pageNum}/{pageSize}") public JsonResult<Page> queryByPagesWithCondition (@PathVariable("pageNum") Integer pageNum, @PathVariable("pageSize") Integer pageSize, @RequestBody(required = false) VOTeacher voTeacher) { Page<EduTeacher> page = new Page <>(pageNum, pageSize); QueryWrapper<EduTeacher> queryWrapper = new QueryWrapper <>(); String name = voTeacher.getName(); Integer level = voTeacher.getLevel(); String begin = voTeacher.getBegin(); String end = voTeacher.getEnd(); if (!StringUtils.isEmpty(name)){ queryWrapper.like("name" ,name); } if (!StringUtils.isEmpty(level)){ queryWrapper.eq("level" ,level); } if (!StringUtils.isEmpty(begin)){ queryWrapper.ge("gmt_create" ,begin); } if (!StringUtils.isEmpty(end)){ queryWrapper.le("gmt_create" ,end); } teacherService.page(page,queryWrapper); return new JsonResult <>(true ,"查询成功" ,page); }
新增讲师 1.在需要在执行插入操作后自动填充属性添加注解@TableFiled
1
2
3
4
5
6
7
8
9
@ApiModelProperty("创建时间") @TableField(value = "gmt_create",fill = FieldFill.INSERT) private LocalDateTime gmtCreate;@ApiModelProperty("更新时间") @TableField(value = "gmt_modified",fill = FieldFill.INSERT_UPDATE) private LocalDateTime gmtModified;
2.在service_base模块使用一个类实现MetaObjectHandler接口并交由spring管理
1
2
3
4
5
6
7
8
9
10
11
12
13
@Component public class MyMetaObjectHandler implements MetaObjectHandler { @Override public void insertFill (MetaObject metaObject) { this .setFieldValByName("gmtCreate" ,new Date (),metaObject); this .setFieldValByName("gmtModified" ,new Date (),metaObject); } @Override public void updateFill (MetaObject metaObject) { this .setFieldValByName("gmtModified" ,new Date (),metaObject); } }
3.编写控制层方法
1
2
3
4
5
@PostMapping("/add") public JsonResult<Void> addTeacher (@RequestBody EduTeacher eduTeacher) { boolean result = teacherService.save(eduTeacher); return new JsonResult <>(result); }
修改讲师 1.编写控制层方法
①根据指定的id进行查询
②根据指定的id进行修改
1
2
3
4
5
6
7
8
9
10
11
@GetMapping("/query/{id}") public JsonResult<EduTeacher> queryById (@PathVariable("id") Integer id) { EduTeacher teacher = teacherService.getById(id); return new JsonResult <>(true ,"查询成功" ,teacher); } @PostMapping("/update/{id}") public JsonResult<Boolean> updateTeacher (@RequestBody EduTeacher eduTeacher) { boolean result = teacherService.updateById(eduTeacher); return new JsonResult <>(result); }
讲师头像
1、在子模块service下再次创建用于云存储微服务子模块service-oss
2、在pom文件中添加下列依赖
1 2 3 4 5 6 7 8 9 10 11 12 13 <dependencies > <dependency > <groupId > com.aliyun.oss</groupId > <artifactId > aliyun-sdk-oss</artifactId > </dependency > <dependency > <groupId > joda-time</groupId > <artifactId > joda-time</artifactId > </dependency > </dependencies >
3、编写yml配置文件
1 2 3 4 5 6 7 8 9 10 11 12 13 14 15 16 17 server: port: 8002 spring: application: name: service-oss profiles: active: dev aliyun: oss: file: endpoint: oss-cn-guangzhou.aliyuncs.com keyid: LTAI5tHuNsemaiLnP3yro4vD keysecret: ed1Zxok1SklTEI40HhRKkJeRcQdyWc bucketname: onlineedufile
4、业务类
①创建常量类读取yml配置文件内容
1
2
3
4
5
6
7
8
9
10
11
12
13
14
15
16
17
18
19
20
21
22
23
24
25
26
27
28
@Component public class OSSConfigurationClass { @Value("${aliyun.oss.file.endpoint}") private String endpoint; @Value("${aliyun.oss.file.keyid}") private String keyid; @Value("${aliyun.oss.file.keysecret}") private String keysecret; @Value("${aliyun.oss.file.bucketname}") private String bucketname; public static String END_POINT; public static String ACCESS_KEY_ID; public static String ACCESS_KEY_SECRET; public static String BUCKET_NAME; @PostConstruct public void init () { END_POINT = endpoint; ACCESS_KEY_ID = keyid; ACCESS_KEY_SECRET = keysecret; BUCKET_NAME = bucketname; } }
②service层负责实现文件上传逻辑
1
2
3
4
5
6
7
8
9
10
11
12
13
14
15
16
17
18
19
20
21
22
23
24
25
26
27
28
29
30
31
32
33
34
35
36
37
38
39
40
41
42
43
44
45
46
47
48
49
50
51
52
53
54
55
56
@Service public class OSSServiceImpl implements OSSService { @Override public String uploadFile (MultipartFile file) { String endpoint = OSSConfigurationClass.END_POINT; String accessKeyId = OSSConfigurationClass.ACCESS_KEY_ID; String accessKeySecret = OSSConfigurationClass.ACCESS_KEY_SECRET; String bucketName = OSSConfigurationClass.BUCKET_NAME; String objectName = file.getOriginalFilename(); String suffix = objectName.substring(objectName.lastIndexOf("." )); String fileName = UUID.randomUUID().toString(); String fileUploadName = fileName + suffix; String datePath = new DateTime ().toString("yyyy-MM-dd" ); String endUploadPath = datePath + "/" + fileUploadName; OSS ossClient = new OSSClientBuilder ().build(endpoint, accessKeyId, accessKeySecret); try { InputStream inputStream = file.getInputStream(); ossClient.putObject(bucketName, endUploadPath, inputStream); String uploadPath = "https://" + bucketName+ "." + endpoint + "/" + endUploadPath; return uploadPath; } catch (Exception e) { e.printStackTrace(); } finally { if (ossClient != null ) { ossClient.shutdown(); } } return null ; } }
③控制层
1 2 3 4 5 6 7 8 @PostMapping("/upload") public JsonResult<String> uploadFile (MultipartFile file) { String filePathFromOSS = ossService.uploadFile(file); return new JsonResult <>(true ,"上传成功" ,filePathFromOSS); }
5、主启动类
1
2
3
4
5
6
7
@SpringBootApplication(exclude = DataSourceAutoConfiguration.class) @ComponentScan(basePackages = {"top.year21.onlineedu"}) public class ServiceOSS8002 { public static void main (String[] args) { SpringApplication.run(ServiceOSS8002.class,args); } }
6、在控制层编写代码进行接口测试
课程分类管理
添加课程
在添加课程界面提供一个上传文件功能,将上传的文件传到后端接口中即可
1 2 3 4 5 6 7 8 9 10 11 12 13 14 15 16 17 18 19 20 21 22 23 24 25 26 27 28 29 30 31 32 33 34 35 36 37 38 39 40 41 42 43 44 45 46 47 48 49 50 51 52 53 54 55 56 57 58 59 60 61 <el-form-item label ="选择Excel" > <el-upload ref ="upload" :auto-upload ="false" :on-success ="fileUploadSuccess" :on-error ="fileUploadError" :disabled ="importBtnDisabled" :limit ="1" :action ="BASE_API+'/serviceedu/subject/add'" name ="file" accept ="application/vnd.openxmlformats-officedocument.spreadsheetml.sheet" > <el-button slot ="trigger" size ="small" type ="primary" > 选取文件</el-button > <el-button :loading ="loading" style ="margin-left: 10px;" size ="small" type ="success" @click ="submitUpload" > 上传</el-button > </el-upload > </el-form-item > <script > export default { name : 'add' , data ( return { BASE_API : process.env .BASE_API , importBtnDisabled : false , loading : false } }, methods : { submitUpload ( this .importBtnDisabled = true this .loading = true this .$refs .upload .submit () }, fileUploadSuccess ( this .loading = false this .$message({ type :'success' , message :'上传成功' }) this .$router .push ({path :'/subject/list' }) }, fileUploadError ( this .loading = false this .$message({ type :'error' , message :'上传失败' }) }, }, } </script >
课程显示 1 2 3 4 5 6 7 8 9 10 11 12 13 14 15 16 17 18 19 20 21 22 23 24 25 26 27 28 29 30 31 32 33 34 35 36 37 38 39 40 41 42 43 44 45 46 47 48 49 50 51 52 <template > <div class ="app-container" > <el-input v-model ="filterText" placeholder ="Filter keyword" clearable style ="margin-bottom:30px;" /> <el-tree ref ="tree2" :data ="list" :props ="defaultProps" :filter-node-method ="filterNode" class ="filter-tree" default-expand-all /> </div > </template > <script > import subject from '@/api/edu/subject.js' export default { name : 'list' , data ( return { filterText : '' , list : [], defaultProps : { children : 'children' , label : 'title' , } } }, created ( this .getSubjectList (); }, watch : { filterText (val ) { this .$refs .tree2 .filter (val) } }, methods : { filterNode (value, data ) { if (!value) return true return data.title .toLowerCase ().indexOf (value) !== -1 }, getSubjectList ( subject.getSubjectList () .then (response => this .list = response.data }) }, } } </script >
后端接口 添加课程 ①控制层创建接收excel文件上传的方法
1 2 3 4 5 6 7 8 9 10 11 @Autowired private IEduSubjectService eduSubjectService;@PostMapping("/add") public JsonResult<Void> addSubject (MultipartFile file) throws IOException { eduSubjectService.addFile(file,eduSubjectService); return new JsonResult <>(true ); }
②业务层负责将上传的文件以流的方式传输给ExcelReadListener监听器对象
1 2 3 4 5 6 7 8 9 10 11 12 13 14 15 16 17 18 19 public interface IEduSubjectService extends IService <EduSubject> { void addFile (MultipartFile file,IEduSubjectService eduSubjectService) ; } @Service public class EduSubjectServiceImpl extends ServiceImpl <EduSubjectMapper, EduSubject> implements IEduSubjectService { @Override public void addFile (MultipartFile file,IEduSubjectService eduSubjectService) { InputStream inputStream = null ; try { inputStream = file.getInputStream(); EasyExcel.read(inputStream, SubjectData.class,new ExcelReadListener (eduSubjectService)).sheet().doRead(); } catch (IOException e) { e.printStackTrace(); } } }
③ExcelReadListener监听器对象负责读取文件和写入数据库
由于spring不建议在new的对象里面依赖注入bean,或说禁止在自己new的对象里面依赖注入,
因为没有交给spring管理的对象,无法实现对其依赖的对象进行依赖注入,导致依赖对象为mull
因此为了使用eduSubjectService将数据插入数据库,必须在业务层将eduSubjectService对象传入
1 2 3 4 5 6 7 8 9 10 11 12 13 14 15 16 17 18 19 20 21 22 23 24 25 26 27 28 29 30 31 32 33 34 35 36 37 38 39 40 41 42 43 44 45 46 47 48 49 50 51 52 53 54 55 56 57 58 59 60 61 62 63 64 65 66 public class ExcelReadListener extends AnalysisEventListener <SubjectData> { private IEduSubjectService eduSubjectService; public ExcelReadListener () {} public ExcelReadListener (IEduSubjectService eduSubjectService) { this .eduSubjectService = eduSubjectService; } @Override public void invoke (SubjectData subjectData, AnalysisContext analysisContext) { if (subjectData == null ){ throw new InsertException (30000 ,"文件内容为空" ); } EduSubject eduSubject = oneSubjectIsExists(eduSubjectService, subjectData.getOneSubjectName()); if (eduSubject == null ){ eduSubject = new EduSubject (); eduSubject.setTitle(subjectData.getOneSubjectName()); eduSubject.setParentId("0" ); eduSubjectService.save(eduSubject); } String parentId = eduSubject.getId(); EduSubject twoSubject = twoSubjectIsExists(eduSubjectService, subjectData.getTwoSubjectName(), parentId); if (twoSubject == null ){ twoSubject = new EduSubject (); twoSubject.setTitle(subjectData.getTwoSubjectName()); twoSubject.setParentId(parentId); eduSubjectService.save(twoSubject); } } @Override public void doAfterAllAnalysed (AnalysisContext analysisContext) { } public EduSubject oneSubjectIsExists (IEduSubjectService eduSubjectService,String oneSubjectName) { QueryWrapper<EduSubject> queryWrapper = new QueryWrapper <>(); queryWrapper.eq("title" ,oneSubjectName); queryWrapper.eq("parent_id" ,"0" ); return eduSubjectService.getOne(queryWrapper); } public EduSubject twoSubjectIsExists (IEduSubjectService eduSubjectService,String twoSubjectName,String parentId) { QueryWrapper<EduSubject> queryWrapper = new QueryWrapper <>(); queryWrapper.eq("title" ,twoSubjectName); queryWrapper.eq("parent_id" ,parentId); return eduSubjectService.getOne(queryWrapper); } }
课程显示
需要返回一个json数组,类似这种 ==> [{id:1, label:’一级’, children:[{id:2, label:’二级’,}]}]
①针对返回数据创建对应的实体类,此处需要创建两个实体类
②建立两个实体类之间的关系
1 2 3 4 5 6 7 8 9 10 11 12 13 14 15 16 17 @Data @AllArgsConstructor @NoArgsConstructor public class OneSubject { private String id; private String title; private List<TwoSubject> children = new ArrayList <>(); } @Data @AllArgsConstructor @NoArgsConstructor public class TwoSubject { private String id; private String title; }
③控制层返回List<OneSubject>,业务层负责返回数据
1 2 3 4 5 6 7 8 9 10 11 12 13 14 15 16 17 18 19 20 21 22 23 24 25 26 27 28 29 30 31 32 33 34 35 36 37 38 39 40 41 42 43 44 45 46 47 48 49 50 51 52 53 54 55 56 57 58 59 60 61 62 63 64 65 66 67 68 69 70 71 @RestController @RequestMapping("/serviceedu/subject") @CrossOrigin(origins = "*",maxAge = 3600) public class EduSubjectController { @GetMapping("/list") public JsonResult<List<OneSubject>> getSubjectList () { List<OneSubject> subjects = eduSubjectService.selectAllSubject(); return new JsonResult <>(true ,"查询成功" ,subjects); } } @Service public class EduSubjectServiceImpl extends ServiceImpl <EduSubjectMapper, EduSubject> implements IEduSubjectService { @Override public List<OneSubject> selectAllSubject () { List<OneSubject> oneDataEntity = new ArrayList <>(); QueryWrapper<EduSubject> oneWrapper = new QueryWrapper <>(); oneWrapper.eq("parent_id" ,"0" ); List<EduSubject> oneSubjectList = eduSubjectMapper.selectList(oneWrapper); for (int i = 0 ; i < oneSubjectList.size(); i++) { EduSubject one = oneSubjectList.get(i); QueryWrapper<EduSubject> twoWrapper = new QueryWrapper <>(); twoWrapper.eq("parent_id" ,one.getId()); List<TwoSubject> twoDataEntity = new ArrayList <>(); List<EduSubject> towSubjectList = eduSubjectMapper.selectList(twoWrapper); for (int j = 0 ; j < towSubjectList.size(); j++) { EduSubject two = towSubjectList.get(j); TwoSubject tSubject = new TwoSubject (); BeanUtils.copyProperties(two,tSubject); twoDataEntity.add(tSubject); } OneSubject oSubject = new OneSubject (); BeanUtils.copyProperties(one,oSubject); oSubject.setChildren(twoDataEntity); oneDataEntity.add(oSubject); } return oneDataEntity; } }
课程管理 前端页面 添加课程
还是新功能开发那一套
①基于element组件库的step步骤实现顺序切换
②在router文件夹中定义一个显示路由和两个隐藏路由,用于切换步骤
1 2 3 4 5 6 7 8 9 10 11 12 13 14 15 16 17 18 19 20 21 22 23 24 25 26 27 28 29 30 31 32 33 34 35 { path : '/course' , component : Layout , redirect : '/course/list' , name : '课程管理' , meta : { title : '课程管理' , icon : 'example' }, children : [ { path : 'list' , name : '课程列表' , component : () => import ('@/views/edu/course/list' ), meta : { title : '课程列表' , icon : 'tree' } }, { path : 'info/:id' , name : '添加课程' , component : () => import ('@/views/edu/course/info' ), meta : { title : '添加课程' , icon : 'tree' } }, { path : 'chapter/:id' , name : '课程大纲' , component : () => import ('@/views/edu/course/chapter' ), meta : { title : '课程大纲' , icon : 'eye' }, hidden : true }, { path : 'publish/:id' , name : '发布课程' , component : () => import ('@/views/edu/course/publish' ), meta : { title : '发布课程' , icon : 'eye' }, hidden : true }, ] },
③在info、chapter、publish各自的vue页面添加内容
课程大纲
1 2 3 4 5 6 7 8 9 10 11 12 13 14 15 16 17 18 19 20 <el-tree :data ="chapterList" :props ="defaultProps" :expand-on-click-node ="false" :highlight-current ="true" default-expand-all > <span class ="custom-tree-node" slot-scope ="{node,data}" > <span > {{ node.label }}</span > <span > <el-button v-if ="data.courseBarList != null" type ="text" style ="padding:10px" @click ="addChapter" > 添加课时 </el-button > </span > </span > </el-tree >
确认课程 ①在api/edu/下的course.文件中添加方法
1 2 3 4 5 6 queryVOPublishInfoById (id ){ return request ({ url : '/serviceedu/course/' +id, method : 'get' , }) },
②并在对应的页面进行调用
1 2 3 4 5 6 7 8 9 10 11 created ( this .queryVOPublishInfoById () }, methods : {queryVOPublishInfoById ( course.queryVOPublishInfoById (this .courseId ) .then (response => this .VOPublish = response.data }) }
最终发布 ①在api/edu/下的course.文件中添加方法
1 2 3 4 5 6 updateCourseStatusById (id ){ return request ({ url : '/serviceedu/course/status/' + id, method : 'post' , }) },
②并在对应的页面进行调用
1 2 3 4 5 6 7 8 9 10 11 12 next ( this .updateCourseStatusById () }, updateCourseStatusById ( course.updateCourseStatusById (this .courseId ) .then (response => this .$message .success ("发布成功!" ) this .$router .push ({path :"/course/list" }) }) },
课程列表
与讲师列表的展示差不多类似,只需要根据讲师列表页面将参数以及一些内容修改即可
查询课程信息
根据url中的参数值查询信息并赋值给voCourse对象即可
1 2 3 4 5 6 queryCourseInfoById (course.queryCourseInfoById (this .courseId ) .then (response => this .voCourse = response.data })
更新课程信息
在这个页面需要解决更新信息和添加课程共用一个按钮问题
解决思路是根据判断voCourse中的id是否为空,在执行添加操作时id值是为空的,反之则不为空
1 2 3 4 5 6 7 8 9 10 11 12 13 addOrUpdate ( if (this .voCourse .id === '' ){ console .log (this .voCourse ); if (!this .voCourse .subjectId === '' ){ this .$message .error ("请先添加数据再执行下一步!!!" ) return false } this .addCourse () }else { this .updateCourseInfoById () }
删除课程 ①在api/edu/下的course.文件中添加方法
1 2 3 4 5 6 delCourseById (id ){ return request ({ url : `/serviceedu/course/del/${id} ` , method : 'post' , }) }
②并在对应的页面进行调用
1 2 3 4 5 6 7 8 9 10 11 12 13 14 15 16 17 18 19 20 21 handleDelete (id ) { this .$confirm("此操作将永久删除该文件, 是否继续?" , "提示" , { confirmButtonText : "确定" , cancelButtonText : "取消" , type : "warning" , }) .then (() => { course.delCourseById (id) .then (response => this .$message({ type : "success" , message : "删除成功!" , }); }) this .getList (); }) },
添加/修改/删除章节
内容过于繁琐,在views/edu/course/chapter.vue下可详细查看
添加/修改/删除课程小节的前端逻辑与添加课程章节几乎是一模一样的
添加(删除)小节视频 ①在api/edu/下创建barvideos.js文件并添加方法
1 2 3 4 5 6 delAliyunVideoById (id ){ return request ({ url : '/servicevod/videoDel/' +id, method : 'post' , }) },
②在对应页面添加上传功能组件和调用对应的上传或删除方法
1 2 3 4 5 6 7 8 9 10 11 12 13 14 15 16 17 18 19 20 21 22 23 24 25 26 27 28 29 30 31 32 33 34 35 36 37 38 39 40 41 42 43 44 45 46 47 48 49 50 51 52 53 <el-form-item label="上传视频" > <el-upload ref ="upload" :auto-upload ="true" :on-success ="fileUploadSuccess" :on-error ="fileUploadError" :before-remove ="beforeRemove" :on-remove ="removeVideo" :disabled ="importBtnDisabled" :limit ="1" :action ="BASE_API+'/servicevod/videoUpload'" name ="file" accept ="video/*" ><el-button slot ="trigger" type ="primary" > 选取视频</el-button > </el-upload > </el-form-item> beforeRemove (file ){ return this .$confirm(`确定移除 ${ file.name } ?` ) }, removeVideo ( barvideo.delAliyunVideoById (this .eduVoder .videoSourceId ) .then (response => this .$message .success ("移除成功" ) this .fileList = [] this .eduVoder .videoSourceId = '' this .eduVoder .videoOriginalName = '' }) }, fileUploadSuccess (response,flie ){ this .loading = false this .$message .success ('上传成功' )({ this .eduVoder .videoSourceId = response.data this .eduVoder .videoOriginalName = file.name }, fileUploadError ( this .loading = false this .$message .error ('上传失败' ) this .fileList = [] this .eduVoder .videoSourceId = '' this .eduVoder .videoOriginalName = '' },
后端接口
添加课程
使用一个vo值对象接收参数
需要将数据插入课程表和课程简介表两张表中
需要将所有讲师和所有课表通过下列列表显示
①创建vo值对象
1 2 3 4 5 6 7 8 9 10 11 @Data public class VOCourse { private String teacherId; private String subjectId; private String subjectParentId; private String title; private BigDecimal price; private Integer lessonNum; private String cover; private String description; }
②控制层接收参数
1 2 3 4 5 6 @PostMapping("/add") public JsonResult addCourse (@RequestBody VOCourse voCourse) { eduCourseService.addCourse(voCourse); return new JsonResult (true ); }
③在业务类中将数据插入课程表和课程信息表
1 2 3 4 5 6 7 8 9 10 11 12 13 14 15 16 17 18 19 20 21 22 23 24 25 26 @Override public void addCourse (VOCourse voCourse) { EduCourse eduCourse = new EduCourse (); BeanUtils.copyProperties(voCourse,eduCourse); int result= baseMapper.insert(eduCourse); if (result == 0 ){ throw new InsertException (30000 ,"出现异常,课程添加失败" ); } String courseId = eduCourse.getId(); EduCourseDescription description = new EduCourseDescription (); description.setId(courseId); description.setDescription(voCourse.getDescription()); boolean insertResult = descriptionService.save(description); if (!insertResult){ throw new InsertException (30000 ,"出现异常,课程简介信息添加失败" ); } }
课程大纲
与课程分类管理类似,都是通过拼装对应属性的对象最后回传
①创建CourseChapter、CourseBar对象并建立关系
1 2 3 4 5 6 7 8 9 10 11 12 @Data public class CourseChapter { private String id; private String title; private List<CourseBar> courseBarList; } @Data public class CourseBar { private String id; private String title; }
②控制层接收指定id的参数
1 2 3 4 5 6 @GetMapping("/list/{courseId}") public JsonResult<List<CourseChapter>> getCourseChaptersByCid (@PathVariable("courseId") String courseId) { List<CourseChapter> chapterList = eduChapterService.getChapterListByCid(courseId); return new JsonResult <>(true ,"查询成功" ,chapterList); }
③业务层负责查询指定的id数据
1 2 3 4 5 6 7 8 9 10 11 12 13 14 15 16 17 18 19 20 21 22 23 24 25 26 27 28 29 30 31 32 33 34 35 36 37 38 39 40 41 42 43 44 45 @Override public List<CourseChapter> getChapterListByCid (String courseId) { List<CourseChapter> courseChapterList = new ArrayList <>(); QueryWrapper<EduChapter> chapterWrapper = new QueryWrapper <>(); chapterWrapper.eq("course_id" ,courseId); chapterWrapper.orderByAsc("sort" ); List<EduChapter> chapterList = this .baseMapper.selectList(chapterWrapper); for (EduChapter chapter : chapterList) { CourseChapter courseChapter = new CourseChapter (); BeanUtils.copyProperties(chapter,courseChapter); QueryWrapper<EduVideo> barWrapper = new QueryWrapper <>(); barWrapper.eq("chapter_id" ,chapter.getId()); barWrapper.orderByAsc("sort" ); List<EduVideo> videoList = eduVideoMapper.selectList(barWrapper); List<CourseBar> courseBarList = new ArrayList <>(); for (EduVideo video : videoList){ CourseBar courseBar = new CourseBar (); BeanUtils.copyProperties(video,courseBar); courseBarList.add(courseBar); } courseChapter.setCourseBarList(courseBarList); courseChapterList.add(courseChapter); } return courseChapterList; }
确认课程 ①根据前端需要的属性构造值对象
1 2 3 4 5 6 7 8 9 10 11 @Data public class VOPublish { private String id; private String title; private String lessonNum; private String oneSubject; private String twoSubject; private String teacherName; private String cover; private BigDecimal price; }
②编写sql语句查询课程信息新并封装到值对象中
1 2 3 4 5 6 7 8 9 10 11 12 13 14 15 16 17 18 19 20 21 22 23 24 25 26 27 28 29 30 31 <resultMap id ="vopublish" type ="top.year21.onlineedu.serviceedu.vo.VOPublish" > <id property ="id" column ="id" /> <result property ="title" column ="title" /> <result property ="lessonNum" column ="lesson_num" /> <result property ="oneSubject" column ="oneSubject" /> <result property ="twoSubject" column ="twoSubject" /> <result property ="teacherName" column ="name" /> <result property ="lessonNum" column ="lessonNum" /> <result property ="cover" column ="cover" /> <result property ="price" column ="price" /> </resultMap > <select id ="getVOPublishById" resultMap ="vopublish" > SELECT c.`id`,c.`title`,c.`lesson_num`,c.`cover`,c.`price`, t.`name`,temp2.title AS oneSubject,s.`title` AS twoSubject FROM edu_course c LEFT JOIN edu_teacher t ON c.`teacher_id` = t.`id` LEFT JOIN edu_subject s ON c.`subject_id` = s.`id` LEFT JOIN ( SELECT * FROM ( SELECT id,title FROM edu_subject )AS temp )AS temp2 ON c.`subject_parent_id` = temp2.id WHERE c.`id` = #{id}; </select >
③持久层、④业务层、⑤控制层
1 2 3 4 5 6 7 8 9 10 11 12 13 14 15 16 17 public interface EduCourseMapper extends BaseMapper <EduCourse> { VOPublish getVOPublishById (@Param("id") String id) ; } @Override public EduChapter queryChapterById (String id) { return this .baseMapper.selectById(id); } @GetMapping("/{id}") public JsonResult<VOPublish> queryVOPublishById (@PathVariable("id") String id) { VOPublish voPublish = eduCourseService.queryVOPublishById(id); return new JsonResult <>(true ,"查询成功" ,voPublish); }
最终发布 ②编写xml映射文件
1 2 3 4 <update id ="updateStatus" > update edu_course set status = 'Normal' where id = #{courseId} </update >
③持久层、④业务层、⑤控制层
1 2 3 4 5 6 7 8 9 10 11 12 13 14 15 16 17 18 int updateStatus (@Param("courseId") String courseId) ;@Override public void updateStatus (String courseId) { int result = this .baseMapper.updateStatus(courseId); if (result == 0 ){ throw new RuntimeException ("修改失败" ); } } @PostMapping("/status/{courseId}") public JsonResult<Void> updateCourseStatusById (@PathVariable("courseId") String courseId) { eduCourseService.updateStatus(courseId); return new JsonResult <>(true ); }
课程列表 ①控制层接收参数
②业务层负责执行查询
1 2 3 4 5 6 7 8 9 10 11 12 @GetMapping("/conditionQuery/{pageNum}/{pageSize}") public JsonResult<Page<EduCourse>> queryCondition (@PathVariable("pageNum") Integer pageNum, @PathVariable("pageSize") Integer pageSize) { Page<EduCourse> page = eduCourseService.queryCondition(pageNum,pageSize); return new JsonResult <>(true ,"查询成功" ,page); } @Override public Page<EduCourse> queryCondition (Integer pageNum, Integer pageSize) { Page<EduCourse> page = new Page <>(pageNum, pageSize); return this .baseMapper.selectPage(page, null ); }
查询课程信息 ①控制层接收参数,传至业务层
1 2 3 4 5 6 @GetMapping("/query/{id}") public JsonResult<VOCourse> queryInfoById (@PathVariable("id") String id) { VOCourse voCourse = eduCourseService.queryCourseInfoById(id); return new JsonResult <>(true ,"查询成功" ,voCourse); }
②业务层负责查询指定id的信息
1 2 3 4 5 6 7 8 9 10 11 12 13 14 @Override public VOCourse queryCourseInfoById (String id) { VOCourse voCourse = new VOCourse (); EduCourse eduCourse = this .baseMapper.selectById(id); BeanUtils.copyProperties(eduCourse,voCourse); EduCourseDescription description = descriptionService.getById(id); voCourse.setDescription(description.getDescription()); return voCourse; }
更新课程信息 ①控制层接收参数,传至业务层
1 2 3 4 5 6 @PostMapping("/update") public JsonResult<Void> updateInfoById (@RequestBody VOCourse voCourse) { eduCourseService.updateCourseInfoById(voCourse); return new JsonResult <>(true ); }
②业务层负责修改指定id的信息
1 2 3 4 5 6 7 8 9 10 11 12 13 14 15 16 17 18 19 20 @Override public void updateCourseInfoById (VOCourse voCourse) { EduCourse eduCourse = new EduCourse (); BeanUtils.copyProperties(voCourse,eduCourse); int result = this .baseMapper.updateById(eduCourse); if (result == 0 ){ throw new InsertException (30001 ,"修改课程信息失败" ); } EduCourseDescription description = new EduCourseDescription (); description.setId(voCourse.getId()); description.setDescription(voCourse.getDescription()); boolean updateResult = descriptionService.updateById(description); if (!updateResult){ throw new InsertException (30001 ,"修改课程信息失败" ); } }
删除课程 ①控制层接收参数
②业务层负责执行处理删除,在这个删除课程中需要调用其他业务层来执行删除
1 2 3 4 5 6 7 8 9 10 11 12 13 14 15 16 17 18 19 20 21 22 23 24 25 26 27 28 29 30 31 32 @PostMapping("/del/{courseId}") public JsonResult<Void> delCourseById (@PathVariable("courseId") String courseId) { eduCourseService.delCourseById(courseId); return new JsonResult <>(true ); } @Autowired private IEduChapterService eduChapterService;@Override public void delCourseById (String courseId) { QueryWrapper<EduChapter> queryWrapper = new QueryWrapper <>(); queryWrapper.eq("course_id" ,courseId); List<EduChapter> chapters = eduChapterService.list(queryWrapper); if (chapters.size() != 0 ){ for (EduChapter chapter : chapters){ eduChapterService.delChapterById(chapter.getId()); } } boolean remove = descriptionService.removeById(courseId); if (!remove){ throw new RuntimeException ("删除指定课程描述失败,课程id是:" + courseId); } int result = this .baseMapper.deleteById(courseId); if (result == 0 ){ throw new RuntimeException ("删除指定课程失败,课程id是:" + courseId); } }
章节管理 ①控制层接收参数,传至业务层
1 2 3 4 5 6 7 8 9 10 11 12 13 14 15 16 17 18 19 20 21 22 23 24 25 26 27 @PostMapping("/add") public JsonResult<Void> addChapterById (@RequestBody EduChapter eduChapter) { eduChapterService.addNewChapterById(eduChapter); return new JsonResult <>(true ); } @PostMapping("/update") public JsonResult<Void> updateChapterById (@RequestBody EduChapter eduChapter) { eduChapterService.updateChapterById(eduChapter); return new JsonResult <>(true ); } @PostMapping("/del/{id}") public JsonResult<Void> delChapterById (@PathVariable("id") String id) { eduChapterService.delChapterById(id); return new JsonResult <>(true ); } @GetMapping("/query/{id}") public JsonResult<EduChapter> queryChapterById (@PathVariable("id") String id) { EduChapter chapter = eduChapterService.queryChapterById(id); return new JsonResult <>(true ,"查询成功" ,chapter); }
②业务层负责修改指定id的信息
1 2 3 4 5 6 7 8 9 10 11 12 13 14 15 16 17 18 19 20 21 22 23 24 25 26 27 28 29 30 31 32 33 34 35 36 37 38 39 40 41 42 43 44 45 @Override public void addNewChapterById (EduChapter eduChapter) { int result = this .baseMapper.insert(eduChapter); if (result ==0 ){ throw new InsertException (30001 ,"添加章节失败!" ); } } @Override public void updateChapterById (EduChapter eduChapter) { UpdateWrapper<EduChapter> updateWrapper = new UpdateWrapper <>(); updateWrapper.eq("course_id" ,eduChapter.getCourseId()); int update = this .baseMapper.update(eduChapter, updateWrapper); if (update ==0 ){ throw new InsertException (30001 ,"更新章节失败!" ); } } @Override public void delChapterById (String id) { UpdateWrapper<EduVideo> wrapper = new UpdateWrapper <>(); wrapper.eq("chapter_id" ,id); Long count = eduVideoMapper.selectCount(wrapper); if (count != 0 ){ int videoDelResult = eduVideoMapper.delete(wrapper); if (videoDelResult == 0 ){ throw new RuntimeException ("删除指定小节失败" ); } } int result = this .baseMapper.deleteById(id); if (result == 0 ){ throw new RuntimeException ("删除指定章节失败,章节id是:" + id); } } @Override public EduChapter queryChapterById (String id) { return this .baseMapper.selectById(id); }
课程小节的后端接口与课程章节几乎是一模一样的,就不再重复书写了
添加小节视频 ①在service模块下创建子模式service_vod负责视频上传相关内容
②引入依赖
1 2 3 4 5 6 7 8 9 10 11 12 13 14 15 16 17 18 19 20 21 22 23 24 25 26 27 28 29 30 31 <dependencies > <dependency > <groupId > com.aliyun</groupId > <artifactId > aliyun-java-sdk-core</artifactId > </dependency > <dependency > <groupId > com.aliyun.oss</groupId > <artifactId > aliyun-sdk-oss</artifactId > </dependency > <dependency > <groupId > com.aliyun</groupId > <artifactId > aliyun-java-sdk-vod</artifactId > </dependency > <dependency > <groupId > com.aliyun</groupId > <artifactId > aliyun-java-vod-upload</artifactId > </dependency > <dependency > <groupId > com.aliyun</groupId > <artifactId > aliyun-sdk-vod-upload</artifactId > </dependency > <dependency > <groupId > com.alibaba</groupId > <artifactId > fastjson</artifactId > </dependency > <dependency > <groupId > org.json</groupId > <artifactId > json</artifactId > </dependency > </dependencies >
③编写控制层,接收参数
1 2 3 4 5 6 7 8 9 10 11 12 13 @RestController @RequestMapping("/serviceedu/video") public class VideoUploadController { @Autowired private VideoUploadService videoUploadService; @PostMapping("/upload") public JsonResult<String> uploadVideoToAliyun (@RequestPart MultipartFile file) { String videoSourceId = videoUploadService.uploadVideo(file); return new JsonResult <>(true ,"上传成功" ,videoSourceId); } }
④业务层负责执行文件的上传
1 2 3 4 5 6 7 8 9 10 11 12 13 14 15 16 17 18 19 20 21 22 23 24 25 26 @Override public String uploadVideo (MultipartFile file) { String title = UUID.randomUUID().toString(); String fileName = file.getOriginalFilename(); InputStream inputStream = null ; try { inputStream = file.getInputStream(); } catch (IOException e) { e.printStackTrace(); } UploadStreamRequest request = new UploadStreamRequest (UploadConfigClass.ACCESS_KEY_ID,UploadConfigClass.ACCESS_KEY_SECRET, title, fileName, inputStream); UploadVideoImpl uploader = new UploadVideoImpl (); UploadStreamResponse response = uploader.uploadStream(request); if (response.isSuccess()) { System.out.print("VideoId=" + response.getVideoId() + "\n" ); return response.getVideoId(); } else { System.out.print("VideoId=" + response.getVideoId() + "\n" ); System.out.print("ErrorCode=" + response.getCode() + "\n" ); System.out.print("ErrorMessage=" + response.getMessage() + "\n" ); return response.getVideoId(); } }
删除小节视频 ①创建一个类初始化删除阿里云视频的配置
1 2 3 4 5 6 7 8 9 10 11 12 13 14 15 16 17 @Component public class UploadConfigClass { @Value("${aliyun.vod.file.keyid}") private String keyid; @Value("${aliyun.vod.file.keysecret}") private String keysecret; public static String ACCESS_KEY_ID; public static String ACCESS_KEY_SECRET; @PostConstruct public void init () { ACCESS_KEY_ID = keyid; ACCESS_KEY_SECRET = keysecret; } }
②创建控制层接收删除视频的id
1 2 3 4 5 @PostMapping("/videoDel/{videoSourceId}") public JsonResult<Void> delVideoInAliyun (@PathVariable("videoSourceId") String videoSourceId) { videoUploadService.delUploadVideo(videoSourceId); return new JsonResult <>(true ); }
③业务层负责处理将阿里云中的指定id视频删除
1 2 3 4 5 6 7 8 9 10 11 12 13 14 15 16 17 @Override public void delUploadVideo (String videoSourceId) { try { DefaultAcsClient client = VodInitClass.initVodClient(UploadConfigClass.ACCESS_KEY_ID, UploadConfigClass.ACCESS_KEY_SECRET); DeleteVideoRequest request = new DeleteVideoRequest (); request.setVideoIds(videoSourceId); client.getAcsResponse(request); } catch (ClientException e) { e.printStackTrace(); } } }
统计分析 前端页面
①在api文件下创建statistic.js文件,创建被调用的方法
1 2 3 4 5 6 7 8 9 10 11 12 13 14 15 16 17 import request from '@/utils/request' export default { countRegister (day ){ return request ({ url :`/servicedaily/countNum/${day} ` , method :'post' }) }, showData (seacheObj ){ return request ({ url :`/servicedaily/showTableData/${seacheObj.type} /${seacheObj.begin} /${seacheObj.end} ` , method :'get' }) } }
②在对应的页面进行调用
后端接口 ①创建新的数据表存储统计分析所需的数据
②在service模块下创建子模块service_statistics
③改pom文件
④编写yml配置文件
⑤主启动类
⑥业务类
需要创建两个接口
在userCenter模块创建被调用接口,查询userCenter表中某个时间的注册人数
1 2 3 4 5 6 7 8 9 10 11 12 13 14 15 16 17 18 @GetMapping("count/{day}") public Integer countRegisterNumInOneDay (@PathVariable("day") String day) { return userCenterService.countRegisterNumInOneDay(day); } @Override public Integer countRegisterNumInOneDay (String day) { return this .baseMapper.countRegisterNumInOneDay(day); } Integer countRegisterNumInOneDay (@Param("day") String day) ; <!-- Integer countRegisterNumInOneDay (String day) ;--> <select id="countRegisterNumInOneDay" resultType="integer" > select count (*) from usercenter_member DATE (gmt_create) = #{day} </select>
在statistics模块创建接口,调用其他模块接口并插入一条新数据到daily表中
1 2 3 4 5 6 7 8 9 10 11 12 13 14 15 16 17 18 19 20 21 22 23 24 25 26 27 28 29 30 31 32 33 34 35 36 37 38 39 @PostMapping("/countNum/{day}") public JsonResult<Void> countRegisterNum (@PathVariable("day") String day) { dailyService.countRegisterNumInOneDay(day); return new JsonResult <>(true ); } @Override public void countRegisterNumInOneDay (String day) { Integer num = uSerCenterTransfer.countRegisterNumInOneDay(day); QueryWrapper<Daily> wrapper = new QueryWrapper <>(); wrapper.eq("date_calculated" ,day); Daily one = this .baseMapper.selectOne(wrapper); if (one != null ){ one.setRegisterNum(num); this .baseMapper.update(one,wrapper); return ; } Daily daily = new Daily (); daily.setRegisterNum(num); daily.setDateCalculated(day); daily.setLoginNum(RandomNum.createRandomNum()); daily.setVideoViewNum(RandomNum.createRandomNum()); daily.setCourseNum(RandomNum.createRandomNum()); int result = this .baseMapper.insert(daily); if (result == 0 ){ throw new InsertException (30001 ,"插入统计数据异常!" ); } }
①在主启动类上添加@EnableScheduLing注解
②创建定时任务类并给spring管理,使用cron表达式(又称七子表达式或七域表达式)
七子表达式(七域表达式):秒 分 时 日 月 周 年 –> 在线cron表达式生成器
③在需要执行定时任务的方法上使用@Scheduled注解
1 2 3 4 5 6 7 8 9 10 11 12 13 14 15 @Component public class ScheduleTask { @Autowired private IDailyService dailyService; @Scheduled(cron = "0 0 1 * * ? ") public void ScheduleTask () { LocalDate date = LocalDate.now().plusDays(-1 ); dailyService.countRegisterNumInOneDay(date.toString()); } }
1 2 3 4 5 6 7 8 9 10 11 12 13 14 15 16 17 18 19 20 21 22 23 24 25 26 27 28 29 30 31 32 33 34 35 36 37 38 39 40 41 42 43 44 45 46 47 48 49 @GetMapping("/showTableData/{type}/{begin}/{end}") public JsonResult<Map<String,Object>> showTableData (@PathVariable("type") String type, @PathVariable("begin") String begin, @PathVariable("end") String end) { Map<String,Object> data = dailyService.showTableData(type,begin,end); return new JsonResult <>(true ,"查询成功" ,data); } @Override public Map<String, Object> showTableData (String type, String begin, String end) { QueryWrapper<Daily> wrapper = new QueryWrapper <>(); wrapper.select("date_calculated" ,type).between("date_calculated" ,begin,end); List<Daily> list = this .baseMapper.selectList(wrapper); List<String> dateList = new ArrayList <>(); List<Integer> numList = new ArrayList <>(); for (Daily d: list) { dateList.add(d.getDateCalculated()); switch (type){ case "register_num" : numList.add(d.getRegisterNum()); break ; case "login_num" : numList.add(d.getLoginNum()); break ; case "video_view_num" : numList.add(d.getVideoViewNum()); break ; case "course_num" : numList.add(d.getCourseNum()); break ; } } HashMap<String, Object> map = new HashMap <>(); map.put("date" ,dateList); map.put("num" ,numList); return map; }
CMS管理 前端页面 ①在api文件下创建comment.js文件并编写被调用的方法
1 2 3 4 5 6 7 8 9 10 11 12 13 14 15 16 17 18 19 20 21 22 23 24 25 26 27 28 29 30 31 32 33 34 35 36 37 38 39 40 41 import request from '@/utils/request' export default { queryBannerList (pageNum,PageSize ){ return request ({ url :`/servicecms/banneradmin/query/${pageNum} /${PageSize} ` , method : 'get' }) }, addBanner (banner ){ return request ({ url :'/servicecms/banneradmin/add' , method : 'post' , data : banner }) }, updateBanner (banner ){ return request ({ url :'/servicecms/banneradmin/update' , method : 'post' , data : banner }) }, delBanner (id ){ return request ({ url :`/servicecms/banneradmin/del/${id} ` , method : 'post' }) }, queryBanner (id ){ return request ({ url :`/servicecms/banneradmin/query/${id} ` , method : 'get' }) }, queryBannerByTitle (title,pageNum,pageSize ){ return request ({ url :`/servicecms/banneradmin//queryByTitle/${title} /${pageNum} /${pageSize} ` , method : 'get' }) } }
②在对应页面进行调用
后端接口 ①通过代码生成器快速生成对应实体类等
②在service模块下创建子模块service_cms
③改pom文件(使用父类依赖,不需要导入什么)
④编写yml配置文件
⑤主启动类
⑥业务类
所有过程与评论管理模块相似且篇幅过长,不再此赘述,可到service_cms下细看
评论管理 前端页面 ①在api文件下创建comment.js文件并编写被调用的方法
1 2 3 4 5 6 7 8 9 10 11 12 13 14 15 16 17 18 19 20 21 22 23 24 25 26 27 28 29 30 31 32 33 34 import request from '@/utils/request' export default { getAllComment (pageNum,pageSize,VOComment ){ return request ({ url : `/servicecomment/getAllComment/${pageNum} /${pageSize} ` , method :'post' , data :VOComment }) }, delComment (commentIds ){ return request ({ url : `/servicecomment/del/${commentIds} ` , method :'post' }) }, reportComment (commentId ){ return request ({ url :`/servicecomment/report/${commentId} /0` , method :'post' }) }, showTeacher ( return request ({ url :`/servicecomment/showTeacher` , method :'get' }) }, showCourse ( return request ({ url :`/servicecomment/showCourse` , method :'get' }) } }
②在对应页面进行调用
后端接口 ①通过代码生成器快速生成对应实体类等
②在service模块下创建子模块service_comment
③改pom文件(使用父类依赖,不需要导入什么)
④编写yml配置文件
1 2 3 4 5 6 7 8 9 10 11 12 13 14 15 16 17 18 19 20 21 22 23 24 25 26 27 28 29 30 31 32 33 34 35 36 37 38 39 40 server: port: 8009 spring: application: name: service-comment profiles: active: dev datasource: driver-class-name: com.mysql.cj.jdbc.Driver url: jdbc:mysql://localhost:3306/online_edu?characterEncoding=utf8&useSSL=false&serverTimezone=UTC&rewriteBatchedStatements=true username: root password: root jackson: date-format: yyyy-MM-dd HH:mm:ss time-zone: GMT+8 cloud: nacos: discovery: server-addr: localhost:8848 management: endpoints: web: exposure: include: "*" health: redis: enabled: false mybatis-plus: mapper-locations: classpath:mybatis/mapper/*.xml configuration: log-impl: org.apache.ibatis.logging.slf4j.Slf4jImpl
⑤主启动类
⑥业务类
篇幅过长,不再此赘述,可到service_comment下细看
订单管理 前端页面 ①在api文件下创建comment.js文件并编写被调用的方法
1 2 3 4 5 6 7 8 9 10 11 12 13 14 15 16 17 import request from '@/utils/request' export default { getOrders (pageNum,pageSize,voOrder,status ){ return request ({ url : `/serviceorder/order/allOrder/${pageNum} /${pageSize} /${status} ` , method : 'post' , data : voOrder, }) }, delOrder (ids ){ return request ({ url : `/serviceorder/order/del/${ids} ` , method : 'post' , }) } }
②在对应页面进行调用
后端接口 ①通过代码生成器快速生成对应实体类等
②在service模块下创建子模块service_order
③改pom文件(使用父类依赖,不需要导入什么)
④编写yml配置文件
⑤主启动类
⑥业务类
篇幅过长,不再此赘述,可到service_order下细看
权限管理 整合Spring Security
①在公共模块下创建子模块Spring Security
②引入依赖
1 2 3 4 5 6 7 8 9 10 11 12 13 14 15 16 17 <dependencies > <dependency > <groupId > top.year21.onlineedu</groupId > <artifactId > common_utils</artifactId > <version > 1.0-SNAPSHOT</version > </dependency > <dependency > <groupId > org.springframework.boot</groupId > <artifactId > spring-boot-starter-security</artifactId > </dependency > <dependency > <groupId > io.jsonwebtoken</groupId > <artifactId > jjwt</artifactId > </dependency > </dependencies >
③创建下图的核心配置类、实体类、过滤器、工具类等
④在acl模块中引入spring security的依赖
⑤在acl模块中创建查询用户登录权限类并实现UserDetails接口,以接收和保存查询到的登录信息
⑥在acl模块中创建一个业务类并实现UserDetailsService接口,在这个实现类中编写查询数据库的逻辑
①TokenLoginFilter过滤器会在attemptAuthentication方法中通过请求拿到登录的用户信息
②通过实现类重写的loadUserByUsername的方法中判断用户登录信息是否正确并查询该用户
对应的权限列表保存在实现了UserDetails接口的自定义用户登录权限类中,决定调用认证
成功的方法还是认证失败的方法
③如果认证成功,调用认证成功的方法,在这个方法中根据用户名生成token并返回,在返回之前
将用户名和其对应的权限列表存入redis缓存中
④在前端接收到token后会放入cookie中,而在每次发起访问请求又会将token从cookie中取出
放到请求头上。
⑤后端接受到请求后,TokenAuthenticationFilter过滤器的UsernamePasswordAuthenticationToken
方法会从请求头中取出token,根据token获取用户名,再利用用户名从redis中获取到对应用户的访问
权限列表,最终进行授权
前端页面
后台接口 目的:不同角色的用户在登录后,在后台管理系统中应拥有不同的菜单和功能权限
①在service模块下创建子模块service_acl
②改pom文件
1 2 3 4 5 6 7 8 9 10 11 <dependencies > <dependency > <groupId > top.year21.onlineedu</groupId > <artifactId > spring_security</artifactId > <version > 1.0-SNAPSHOT</version > </dependency > <dependency > <groupId > com.alibaba</groupId > <artifactId > fastjson</artifactId > </dependency > </dependencies >
③编写yml配置文件
1 2 3 4 5 6 7 8 9 10 11 12 13 14 15 16 17 18 19 20 21 22 23 server: port: 8011 spring: application: name: service-acl cloud: nacos: discovery: server-addr: localhost:8848 datasource: driver-class-name: com.mysql.cj.jdbc.Driver url: jdbc:mysql://localhost:3306/online_edu?characterEncoding=utf8&useSSL=false&serverTimezone=UTC&rewriteBatchedStatements=true username: root password: root jackson: date-format: yyyy-MM-dd HH:mm:ss time-zone: GMT+8 mybatis-plus: mapper-locations: classpath:mybatis/mapper/*.xml configuration: log-impl: org.apache.ibatis.logging.slf4j.Slf4jImpl
④业务类
递归查询所有菜单思路:
先查询出所有的数据,遍历所有数据列表根据pid值为1查询出所有的顶级分类列表,
遍历顶级分类列表,通过一个递归方法传入当前顶级分类对象和所有的数据列表,将当前
顶级分类的id与数据列表每一个对象的pid做对比,当相同则代表此对象为当前顶级分类下
的子分类,则添加进当前顶级分类的子节点数组中,此后将此对象和所有的数据列表中放入
递归方法中,反复调用,直至循环结束
递归删除菜单思路:
先根据指定的id查询所有的子节点,判断是否有子节点,有则反复调用自己,本身就是递归方法
没有则直接删除即可。
1 2 3 4 5 6 7 8 9 10 11 12 13 14 15 16 17 18 19 20 21 22 23 24 25 26 27 28 29 30 31 32 33 34 35 36 37 38 39 40 41 42 43 44 45 46 47 48 49 50 51 52 53 54 55 56 57 58 59 60 61 62 63 64 65 66 67 68 69 70 71 72 73 74 75 76 77 78 79 80 81 82 83 84 85 86 87 88 89 90 @Service public class PermissionServiceImpl extends ServiceImpl <PermissionMapper, Permission> implements IPermissionService { @Override public List<Permission> queryAllPermission () { QueryWrapper<Permission> wrapper = new QueryWrapper <>(); wrapper.orderByDesc("id" ); List<Permission> permissionList = this .baseMapper.selectList(wrapper); List<Permission> resultList = buildNeedTreePermission(permissionList); return resultList; } public static List<Permission> buildNeedTreePermission (List<Permission> permissionList) { List<Permission> finalTreePermissionList = new ArrayList <>(); for (Permission p: permissionList) { if ("0" .equals(p.getPid())){ p.setLevel(1 ); finalTreePermissionList.add(selectChildren(p,permissionList)); } } return finalTreePermissionList; } public static Permission selectChildren (Permission p, List<Permission> permissionList) { p.setChildren(new ArrayList <>()); for (Permission obj : permissionList ){ if (p.getId().equals(obj.getPid())){ obj.setLevel(p.getLevel()+1 ); p.getChildren().add(selectChildren(obj,permissionList)); } } return p; } @Override public void delPermissionById (String id) { QueryWrapper<Permission> wrapper = new QueryWrapper <>(); wrapper.eq("pid" ,id); List<Permission> delList = this .baseMapper.selectList(wrapper); if (delList.size() != 0 ){ for (Permission node : delList){ delPermissionById(node.getId()); } } int result = this .baseMapper.deleteById(id); if (result == 0 ){ throw new CommonException (30001 ,"删除菜单失败" ); } } @Override public void givePermission (String roleId, String[] permissionIds) { List<RolePermission> rolePermissionList = new ArrayList <>(); for (String pid : permissionIds){ RolePermission rolePermission = new RolePermission (); rolePermission.setRoleId(roleId); rolePermission.setPermissionId(pid); rolePermissionList.add(rolePermission); } rolePermissionService.saveBatch(rolePermissionList); } }
登录过程分析
好像没被spring security放行的请求都会每次都会被拦截去请求selectPermissionValueByUserId
方法去获取用户id对应的权限列表 做鉴权
①在前端发送登录请求之后,在拦截器中对登录用户进行判断,判断用户存在之后会去查询用户信息和
其对应权限列表,并将这些信息保存在spring security保存登录信息的实体类中
②在经过登录拦截器之后调用登录成功的方法根据用户名生成的token并返回到前端,将用户名和用户名
对应的权限值列表存储到redis中,而在前端会将该token存储在cookie中,在接下来的任何请求的请求头
中都携带着token信息,在每次发起访问请求又会将token从cookie中取出放到请求头上。
③并且由于vue配置了全局路由卫士permission.js在每访问一个页面都会查看token判断是否登录,
经过上面的操作此时token时有登录信息的,因此会发起请求获取对应用户的信息和能够访问的菜单
④后端在接受请求后会从请求头中取token信息中,根据token信息获取用户名,根据用户名从redis中
查询数据,给该用户授权,再发送info请求获取用户信息的请求并返回查询出的数据,在这个方法中会
获取用户信息(页面展示需要)、用户角色列表(页面展示需要)、用户权限列表(判断页面按钮是否显示需要)
前端会将这些信息存储在vuex负责管理应用状态的store对象中
⑤后端还会接受到menu动态获取对应用户的路由菜单的请求,在这个方法中,会先判断用户角色,
如果是管理员获取全部,否则只获取对应用户的权限列表,通过递归方法获得权限列表,再进行封装,
最后返回类似前端路由形式的数据。前端接受这些数据后,经过vue渲染,从而能够在侧边栏和路由界面
进行访问
前台系统 使用NUXT框架搭建前台系统,NUXT是一种服务端渲染技术框架,且NUXT是对node.js进行了封装
1、使用NUXT提供的starter-template-master模板文件
starter-template-master模板是基于Vue实现的
2、将模板文件中的template文件中的内容解压到VSCode的工作区的某个文件中
3、修改模板文件中的配置信息
4、通过集成终端键入npm install 根据package.json安装依赖
.nuxt是前端工程编译后的文件,不允许更改
.asset是存储项目中使用的静态资源,js、img、css等
.component是项目中需要使用的公共组件
layouts中的default.vue是定义网页布局的方式
.node_modules是项目的依赖文件
pages是放在项目中的具体页面
nuxt.config.js是nuxy框架中的核心配置文件
(1)资源目录 assets
用于组织未编译的静态资源如 LESS、SASS 或 JavaScript。
(2)组件目录 components
用于组织应用的 Vue.js 组件。Nuxt.js 不会扩展增强该目录下 Vue.js 组件,即这些组件不会像页面组件那样有 asyncData 方法的特性。
(3)布局目录 layouts
用于组织应用的布局组件。
(4)页面目录 pages
用于组织应用的路由及视图。Nuxt.js 框架读取该目录下所有的 .vue 文件并自动生成对应的路由配置。
(5)插件目录 plugins
用于组织那些需要在 根vue.js应用 实例化之前需要运行的 Javascript 插件。
(6)nuxt.config.js 文件
nuxt.config.js 文件用于组织Nuxt.js 应用的个性化配置,以便覆盖默认配置。
NUXT路由 1、固定路由:路径是固定地址,不会发生变化
①使用router-link构建路由,通过设置to属性跳转到指定地址,地址是/course
当点击此路由,会先到page文件夹下找course文件夹,再从course文件夹下找到index.vue文件
1 2 3 <router-link to ="/course" tag ="li" active-class ="current" > <a > 课程</a > </router-link >
②在page目录创建文件夹course ,在course目录创建index.vue
1 2 3 4 5 6 7 <template > <div > <h1 > 跳转过来了course </h1 > </div > </template >
2、动态路由:每次生成的路由地址都不一样
①NUXT的动态路由是以下划线开头的vue文件,参数名为下划线后边的文件名
②在pages下的course目录下创建_id.vue
引入axios
由于NUXT框架没有像vue一样自带封装了ajax的axios,因此需要手动引入并封装
在一个文件夹下创建request.js文件并写入以下内容
1 2 3 4 5 6 7 import axios from 'axios' const service = axios.create ({ baseURL : 'http://192.168.231.134:9001' , timeout : 20000 }) export default service
整合redis 一般将经常进行查询的,不太重要的,而又不经常修改的数据放入nosql的redis(基于内存的数据库)中
整合步骤 ①引入依赖
由于redis缓存是公共应用,所以把依赖与配置添加到common模块里,在这个模块的pom文件添加依赖
1 2 3 4 5 6 7 8 9 10 11 12 <dependency > <groupId > org.springframework.boot</groupId > <artifactId > spring-boot-starter-data-redis</artifactId > </dependency > <dependency > <groupId > org.apache.commons</groupId > <artifactId > commons-pool2</artifactId > <version > 2.6.0</version > </dependency >
②创建redis缓存配置类,配置插件
1 2 3 4 5 6 7 8 9 10 11 12 13 14 15 16 17 18 19 20 21 22 23 24 25 26 27 28 29 30 31 32 33 34 35 36 37 38 39 40 41 42 43 44 @Configuration @EnableCaching public class RedisConfig extends CachingConfigurerSupport { @Bean public RedisTemplate<String, Object> redisTemplate (RedisConnectionFactory factory) { RedisTemplate<String, Object> template = new RedisTemplate <>(); RedisSerializer<String> redisSerializer = new StringRedisSerializer (); Jackson2JsonRedisSerializer jackson2JsonRedisSerializer = new Jackson2JsonRedisSerializer (Object.class); ObjectMapper om = new ObjectMapper (); om.setVisibility(PropertyAccessor.ALL, JsonAutoDetect.Visibility.ANY); om.enableDefaultTyping(ObjectMapper.DefaultTyping.NON_FINAL); jackson2JsonRedisSerializer.setObjectMapper(om); template.setConnectionFactory(factory); template.setKeySerializer(redisSerializer); template.setValueSerializer(jackson2JsonRedisSerializer); template.setHashValueSerializer(jackson2JsonRedisSerializer); return template; } @Bean public CacheManager cacheManager (RedisConnectionFactory factory) { RedisSerializer<String> redisSerializer = new StringRedisSerializer (); Jackson2JsonRedisSerializer jackson2JsonRedisSerializer = new Jackson2JsonRedisSerializer (Object.class); ObjectMapper om = new ObjectMapper (); om.setVisibility(PropertyAccessor.ALL, JsonAutoDetect.Visibility.ANY); om.enableDefaultTyping(ObjectMapper.DefaultTyping.NON_FINAL); jackson2JsonRedisSerializer.setObjectMapper(om); RedisCacheConfiguration config = RedisCacheConfiguration.defaultCacheConfig() .entryTtl(Duration.ofSeconds(600 )) .serializeKeysWith(RedisSerializationContext.SerializationPair.fromSerializer(redisSerializer)) .serializeValuesWith(RedisSerializationContext.SerializationPair.fromSerializer(jackson2JsonRedisSerializer)) .disableCachingNullValues(); RedisCacheManager cacheManager = RedisCacheManager.builder(factory) .cacheDefaults(config) .build(); return cacheManager; } }
③在yml文件中设置redis的配置
1 2 3 4 5 6 7 8 9 10 11 12 13 spring: redis: port: 6379 host: 192.168 .231 .134 database: 0 timeout: 1800000 lettuce: pool: max-active: 20 max-wait: 1 max-idle: 5 min-idle: 0
④在需要缓存的方法上添加注解
1 2 3 4 5 6 7 8 9 10 11 12 13 @Override @Cacheable(value = "banner",key = "'selectIndexList'") public List<Banner> queryAllBanner () { QueryWrapper<Banner> queryWrapper = new QueryWrapper <>(); queryWrapper.orderByDesc("sort" ); queryWrapper.last("limit 2" ); return this .baseMapper.selectList(queryWrapper); }
SpringBoot缓存注解 (1)缓存@Cacheable,一般用在查询方法上
根据方法对其返回结果进行缓存,下次请求时,如果缓存存在,则直接读取缓存数据返回;
如果缓存不存在,则执行方法,并把返回的结果存入缓存中。
属性/方法名 解释
value
缓存名,必填,它指定了你的缓存存放在哪块命名空间
cacheNames
与 value 差不多,二选一即可
key
可选属性,可以使用 SpEL 标签自定义缓存的key
(2)缓存@CachePut,一般用在新增方法上
使用该注解标志的方法,每次都会执行,并将结果存入指定的缓存中。
其他方法可以直接从响应的缓存中读取缓存数据,而不需要再去查询数据库。
属性/方法名 解释
value
缓存名,必填,它指定了你的缓存存放在哪块命名空间
cacheNames
与 value 差不多,二选一即可
key
可选属性,可以使用 SpEL 标签自定义缓存的key
(3)缓存@CacheEvict,一般用在更新或者删除方法上
使用该注解标志的方法,会清空指定的缓存。
属性/方法名 解释
value
缓存名,必填,它指定了你的缓存存放在哪块命名空间
cacheNames
与 value 差不多,二选一即可
key
可选属性,可以使用 SpEL 标签自定义缓存的key
allEntries
是否清空所有缓存,默认为 false。如果指定为 true,则方法调用后将立即清空所有的缓存
beforeInvocation
是否在方法执行前就清空,默认为 false。如果指定为 true,则在方法执行前就会清空缓存
banner轮播图 数据表
1 2 3 4 5 6 7 8 9 10 11 12 CREATE TABLE `crm_banner` ( `id` char(19) NOT NULL DEFAULT '' COMMENT 'ID', `title` varchar(20) DEFAULT '' COMMENT '标题', `image_url` varchar(500) NOT NULL DEFAULT '' COMMENT '图片地址', `link_url` varchar(500) DEFAULT '' COMMENT '链接地址', `sort` int(10) unsigned NOT NULL DEFAULT '0' COMMENT '排序', `is_deleted` tinyint(1) unsigned NOT NULL DEFAULT '0' COMMENT '逻辑删除 1(true)已删除, 0(false)未删除', `gmt_create` datetime NOT NULL COMMENT '创建时间', `gmt_modified` datetime NOT NULL COMMENT '更新时间', PRIMARY KEY (`id`), UNIQUE KEY `uk_name` (`title`) ) ENGINE=InnoDB DEFAULT CHARSET=utf8mb4 COMMENT='首页banner表';
前端页面
①创建用于被调用的js文件
1 2 3 4 5 6 7 8 9 10 import request from '@/utils/request' export default { getBanner ( return request ({ url : '/servicecms/bannerfront/queryAll' , method : 'get' }) } }
②在对应页面进行调用
1 2 3 4 5 6 7 methods : {getBanner ( banner.getBanner () .then (response => this .bannerList = response.data .data ; }) }
后端接口 ①在父工程service下创建子模块service-cms
②改pom文件
③编写yml配置文件
1 2 3 4 5 6 7 8 9 10 11 12 13 14 15 16 17 18 19 20 21 22 server: port: 8004 spring: application: name: service-cms profiles: active: dev datasource: driver-class-name: com.mysql.cj.jdbc.Driver url: jdbc:mysql://localhost:3306/online_edu?characterEncoding=utf8&useSSL=false&serverTimezone=UTC&rewriteBatchedStatements=true username: root password: root jackson: date-format: yyyy-MM-dd HH:mm:ss time-zone: GMT+8 mybatis-plus: mapper-locations: classpath:mybatis/mapper/*.xml configuration: log-impl: org.apache.ibatis.logging.slf4j.Slf4jImpl
④主启动类需要加上这些注解
1 2 @ComponentScan(basePackages = {"top.year21.onlineedu"}) @MapperScan("top.year21.onlineedu.servicecms.mapper")
⑤业务类
创建两个controller层区分前台系统和后台系统的请求
1 2 3 4 5 6 7 8 9 10 11 12 13 14 15 16 17 18 19 20 21 22 23 24 25 26 27 28 29 30 31 32 33 34 35 36 37 38 39 40 41 42 43 44 45 46 47 48 49 50 51 52 53 @RestController @RequestMapping("/servicecms/banneradmin") @CrossOrigin(origins = "*",maxAge = 3600) public class BannerAdminController { @Autowired private ICrmBannerService bannerService; @GetMapping("/query/{pageNum}/{pageSize}") public JsonResult<Page<Banner>> queryBannerByCondition (@PathVariable("pageNum") Integer pageNum, @PathVariable("pageSize") Integer pageSize) { Page<Banner> page = bannerService.page(new Page <>(pageNum, pageSize)); return new JsonResult <>(true ,"查询成功" ,page); } @PostMapping("/add") public JsonResult<Void> addBanner (@RequestBody Banner banner) { bannerService.save(banner); return new JsonResult <>(true ); } @PostMapping("/update") public JsonResult<Void> updateBanner (@RequestBody Banner banner) { bannerService.update(banner,null ); return new JsonResult <>(true ); } @PostMapping("/del/{id}") public JsonResult<Void> delBanner (@PathVariable("id") String id) { bannerService.removeById(id); return new JsonResult <>(true ); } } @RestController @RequestMapping("/servicecms/bannerfront") @CrossOrigin(origins = "*",maxAge = 3600) public class BannerFrontController { @Autowired private ICrmBannerService bannerService; @GetMapping("/queryAll") public JsonResult<List<Banner>> queryBanners () { List<Banner> banners = bannerService.queryAllBanner(); return new JsonResult <>(true ,"查询成功" ,banners); } }
首页展示
前端页面 ①创建用于被调用的js文件
1 2 3 4 5 6 7 8 9 10 11 12 13 14 15 16 17 18 19 20 21 import request from '@/utils/request' export default { getHotCourse ( return request ({ url : '/serviceedu/front/querycourse' , method :'get' }) }, } import request from '@/utils/request' export default { getSortTeacher ( return request ({ url : '/serviceedu/front/queryteaher' , method :'get' }) }, }
②在对应页面进行调用
1 2 3 4 5 6 7 8 9 10 11 12 13 14 methods : {getHotCourse ( course.getHotCourse () .then (response => this .courseList = response.data .data }) }, getSortTeacher ( teacher.getSortTeacher () .then (response => this .teacherList = response.data .data }) }, }
后端接口 ①控制层
这个控制层本应该写在service_cms模块中,但由于使用到了teacher和course类,为了方便就写在service_edu中
1 2 3 4 5 6 7 8 9 10 11 12 13 14 15 16 17 18 19 20 21 22 23 24 @RestController @RequestMapping("/serviceedu/front") @CrossOrigin(origins = "*",maxAge = 3600) public class FrontIndexController { @Autowired private IEduCourseService eduCourseService; @Autowired private IEduTeacherService eduTeacherService; @GetMapping("/queryteaher") public JsonResult<List<EduTeacher>> queryTeacherByCondition () { List<EduTeacher> list = eduTeacherService.getSortTeacher(); return new JsonResult <>(true ,"查询成功" ,list); } @GetMapping("/querycourse") public JsonResult<List<EduCourse>> queryCourseByCondition () { List<EduCourse> list = eduCourseService.getHotCourse(); return new JsonResult <>(true ,"查询成功" ,list); } }
②业务层
1 2 3 4 5 6 7 8 9 10 11 12 13 14 15 16 17 18 19 20 21 22 23 24 25 26 27 28 29 30 31 public interface IEduCourseService extends IService <EduCourse> {List<EduCourse> getHotCourse () ; } @Override @Cacheable(value = "course",key = "'selectCourse'") public List<EduCourse> getHotCourse () { QueryWrapper<EduCourse> queryWrapper = new QueryWrapper <>(); queryWrapper.orderByDesc("view_count" ) .ne("is_deleted" ,1 ) .last("limit 8" ); return this .baseMapper.selectList(queryWrapper); } public interface IEduTeacherService extends IService <EduTeacher> { List<EduTeacher> getSortTeacher () ; } @Override @Cacheable(value = "teacher",key = "'selectTeacher'") public List<EduTeacher> getSortTeacher () { QueryWrapper<EduTeacher> queryWrapper = new QueryWrapper <>(); queryWrapper.orderByDesc("gmt_create" ) .ne("is_deleted" ,1 ) .last("limit 4" ); return this .baseMapper.selectList(queryWrapper); }
注册功能 前端页面 ①由于nuxt没有集成element-ui,因此需要下载此依赖
npm install element-ui
②在plugins创建js文件进行引用
1 2 3 import ElementUI from 'element-ui' import 'element-ui/lib/theme-chalk/index.css' Vue .use (ElementUI )
③在layout文件夹中创建一个vue文件,目的是为注册页面换个页面布局样式
1 2 3 4 5 6 7 8 9 10 <template > <div class ="sign" > <div class ="logo" > <img src ="~/assets/img/logo.png" alt ="logo" /> </div > <nuxt /> </div > </template >
④在pages文件夹中创建注册页面,前提是先修改default.vue中关于注册页面的路由地址
⑤在api文件夹下创建register.js文件,编写需要被调用的方法
1 2 3 4 5 6 7 8 9 10 11 12 13 14 15 16 17 import request from '@/utils/request' export default { userRegister (VoRegister ){ return request ({ url : '/serviceusercenter/register' , method : 'post' , data : VoRegister }) }, getCode (phone ){ return request ({ url : '/servicemsm/send/' + phone, method : 'get' }) } }
⑥在对应页面进行调用即可
短信注册
①在service模块下创建service_msm模块,处理短信服务
②在service_msm的pom文件加入下列依赖
1 2 3 4 5 6 7 8 9 10 11 12 13 14 15 16 17 18 19 20 21 22 23 24 25 26 27 28 29 30 31 <dependencies > <dependency > <groupId > com.aliyun</groupId > <artifactId > aliyun-java-sdk-core</artifactId > </dependency > <dependency > <groupId > com.alibaba</groupId > <artifactId > fastjson</artifactId > </dependency > <dependency > <groupId > org.apache.httpcomponents</groupId > <artifactId > httpclient</artifactId > <version > 4.3.4</version > </dependency > <dependency > <groupId > org.apache.httpcomponents</groupId > <artifactId > httpcore</artifactId > <version > 4.3.3</version > </dependency > <dependency > <groupId > commons-lang</groupId > <artifactId > commons-lang</artifactId > <version > 2.6</version > </dependency > <dependency > <groupId > org.eclipse.jetty</groupId > <artifactId > jetty-util</artifactId > <version > 9.3.7.v20160115</version > </dependency > </dependencies >
③编写yml配置文件
1 2 3 4 5 6 7 8 9 10 11 12 13 14 15 16 17 18 19 20 21 22 23 24 25 26 27 28 29 30 31 32 33 34 35 36 37 server: port: 8005 spring: application: name: service-msm profiles: active: dev datasource: driver-class-name: com.mysql.cj.jdbc.Driver url: jdbc:mysql://localhost:3306/online_edu?characterEncoding=utf8&useSSL=false&serverTimezone=UTC&rewriteBatchedStatements=true username: root password: root jackson: date-format: yyyy-MM-dd HH:mm:ss time-zone: GMT+8 cloud: nacos: discovery: server-addr: localhost:8848 redis: port: 6379 host: 192.168 .231 .134 database: 0 timeout: 1800000 lettuce: pool: max-active: 20 max-wait: 1 max-idle: 5 min-idle: 0 mybatis-plus: mapper-locations: classpath:mybatis/mapper/*.xml configuration: log-impl: org.apache.ibatis.logging.slf4j.Slf4jImpl
④主启动类
⑤业务类
1 2 3 4 5 6 7 8 9 10 11 12 13 14 15 16 17 18 19 20 21 22 23 24 25 26 27 28 29 30 31 32 @RestController @RequestMapping("/servicemsm") @CrossOrigin(value = "*",maxAge = 3600) public class MsgController { @Autowired private MsgService msgService; @Autowired private RedisTemplate<String,String> redisTemplate; @GetMapping("/send/{phone}") public JsonResult<Void> sendMsg (@PathVariable("phone") String phone) { String code = redisTemplate.opsForValue().get(phone); if (!StringUtils.isEmpty(code)){ return new JsonResult <>(true ); } code = RandomUtil.getFourBitRandom(); Boolean result = msgService.sendMessage(phone,code); if (result){ redisTemplate.opsForValue().set(phone,code,5 , TimeUnit.MINUTES); return new JsonResult <>(true ,"短信发送成功" ,null ); }else { return new JsonResult <>(false ,"短信发送失败" ,null ); } } }
1 2 3 4 5 6 7 8 9 10 11 12 13 14 15 16 17 18 19 20 21 22 23 24 25 26 27 28 29 30 31 32 33 34 35 36 37 38 39 40 41 42 43 44 45 46 47 @Service public class MsgServiceImpl implements MsgService { @Override public Boolean sendMessage (String phone, String code) { if ("" .equals(phone)){ return false ; } String host = "https://gyytz.market.alicloudapi.com" ; String path = "/sms/smsSend" ; String method = "POST" ; String appcode = "e9323c6105394949a1c1a7dbb05253f0" ; Map<String, String> headers = new HashMap <String, String>(); headers.put("Authorization" , "APPCODE " + appcode); Map<String, String> querys = new HashMap <String, String>(); querys.put("mobile" ,phone); querys.put("param" , "**code**:" + code); querys.put("smsSignId" , "2e65b1bb3d054466b82f0c9d125465e2" ); querys.put("templateId" , "63698e3463bd490dbc3edc46a20c55f5" ); Map<String, String> bodys = new HashMap <String, String>(); try { HttpResponse response = HttpUtils.doPost(host, path, method, headers, querys, bodys); System.out.println(response.toString()); int statusCode = response.getStatusLine().getStatusCode(); if (statusCode == 200 ){ return true ; } } catch (Exception e) { e.printStackTrace(); } return false ; } }
后台接口 ①创建一个值对象VOregister封装注册的数据
1 2 3 4 5 6 7 @Data public class VORegister { private String phone; private String nickName; private String password; private String code; }
②业务层
1 2 3 4 5 6 @PostMapping("/register") public JsonResult<Void> userRegister (@RequestBody VORegister voRegister) { userCenterService.userRegister(voRegister); return new JsonResult <>(true ); }
③控制层
1 2 3 4 5 6 7 8 9 10 11 12 13 14 15 16 17 18 19 20 21 22 23 24 25 26 27 28 29 30 31 32 33 34 35 36 37 38 39 40 41 42 43 44 45 46 47 48 @Override public void userRegister (VORegister voRegister) { String phone = voRegister.getPhone(); QueryWrapper<UserCenter> queryWrapper = new QueryWrapper <>(); queryWrapper.eq("mobile" ,phone); Long count = this .baseMapper.selectCount(queryWrapper); if (count != 0 ){ throw new CommonException (30001 ,"手机号已注册!" ); } String redisCode = redisTemplate.opsForValue().get(phone); if (StringUtils.isEmpty(redisCode)){ throw new CommonException (30001 ,"验证码已过期,注册失败,请重新获取验证码" ); } String inputCode = voRegister.getCode(); if (!inputCode.equals(redisCode)){ throw new CommonException (30001 ,"验证码错误,注册失败" ); } String inputPwd = voRegister.getPassword(); String salt = UUID.randomUUID().toString().toUpperCase(); String pwdByMd5 = PasswordEncryptedUtils.getPasswordByMD5(inputPwd, salt); UserCenter userCenter = new UserCenter (); userCenter.setMobile(phone); userCenter.setPassword(pwdByMd5); userCenter.setNickname(voRegister.getNickName()); userCenter.setAvatar("https://onlineedufile.oss-cn-guangzhou.aliyuncs.com/2022-08-23/ee578e07-753c-4ddc-8ff3-73ff79f749d8.jpg" ); userCenter.setSalt(salt); this .baseMapper.insert(userCenter); }
登录功能 单点登录模式:在任一模块登录后,访问其他模块不需要进行二次登录
本项目的单点登录,利用了JWT框架
SSO(single sign on)模式 也称为单点登录模式,有三种方式
1、通过session广播机制实现,通过将session复制到其他模块中,缺点是比较浪费资源
2、通过cookie+redis实现
步骤一:在任一模块登录后,将数据放入redis和cookie中
①redis:在key:生成唯一随机值(ip、用户id等),value:用户数据
②cookie:把redis里面生成的key值放到cookie中
步骤二:在访问其他模块时,发送的请求中携带cookie,通过获取此cookie的值,到redis中进行查询,
根据此cookie即key查询,如果能查询到数据代表已经登录
3、通过token实现
token是按照一定规则生成的字符串,而这个字符串中可以包含用户信息
步骤一:在某个模块进行登录之后,将按照规则生成的token字符串通过cookie或地址栏参数返回
步骤二:当再去访问其他模块时,在每次访问时在地址栏或者cookie中都会携带token字符串,从
地址栏或者cookie中获取token,根据此token获取用户信息,如果获取成功则表示是登录状态
前端页面
①在pages文件夹中创建登录页面,前提是先修改default.vue中关于登录页面的路由地址
②下载 cookie插件,用于传输用户数据,npm install js-cookie
③在api文件夹下创建login.js文件,编写需要被调用的方法
1 2 3 4 5 6 7 8 9 10 11 12 13 14 15 16 import request from '@/utils/request' export default { userLogin (user ){ return request ({ url : '/serviceusercenter/login' , method : 'post' , data : user }) }, getInfoByToken ( return request ({ url : '/serviceusercenter/queryInfo' , method : 'get' }) }, }
③在对应页面进行调用即可
①在登录成功后,将服务器生成的token返回
②将返回的token存入cookie中,根据此token去服务器中调用接口查询用户数据
③创建拦截器,在请求正在发送之前,先拦截判断cookie中是否存储了token,如果发现存储了,
则从cookie中取出放入到请求头中,因为后端接口就是从请求头中获取token的
1 2 3 4 5 6 7 8 9 10 11 12 13 14 15 16 17 18 19 20 import cookie from 'js-cookie' const service = axios.create ({ baseURL : 'http://192.168.231.134:9001' , timeout : 20000 }) service.interceptors .request .use ( config => if (cookie.get ('onlineedu_token' )) { config.headers ['token' ] = cookie.get ('onlineedu_token' ); } return config }, err => return Promise .reject (err); })
④将经过服务接口查询返回的用户信息放入cookie中
1 2 3 4 5 6 7 8 9 10 11 12 13 14 15 16 17 18 19 20 21 22 23 24 25 26 27 28 29 30 31 32 login ( login.userLogin (this .user ) .then (response => if (response.data .code === 20000 ){ let token = response.data .data cookie.set ('onlineedu_token' ,token,{domian :'localhost' }) login.getInfoByToken () .then (response => if (response.data .code === 20000 ){ this .userInfo = JSON .stringify (response.data .data ) cookie.set ('userInfo' ,this .userInfo ,{domian :'localhost' }) } }) this .$message .success ("登录成功" ) this .$router .push ({path :"/" }) } }) .catch (error => this .$message .error (error.response .data .message ) }) },
⑤在主页从cookie中取出用户信息,填充页面内容
1 2 3 4 5 6 7 8 9 10 11 12 13 14 15 16 getUserInfo ( let user = cookie.get ('userInfo' ) if (user){ this .userInfo = JSON .parse (user) } }, logout ( cookie.set ("userInfo" ,'' ,{domain :'localhost' }) cookie.set ('onlineedu_token' ,'' ,{domian :'localhost' }) this .$message .success ("退出成功" ) window .location .href = '/' }
整合微信登录
①在service-usercenter模块中的yml文件配置微信相关的信息
1 2 3 4 5 6 7 8 9 wx: open: appid: wxed9954c01bb89b47 appsecret: a7482517235173ddb4083788de60b90e redirecturl: http://localhost:8160/wx/callback
②创建一个类读取配置yml配置文件的内容
1 2 3 4 5 6 7 8 9 10 11 12 13 14 15 16 17 18 19 20 21 22 23 24 @Component public class WXUtils { @Value("${wx.open.appid}") private String appId; @Value("${wx.open.appsecret}") private String appSecret; @Value("${wx.open.redirecturl}") private String redirectUrl; public static String WX_OPEN_APP_ID; public static String WX_OPEN_APP_SECRET; public static String WX_OPEN_REDIRECT_URL; @PostConstruct public void init () { WX_OPEN_APP_ID = appId; WX_OPEN_APP_SECRET = appSecret; WX_OPEN_REDIRECT_URL = redirectUrl; } }
③创建一个controller用于创建扫描登录的二维码
④在扫描二维码后从控制类中获取code(随机唯一的值,用于识别身份)
⑤用获取到的code值请求微信提供的固定地址,获取access_token(访问凭证)和openId(区分不同标识)
⑥用access_token和openId再去获取微信提供的固定地址,从而得到微信扫码人的信息
1 2 3 4 5 6 7 8 9 10 11 12 13 14 15 16 17 18 19 20 21 22 23 24 25 26 27 28 29 30 31 32 33 34 35 36 37 38 39 40 41 42 43 44 45 46 47 48 49 50 51 52 53 54 55 56 57 58 59 60 61 62 63 64 65 66 67 68 69 70 71 72 73 74 75 76 77 78 79 80 81 82 83 84 85 86 87 88 89 90 91 92 93 94 95 96 97 98 99 100 101 102 103 104 105 106 107 108 109 @Controller @RequestMapping("/api/ucenter/wx") @CrossOrigin(origins = "*",maxAge = 3600) @Slf4j public class WxController { @Autowired private IUserCenterService userCenterService; @GetMapping("/login") public String getWxCode () { String baseUrl = "https://open.weixin.qq.com/connect/qrconnect" + "?appid=%s" + "&redirect_uri=%s" + "&response_type=code" + "&scope=snsapi_login" + "&state=%s" + "#wechat_redirect" ; String redirectUrl = WXUtils.WX_OPEN_REDIRECT_URL; try { redirectUrl = URLEncoder.encode(redirectUrl,"utf-8" ); } catch (Exception e) { e.printStackTrace(); } String codeUrl = String.format( baseUrl, WXUtils.WX_OPEN_APP_ID, WXUtils.WX_OPEN_REDIRECT_URL, "success" ); return "redirect:" + codeUrl; } @GetMapping("/callback") public String callback (String code,String state) { try { String baseAccessTokenUrl = "https://api.weixin.qq.com/sns/oauth2/access_token" + "?appid=%s" + "&secret=%s" + "&code=%s" + "&grant_type=authorization_code" ; String accessTokenUrl = String.format(baseAccessTokenUrl, WXUtils.WX_OPEN_APP_ID, WXUtils.WX_OPEN_APP_SECRET, code); String accessTokenInfo = HttpClientUtils.get(accessTokenUrl); log.info("accessTokenInfo:" + accessTokenInfo); Gson gson = new Gson (); HashMap<String,String> hashMap = gson.fromJson(accessTokenInfo, HashMap.class); String accessToken = hashMap.get("access_token" ); String openid = hashMap.get("openid" ); QueryWrapper<UserCenter> wrapper = new QueryWrapper <>(); wrapper.eq("openid" ,openid); UserCenter queryUser = userCenterService.getOne(wrapper); if (queryUser == null ){ String baseUserInfoUrl = "https://api.weixin.qq.com/sns/userinfo" + "?access_token=%s" + "&openid=%s" ; String userInfoUrl = String.format(baseUserInfoUrl, accessToken, openid); String userInfo = HttpClientUtils.get(userInfoUrl); log.info("userInfo:" + userInfo); Gson userGson = new Gson (); HashMap<String,String> userMap = userGson.fromJson(userInfo, HashMap.class); String nickname = userMap.get("nickname" ); String headimgurl = userMap.get("headimgurl" ); queryUser = new UserCenter (); queryUser.setOpenid(openid); queryUser.setNickname(nickname); queryUser.setAvatar(headimgurl); userCenterService.save(queryUser); } String token = JwtUtils.getJwtToken(queryUser.getId(), queryUser.getNickname()); return "redirect:http://localhost:3000?token=" + token; }catch (Exception e){ throw new RuntimeException (e.getMessage()); } } }
⑦在首页中回显登录后的用户信息
1 2 3 4 5 6 7 8 9 10 11 12 13 14 15 16 17 18 19 20 21 22 23 24 25 26 27 28 29 30 31 32 33 created ( this .token = this .$route .query .token if (this .token ){ this .setTokenInCookie () } this .getUserInfo () }, methods : { getUserInfo ( let user = cookie.get ('userInfo' ) if (user){ this .userInfo = JSON .parse (user) } }, setTokenInCookie ( cookie.set ("onlineedu_token" ,this .token ,{domain :'localhost' }) cookie.set ("userInfo" ,'' ,{domain :'localhost' }) login.getInfoByToken () .then (response => if (response.data .code === 20000 ){ this .userInfo = JSON .stringify (response.data .data ) cookie.set ('userInfo' ,this .userInfo ,{domian :'localhost' }) this .getUserInfo () } }) }, }
后端接口 ①在service模块下创建service_usercenter子模块
②创建数据表,根据数据表快速生成相关的实体类等
1 2 3 4 5 6 7 8 9 10 11 12 13 14 15 16 CREATE TABLE `usercenter_member` ( `id` CHAR(19) NOT NULL COMMENT '会员id', `openid` VARCHAR(128) DEFAULT NULL COMMENT '微信openid', `mobile` VARCHAR(11) DEFAULT '' COMMENT '手机号', `password` VARCHAR(255) DEFAULT NULL COMMENT '密码', `nickname` VARCHAR(50) DEFAULT NULL COMMENT '昵称', `sex` TINYINT(2) UNSIGNED DEFAULT NULL COMMENT '性别 1 女,2 男', `age` TINYINT(3) UNSIGNED DEFAULT NULL COMMENT '年龄', `avatar` VARCHAR(255) DEFAULT NULL COMMENT '用户头像', `sign` VARCHAR(100) DEFAULT NULL COMMENT '用户签名', `is_disabled` TINYINT(1) NOT NULL DEFAULT '0' COMMENT '是否禁用 1(true)已禁用, 0(false)未禁用', `is_deleted` TINYINT(1) NOT NULL DEFAULT '0' COMMENT '逻辑删除 1(true)已删除, 0(false)未删除', `gmt_create` DATETIME NOT NULL COMMENT '创建时间', `gmt_modified` DATETIME NOT NULL COMMENT '更新时间', PRIMARY KEY (`id`) ) ENGINE=INNODB DEFAULT CHARSET=utf8mb4 COMMENT='会员表';
③修改子模块的pom文件
④编写yml配置文件
1 2 3 4 5 6 7 8 9 10 11 12 13 14 15 16 17 18 19 20 21 22 23 24 25 26 27 28 29 30 31 32 33 34 35 36 37 38 server: port: 8006 spring: application: name: user-center profiles: active: dev datasource: driver-class-name: com.mysql.cj.jdbc.Driver url: jdbc:mysql://localhost:3306/online_edu?characterEncoding=utf8&useSSL=false&serverTimezone=UTC&rewriteBatchedStatements=true username: root password: root jackson: date-format: yyyy-MM-dd HH:mm:ss time-zone: GMT+8 cloud: nacos: discovery: server-addr: localhost:8848 redis: port: 6379 host: 192.168 .231 .134 database: 0 timeout: 1800000 lettuce: pool: max-active: 20 max-wait: 1 max-idle: 5 min-idle: 0 mybatis-plus: mapper-locations: classpath:mybatis/mapper/*.xml
⑤主启动类
⑥业务类
1 2 3 4 5 6 7 @PostMapping("/login") public JsonResult<String> userLogin (@RequestBody UserCenter user) { String userToken = userCenterService.userLogin(user); return new JsonResult <>(true ,"登录成功" ,userToken); }
1 2 3 4 5 6 7 8 9 10 11 12 13 14 15 16 17 18 19 20 21 22 23 24 25 26 27 28 29 30 31 32 33 34 35 36 37 @Service public class UserCenterServiceImpl extends ServiceImpl <UserCenterMapper, UserCenter> implements IUserCenterService { public String userLogin (UserCenter user) { String phone = user.getMobile(); String inputPassword = user.getPassword(); if (StringUtils.isEmpty(phone) || StringUtils.isEmpty(inputPassword)){ throw new CommonException (30001 ,"账户名或密码为空,登录失败" ); } QueryWrapper<UserCenter> queryWrapper = new QueryWrapper <>(); queryWrapper.eq("mobile" ,phone); UserCenter queryUser = this .baseMapper.selectOne(queryWrapper); if (queryUser == null || queryUser.getIsDisabled()){ throw new CommonException (30001 ,"账户名不存在,登录失败" ); } String salt = queryUser.getSalt(); String dbPassword = queryUser.getPassword(); String md5Pwd = PasswordEncryptedUtils.getPasswordByMD5(inputPassword, salt); if (!dbPassword.equals(md5Pwd)){ throw new CommonException (30001 ,"密码错误,登录失败" ); } String id = queryUser.getId(); String nickname = queryUser.getNickname(); return JwtUtils.getJwtToken(id, nickname); } }
1 2 3 4 5 6 7 8 9 @GetMapping("/queryInfo") public JsonResult<UserCenter> queryInfoByToken (HttpServletRequest request) { String userId = JwtUtils.getMemberIdByJwtToken(request); UserCenter loginUser = userCenterService.getById(userId); return new JsonResult <>(true ,"查询成功" ,loginUser); }
用户中心 前端页面 ①在api文件下的login.js添加被调用的方法
1 2 3 4 5 6 7 8 9 10 11 12 13 14 15 16 17 18 19 updateUserInfo (user ){ return request ({ url : `/serviceusercenter/update` , method : 'post' , data : user }) }, updatePhotoById (uid,path ){ return request ({ url : `/serviceusercenter/updatePhoto/${uid} /${path} ` , method : 'post' , }) }, updatePwdById (uid,oldPwd,newPwd ){ return request ({ url : `/serviceusercenter/updatepwd/${uid} /${oldPwd} /${newPwd} ` , method : 'post' , }) }
②在对应页面进行调用
后端接口 ①在usercenter模块下编写接口
1 2 3 4 5 6 7 8 9 10 11 12 13 14 15 16 17 18 19 20 21 22 23 24 25 26 27 28 29 30 31 32 33 34 35 36 37 38 39 40 41 42 43 44 45 46 47 48 49 50 51 52 53 54 55 56 57 58 59 60 61 62 63 64 @PostMapping("/update") public JsonResult<Void> updateUserInfoById (@RequestBody UserCenter user) { UpdateWrapper<UserCenter> wrapper = new UpdateWrapper <>(); wrapper.eq("id" ,user.getId()); if (!userCenterService.update(user,wrapper)){ throw new CommonException (30001 ,"更新用户信息失败!" ); } return new JsonResult <>(true ); } @PostMapping("/updatePhoto/{userId}/{path}") public JsonResult<Void> updatePhotoById (@PathVariable("userId") String userId, @PathVariable("path") String path) { String dbPath = decode(path); userCenterService.updatePhotoById(userId,dbPath); return new JsonResult <>(true ); } public static String decode (String code) { String str="" ; try { str=new String (Base64.decodeBase64(code),"utf-8" ); } catch (UnsupportedEncodingException e) { e.printStackTrace(); } return str; } @PostMapping("/updatepwd/{userId}/{oldPwd}/{newPwd}") public JsonResult<Void> updatePwd (@PathVariable("userId") String userId, @PathVariable("oldPwd") String oldPwd, @PathVariable("newPwd") String newPwd) { UserCenter user = userCenterService.getById(userId); String salt = user.getSalt(); String dbPassword = user.getPassword(); String md5Password = PasswordEncryptedUtils.getPasswordByMD5(oldPwd, salt); if (!md5Password.equals(dbPassword)){ throw new CommonException (30001 ,"原密码错误!" ); } String newPassword = PasswordEncryptedUtils.getPasswordByMD5(newPwd, salt); user.setPassword(newPassword); boolean result = userCenterService.updateById(user); if (!result){ throw new CommonException (30001 ,"密码更新失败!" ); } return new JsonResult <>(true ); }
讲师及详情展示 前端页面 ①在对应的页面进行调用并回填数据
1 2 3 4 5 6 7 8 9 10 11 12 13 14 15 16 17 18 19 20 21 22 23 24 25 26 27 28 29 30 31 32 33 34 35 36 37 38 39 40 41 42 43 44 45 46 47 48 49 50 51 52 <script> import teacher from '@/api/teacher' export default { asyncData ({ params, error } ) { return teacher.getFrontTeacher (1 , 8 ) .then (response => return { data : response.data .data } }) }, methods : { pageQuery (pageNum ){ if (pageNum > this .data .pages || pageNum < 1 || pageNum === this .data .current ){ return false ; } teacher.getFrontTeacher (pageNum,8 ) .then (response => this .data = response.data .data }) } }, } </script> <script > import teacher from '@/api/teacher' export default { name :"teacherInfo" , data ( return { teacherId : '' , teacherInfo :{}, courses : [], } }, created ( this .teacherId = this .$route .params .id this .getTeacherByid () }, methods : { getTeacherByid ( teacher.getTeacherByid (this .teacherId ) .then (response => this .teacherInfo = response.data .data .teacher this .courses = response.data .data .courses }) } }, }; </script >
后端接口
①控制层返回map类型对象
1 2 3 4 5 6 7 8 9 10 11 12 13 14 15 16 17 18 19 20 21 22 @GetMapping("/query/{pageNum}/{pageSize}") public JsonResult<Map<String,Object>> queryTeacherOnIndex (@PathVariable("pageNum") Integer pageNum, @PathVariable("pageSize") Integer pageSize) { HashMap<String,Object> teacherList = eduTeacherService.getFrontTeacherList(pageNum,pageSize); return new JsonResult <>(true ,"查询成功" ,teacherList); } @GetMapping("/query/{teacherId}") public JsonResult<HashMap<String,Object>> queryTeacherById (@PathVariable("teacherId") String teacherId) { EduTeacher teacher = eduTeacherService.getById(teacherId); QueryWrapper<EduCourse> wrapper = new QueryWrapper <>(); wrapper.eq("teacher_id" ,teacher.getId()); List<EduCourse> courses = eduCourseService.list(wrapper); HashMap<String, Object> map = new HashMap <>(); map.put("teacher" ,teacher); map.put("courses" ,courses); return new JsonResult <>(true ,"查询成功" ,map); }
②业务层执行查询
1 2 3 4 5 6 7 8 9 10 11 12 13 14 15 16 17 18 19 20 21 22 23 24 25 26 27 28 @Override public HashMap<String, Object> getFrontTeacherList (Integer pageNum, Integer pageSize) { QueryWrapper<EduTeacher> wrapper = new QueryWrapper <>(); wrapper.orderByDesc("id" ); Page<EduTeacher> page = new Page <>(pageNum,pageSize); this .baseMapper.selectPage(page,wrapper); HashMap<String, Object> map = new HashMap <>(); List<EduTeacher> lists = page.getRecords(); long current = page.getCurrent(); long pages = page.getPages(); long size = page.getSize(); long total = page.getTotal(); boolean hasNext = page.hasNext(); boolean hasPrevious = page.hasPrevious(); map.put("lists" ,lists); map.put("current" ,current); map.put("pages" ,pages); map.put("size" ,size); map.put("total" ,total); map.put("hasNext" ,hasNext); map.put("hasPrevious" ,hasPrevious); return map; }
课程及详情展示 前端页面 ①在api文件夹下的course.js文件添加被调用的方法
1 2 3 4 5 6 7 8 9 10 11 12 13 14 15 16 17 18 19 20 21 22 23 24 25 26 getHtmlCourse (pageNum,pageSize,VOFrontCourse ){ return request ({ url : `/serviceedu/frontCourse/courseList/${pageNum} /${pageSize} ` , method :'post' , data : VOFrontCourse }) }, getOneSubject ( return request ({ url : '/serviceedu/frontCourse/querySubject' , method :'get' }) }, getTwoSubject (subjectId ){ return request ({ url : `/serviceedu/frontCourse/querySubject` , method :'get' , params : subjectId }) } getCourseDetailsById (courseId ){ return request ({ url : `/serviceedu/frontCourse/details/${courseId} ` , method :'get' }) }
②在对应的页面进行调用
后端接口
①创建两个vo类封装查询数据和封装课程详情信息
1 2 3 4 5 6 7 8 9 10 11 12 13 14 15 16 17 18 19 20 21 22 23 24 @Data public class VOFrontCourse { private String title; private String courseId; private String subjectParentId; private String subjectId; private String viewCountSort; private String gmtCreateSort; private String priceSort; } @Data public class VOFrontCourseDetails { private String id; private String title; private BigDecimal price; private String teacherId; private String buyCount; private String lessonNum; private String viewCount; private String name; private String career; private String avatar; private String description; }
②控制层接收参数
1 2 3 4 5 6 7 8 9 10 11 12 13 14 15 16 17 18 19 20 21 22 23 24 25 26 27 28 29 30 31 @RestController @RequestMapping("/serviceedu/frontCourse") @CrossOrigin(origins = "*",maxAge = 3600) public class FrontCourseController { @Autowired private IEduCourseService courseService; @Autowired private IEduSubjectService subjectService; @PostMapping("/courseList/{pageNum}/{pageSize}") public JsonResult<Map<String,Object>> showCourseListByCondition (@PathVariable("pageNum") Integer pageNum, @PathVariable("pageSize") Integer pageSize, @RequestBody(required = false) VOFrontCourse course) { HashMap<String,Object> courseList = courseService.showCourseListByCondition(pageNum,pageSize,course); return new JsonResult <>(true ,"查询成功" ,courseList); } @GetMapping("/querySubject") public JsonResult<List<EduSubject>> queryOneSubjectList (@RequestParam(required = false) String subjectParentId) { QueryWrapper<EduSubject> wrapper = new QueryWrapper <>(); if (!StringUtils.isEmpty(subjectParentId)){ wrapper.eq("parent_id" ,subjectParentId); }else { wrapper.eq("parent_id" ,0 ); } List<EduSubject> subjectList = subjectService.list(wrapper); return new JsonResult <>(true ,"查询成功" ,subjectList); } }
③业务层执行业务
1 2 3 4 5 6 7 8 9 10 11 12 13 14 15 16 17 18 19 20 21 22 23 24 25 26 27 28 29 30 31 32 33 34 35 36 37 38 39 40 41 42 43 44 45 46 47 48 49 50 51 52 53 54 55 56 57 58 59 @Override public HashMap<String, Object> showCourseListByCondition (Integer pageNum, Integer pageSize, VOFrontCourse course) { QueryWrapper<EduCourse> wrapper = new QueryWrapper <>(); String title = course.getTitle(); String subjectParentId = course.getSubjectParentId(); String subjectId = course.getSubjectId(); String viewCountSort = course.getViewCountSort(); String createSort = course.getGmtCreateSort(); String priceSort = course.getPriceSort(); if (!StringUtils.isEmpty(title)){ wrapper.like("title" ,title); } if (!StringUtils.isEmpty(subjectParentId)){ wrapper.eq("subject_parent_id" ,subjectParentId); } if (!StringUtils.isEmpty(subjectId)){ wrapper.eq("subject_id" ,subjectId); } if (!StringUtils.isEmpty(viewCountSort)){ wrapper.orderByDesc("view_count" ); } if (!StringUtils.isEmpty(createSort)){ wrapper.orderByDesc("gmt_create" ); } if (!StringUtils.isEmpty(priceSort)){ wrapper.orderByDesc("price" ); } Page<EduCourse> page = new Page <>(pageNum, pageSize); this .baseMapper.selectPage(page,wrapper); HashMap<String, Object> map = new HashMap <>(); List<EduCourse> lists = page.getRecords(); long current = page.getCurrent(); long pages = page.getPages(); long size = page.getSize(); long total = page.getTotal(); boolean hasNext = page.hasNext(); boolean hasPrevious = page.hasPrevious(); map.put("lists" ,lists); map.put("current" ,current); map.put("pages" ,pages); map.put("size" ,size); map.put("total" ,total); map.put("hasNext" ,hasNext); map.put("hasPrevious" ,hasPrevious); return map; }
①持久层
编写sql语句
1 2 3 4 5 6 7 8 9 10 11 12 13 SELECT * FROM edu_course WHERE id = 1189389726308478977; SELECT c.`id`,c.title,c.`cover`,c.`price`,c.`teacher_id`,c.`buy_count`, c.`lesson_num`,c.`view_count`,t.`name`,t.`career`, t.`avatar`,d.`description`,v.`is_free` FROM edu_course c LEFT JOIN edu_teacher t ON c.`teacher_id` = t.`id` LEFT JOIN edu_course_description d ON c.`id` = d.`id` LEFT JOIN edu_video v ON c.`id` = v.`id` WHERE c.id = #{id};
定义映射文件内容
1 2 3 4 5 6 7 8 9 10 11 12 13 14 15 16 17 18 19 20 21 22 23 24 25 26 27 28 <resultMap id ="queryVOFrontCourseDetails" type ="top.year21.onlineedu.serviceedu.vo.VOFrontCourseDetails" > <id column ="id" property ="id" /> <result column ="title" property ="title" /> <result column ="cover" property ="cover" /> <result column ="price" property ="price" /> <result column ="teacher_id" property ="teacherId" /> <result column ="buy_count" property ="buyCount" /> <result column ="lesson_num" property ="lessonNum" /> <result column ="view_count" property ="viewCount" /> <result column ="name" property ="name" /> <result column ="career" property ="career" /> <result column ="avatar" property ="avatar" /> <result column ="description" property ="description" /> </resultMap > <select id ="queryCourseDetails" resultMap ="queryVOFrontCourseDetails" > SELECT c.`id`,c.title,c.`cover`,c.`price`,c.`teacher_id`,c.`buy_count`, c.`lesson_num`,c.`view_count`,t.`name`,t.`career`, t.`avatar`,d.`description` FROM edu_course c LEFT JOIN edu_teacher t ON c.`teacher_id` = t.`id` LEFT JOIN edu_course_description d ON c.`id` = d.`id` WHERE c.id = #{courseId}; </select >
②持久层、业务层、控制层分别调用
1 2 3 4 5 6 7 8 9 10 11 12 13 14 15 16 17 18 19 20 21 22 23 24 25 VOFrontCourseDetails queryCourseDetails (@Param("courseId") String courseId) ; @Override public VOFrontCourseDetails queryCourseDetailsById (String courseId) { return this .baseMapper.queryCourseDetails(courseId); } @GetMapping("/details/{courseId}") public JsonResult<Map<String,Object>> queryCourseDetailsById (@PathVariable("courseId") String courseId) { VOFrontCourseDetails courseDetails = courseService.queryCourseDetailsById(courseId); List<CourseChapter> courseChapterList = chapterService.getChapterListByCid(courseId); HashMap<String, Object> details = new HashMap <>(); details.put("courseDetails" ,courseDetails); details.put("courseChapterList" ,courseChapterList); return new JsonResult <>(true ,"查询成功" ,details); }
课程视频播放
前端页面
1 2 3 4 5 <a :href ="'/video/' + video.videoSourceId" title target ="_blank" > <span class ="fr" > <i class ="free-icon vam mr10" > 免费试听</i > </span >
①在api下的文件夹创建vod.js,编写被调用的方法
1 2 3 4 5 6 7 8 9 10 import request from '@/utils/request' export default { getVideoAuth (videoId ){ return request ({ url : `/servicevod/videovoucher/${videoId} ` , method :'get' }) }, }
②在对应的页面调用
1 2 3 4 5 6 7 8 9 10 11 12 13 14 15 16 17 18 19 20 21 22 23 24 25 26 27 28 29 30 31 32 33 34 35 36 37 38 39 40 41 42 <script> import vod from '@/api/vod' export default {name :'videoId' ,data ( return { videoId : '' , videoAuth :'' , } }, created ( this .videoId = this .$route .params .id this .getVideoAuth () }, methods : { getVideoAuth ( vod.getVideoAuth (this .videoId ) .then (response => this .videoAuth = response.data .data this .createVideoPlay () }) }, createVideoPlay ( new Aliplayer ({ id : 'J_prismPlayer' , vid : this .videoId , playauth : this .videoAuth , encryptType : '1' , width : '100%' , height : '500px' , autoplay : false , }, function (player ) { console .log ('播放器创建成功' ) }) } }, } </script>
后端接口
1 2 3 4 5 6 7 8 9 10 11 12 13 14 15 16 17 18 19 20 21 22 @GetMapping("/videovoucher/{videoSourceId}") public JsonResult<String> getVideoVoucherById (@PathVariable("videoSourceId") String videoSourceId) { try { DefaultAcsClient defaultAcsClient = VodInitClass.initVodClient(UploadConfigClass.ACCESS_KEY_ID, UploadConfigClass.ACCESS_KEY_SECRET); GetVideoPlayAuthResponse response = new GetVideoPlayAuthResponse (); GetVideoPlayAuthRequest request = new GetVideoPlayAuthRequest (); request.setVideoId(videoSourceId); response = defaultAcsClient.getAcsResponse(request); String videoAuth = response.getPlayAuth(); return new JsonResult <>(true ,"查询成功" ,videoAuth); } catch (Exception e) { return new JsonResult <>(false ,"获取视频凭证失败,错误信息是:" ,e.getMessage()); } }
课程评论 前台页面 ①在api文件下创建comment.js文件创建被调用的方法
1 2 3 4 5 6 7 8 9 10 11 12 13 14 15 16 17 18 19 20 21 22 import request from '@/utils/request' export default { createComment (content,courseId,rate ){ return request ({ url :`/servicecomment/create/${courseId} /${content} /${rate} ` , method :'get' }) }, showCommnet (pageNum,pageSize,courseId,teacherId ){ return request ({ url :`/servicecommnet/show/${pageNum} /${pageSize} /${courseId} /${teacherId} ` , method :'get' }) }, reportComment (commentId ){ return request ({ url :`/servicecommnet/report/${commentId} ` , method :'post' }) } }
②在对应的页面进行调用
后端接口 ①创建edu_comment数据表
②在service模块下创建子模块service_comment
③修改pom文件
④编写yml配置文件
⑤主启动类
⑥业务类
通过代码生成器快速生成实体类、控制层等
需要远程调用edu和userCenter模块(直接cv订单order模块的接口即可)
1 2 3 4 5 6 7 8 9 10 11 12 13 14 15 16 17 18 19 20 21 22 23 24 25 26 27 28 29 30 31 32 33 34 35 36 37 38 39 40 41 42 43 44 45 46 47 48 49 50 51 52 53 54 55 56 57 58 59 60 61 62 63 64 65 66 67 68 69 70 71 72 73 74 75 76 77 78 79 80 81 82 83 @PostMapping("/create/{courseId}") public JsonResult<Void> createComment (@RequestBody String content, @PathVariable("courseId") String courseId, HttpServletRequest request) { commentService.createCommnet(content,courseId,request); return new JsonResult <>(true ); } @GetMapping("/show/{pageNum}/{pageSize}/{courseId}/{teacherId}") public JsonResult<Map<String, Object>> showComment (@PathVariable("pageNum") Integer pageNum, @PathVariable("pageSize") Integer pageSize, @PathVariable("courseId") String courseId, @PathVariable("teacherId") String teacherId) { Map<String, Object> comments = commentService.showComment(pageNum,pageSize,courseId,teacherId); return new JsonResult <>(true ,"查询成功" ,comments); } @Service public class CommentServiceImpl extends ServiceImpl <CommentMapper, Comment> implements ICommentService { @Resource private OpenFeignTransferEdu transferEdu; @Resource private OpenFeignTransferUserCenter transferUserCenter; @Override public void createCommnet (String content,String courseId,Integer rate,HttpServletRequest request) { VOCourseDetails courseDetails = transferEdu.orderCourseDetailsById(courseId); String userId = JwtUtils.getMemberIdByJwtToken(request); VOUserCenter userInfo = transferUserCenter.getUserInfoById(userId); Comment comment = new Comment (); comment.setCourseId(courseId); comment.setTeacherId(courseDetails.getTeacherId()); comment.setMemberId(userId); comment.setNickname(userInfo.getNickname()); comment.setAvatar(userInfo.getAvatar()); comment.setContent(content); comment.setRate(rate); int result = this .baseMapper.insert(comment); if (result == 0 ){ throw new InsertException (30001 ,"创建评论数据失败!" ); } } @Override public Map<String, Object> showComment (Integer pageNum, Integer pageSize, String courseId, String teacherId) { Page<Comment> page = new Page <>(pageNum, pageSize); QueryWrapper<Comment> wrapper = new QueryWrapper <>(); wrapper.eq("course_id" ,courseId).eq("teacher_id" ,teacherId); this .baseMapper.selectPage(page,wrapper); HashMap<String, Object> map = new HashMap <>(); List<Comment> lists = page.getRecords(); long current = page.getCurrent(); long pages = page.getPages(); long size = page.getSize(); long total = page.getTotal(); boolean hasNext = page.hasNext(); boolean hasPrevious = page.hasPrevious(); map.put("lists" ,lists); map.put("current" ,current); map.put("pages" ,pages); map.put("size" ,size); map.put("total" ,total); map.put("hasNext" ,hasNext); map.put("hasPrevious" ,hasPrevious); return map; } }
课程支付
前端页面 ①在api文件夹下创建order.js文件定义被调用的方法
1 2 3 4 5 6 7 8 9 10 11 12 13 14 15 16 17 18 19 20 21 22 23 24 25 26 27 28 29 30 31 32 import request from '@/utils/request' export default { createOrder (courseId ){ return request ({ url :`/serviceorder/order/createOrder/${courseId} ` , method :'post' }) }, queryOrder (orderNo ){ return request ({ url :`/serviceorder/order/query/${orderNo} ` , method :'get' }) }, createOrderCode (orderNo ){ return request ({ url :`/serviceorder/paylog/createCode/${orderNo} ` , method :'get' }) }, queryOrderPayStatus (orderNo ){ return request ({ url :`/serviceorder/paylog/queryStatus/${orderNo} ` , method :'get' }) }, }
②在对应页面进行调用
③需要修改前端课程显示页面一些内容,动态判断立即观看或立即购买
1 2 3 4 5 6 7 8 9 10 11 12 13 14 15 16 17 18 19 20 21 22 23 24 25 26 27 28 29 30 31 32 33 34 35 36 37 38 39 40 41 42 43 44 45 46 47 48 49 50 51 data ( return { isFree : true , isBuy : false , } }, created ( this .courseId = this .$route .params .id this .getCourseDetailsById () }, methods : { getCourseDetailsById ( course.getCourseDetailsById (this .courseId ) .then (response => this .courseDetails = response.data .data .courseDetails this .courseChapterList = response.data .data .courseChapterList this .judgeCourseIfNeedBuy () }) }, judgeCourseIfNeedBuy ( let user = cookie.get ('userInfo' ) if (user){ this .judgeCourseIsBuyOrNot () }else { if (this .courseDetails .price !== 0 ){ this .isFree = false this .isBuy = true } } }, judgeCourseIsBuyOrNot ( course.judgeCourseIsBuyOrNot (this .courseId ) .then (response => if (!response.data .data ){ this .isFree = false this .isBuy = true } }) } },
后端接口 生成订单 ①创建数据表
②在service模块下创建子模块service_order
③改pom文件
④编写yml配置文件
1 2 3 4 5 6 7 8 9 10 11 12 13 14 15 16 17 18 19 20 21 22 23 24 25 26 27 28 29 30 31 32 33 34 35 36 37 38 39 40 41 42 43 44 45 46 47 server: port: 8007 spring: application: name: server-order profiles: active: dev datasource: driver-class-name: com.mysql.cj.jdbc.Driver url: jdbc:mysql://localhost:3306/online_edu?characterEncoding=utf8&useSSL=false&serverTimezone=UTC&rewriteBatchedStatements=true username: root password: root jackson: date-format: yyyy-MM-dd HH:mm:ss time-zone: GMT+8 cloud: nacos: discovery: server-addr: localhost:8848 management: endpoints: web: exposure: include: "*" health: redis: enabled: false ribbon: ReadTimeout: 5000 ConnectTimeout: 5000 mybatis-plus: mapper-locations: classpath:mybatis/mapper/*.xml configuration: log-impl: org.apache.ibatis.logging.slf4j.Slf4jImpl
⑤主启动类
⑥业务类
1 2 3 4 5 6 7 8 9 10 11 12 13 14 15 16 17 18 19 20 21 22 23 24 25 26 27 28 29 30 31 32 33 34 35 36 @Data public class VOCourseDetails { private String id; private String title; private String cover; private BigDecimal price; private String teacherId; private String buyCount; private String lessonNum; private String viewCount; private String name; private String career; private String avatar; private String description; } @Data public class VOUserCenter { private String id; private String openid; private String mobile; private String salt; private String password; private String nickname; private Integer sex; private Integer age; private String avatar; private String sign; private Boolean isDisabled; private Boolean isDeleted; private Date gmtCreate; private Date gmtModified; }
在edu和userCenter模块中重新编写两个接口用于消费者调用
1 2 3 4 5 6 7 8 9 10 11 12 13 14 15 16 17 18 19 20 21 22 23 24 25 @GetMapping("/orderDetails/{courseId}") public VOCourseDetails orderCourseDetailsById (@PathVariable("courseId") String courseId) { VOFrontCourseDetails queryDetails = courseService.queryCourseDetailsById(courseId); VOCourseDetails courseDetails = new VOCourseDetails (); BeanUtils.copyProperties(queryDetails,courseDetails); return courseDetails; } @GetMapping("/userInfo/{userId}") public VOUserCenter getUserInfoById (@PathVariable("userId") String userId) { UserCenter queryUser = userCenterService.getById(userId); VOUserCenter voUser = new VOUserCenter (); BeanUtils.copyProperties(queryUser,voUser); return voUser; }
order模块控制层接收参数、业务层定义两个接口远程调用其他模块以及实现具体业务逻辑
1 2 3 4 5 6 7 8 9 10 11 12 13 14 15 16 17 18 19 20 21 22 23 24 25 26 27 28 29 30 31 32 33 34 35 36 37 38 39 40 41 42 43 44 45 46 47 48 49 50 51 52 53 54 55 56 57 58 59 60 61 62 63 64 65 66 67 68 69 70 71 72 73 74 75 76 77 78 79 80 81 82 83 84 85 86 87 88 89 90 91 @RestController @RequestMapping("/serviceorder/order") @CrossOrigin(origins = "*",maxAge = 3600) public class OrderController { @Autowired private IOrderService orderService; @PostMapping("/createOrder/{courseId}") public JsonResult<String> createOrderByCourseId (@PathVariable("courseId") String courseId, HttpServletRequest request) { String userId = JwtUtils.getMemberIdByJwtToken(request); String orderId = orderService.createOrder(courseId,userId); return new JsonResult <>(true ,"订单创建成功" ,orderId); } @GetMapping("/query/{orderNo}") public JsonResult<Order> queryOrderDetailsById (@PathVariable("orderNo") String orderNo) { QueryWrapper<Order> wrapper = new QueryWrapper <>(); wrapper.eq("order_no" ,orderNo); Order order = orderService.getOne(wrapper); return new JsonResult <>(true ,"查询成功" ,order); } } @Component @FeignClient("service-edu") public interface OpenFeignTransferEdu { @GetMapping("/serviceedu/frontCourse/orderDetails/{courseId}") public VOCourseDetails orderCourseDetailsById (@PathVariable("courseId") String courseId) ; } @Component @FeignClient("user-center") public interface OpenFeignTransferUserCenter { @GetMapping("/serviceusercenter/userInfo/{userId}") public VOUserCenter getUserInfoById (@PathVariable("userId") String userId) ; } @Service public class OrderServiceImpl extends ServiceImpl <OrderMapper, Order> implements IOrderService { @Resource private OpenFeignTransferEdu transferEdu; @Resource private OpenFeignTransferUserCenter transferUserCenter; @Override public String createOrder (String courseId, String userId) { VOCourseDetails courseDetails = transferEdu.orderCourseDetailsById(courseId); VOUserCenter userInfo = transferUserCenter.getUserInfoById(userId); String orderNo = UUID.randomUUID().toString(); String courseTitle = courseDetails.getTitle(); String courseCover = courseDetails.getCover(); String teacherName = courseDetails.getName(); String nickname = userInfo.getNickname(); String mobile = userInfo.getMobile(); BigDecimal totalFee = courseDetails.getPrice(); Order order = new Order (); order.setOrderNo(orderNo); order.setCourseId(courseId); order.setCourseTitle(courseTitle); order.setCourseCover(courseCover); order.setTeacherName(teacherName); order.setMemberId(userId); order.setNickname(nickname); order.setMobile(mobile); order.setTotalFee(totalFee); int result = this .baseMapper.insert(order); if (result == 0 ){ throw new InsertException (30001 ,"订单创建失败" ); } return order.getOrderNo(); } }
微信二维码
1 2 3 4 5 6 7 8 9 10 11 12 <dependencies > <dependency > <groupId > com.github.wxpay</groupId > <artifactId > wxpay-sdk</artifactId > <version > 0.0.3</version > </dependency > <dependency > <groupId > com.alibaba</groupId > <artifactId > fastjson</artifactId > </dependency > </dependencies >
1 2 3 4 5 6 7 8 9 10 11 12 13 14 15 16 17 18 19 20 21 22 23 24 25 26 27 28 29 30 31 32 33 34 35 36 37 38 39 40 41 42 43 44 45 46 47 48 49 50 51 52 53 54 55 @GetMapping("/createCode/{orderNo}") public JsonResult<Map<String,Object>> createCode (@PathVariable("orderNo") String orderNo) { Map<String,Object> info = payLogService.createCode(orderNo); return new JsonResult <>(true ,"创建成功" ,info); } @Override public Map<String, Object> createCode (String orderNo) { try { QueryWrapper<Order> wrapper = new QueryWrapper <>(); wrapper.eq("order_no" ,orderNo); Order order = orderService.getOne(wrapper); Map<String,String> map = new HashMap <>(); map.put("appid" , "wx74862e0dfcf69954" ); map.put("mch_id" , "1558950191" ); map.put("nonce_str" , WXPayUtil.generateNonceStr()); map.put("body" , order.getCourseTitle()); map.put("out_trade_no" , orderNo); map.put("total_fee" , order.getTotalFee().multiply(new BigDecimal ("100" )).longValue()+"" ); map.put("spbill_create_ip" , "127.0.0.1" ); map.put("notify_url" , "http://guli.shop/api/order/weixinPay/weixinNotify" ); map.put("trade_type" , "NATIVE" ); HttpClient client = new HttpClient ("https://api.mch.weixin.qq.com/pay/unifiedorder" ); client.setXmlParam(WXPayUtil.generateSignedXml(map,"T6m9iK73b0kn9g5v426MKfHQH7X8rKwb" )); client.setHttps(true ); client.post(); String contentXml = client.getContent(); Map<String,String> resultMap = WXPayUtil.xmlToMap(contentXml); Map<String,Object> endMap = new HashMap <>(); endMap.put("out_trade_no" , orderNo); endMap.put("course_id" , order.getCourseId()); endMap.put("total_fee" , order.getTotalFee()); endMap.put("result_code" , resultMap.get("result_code" )); endMap.put("code_url" , resultMap.get("code_url" )); return endMap; }catch (Exception e){ throw new CommonException (30001 ,"生成二维码失败,错误信息是:" + e.getMessage()); } }
支付状态 1 2 3 4 5 6 7 8 9 10 11 12 13 14 15 16 17 18 19 20 21 22 23 24 25 26 27 28 29 30 31 32 33 34 35 36 37 38 39 40 41 42 43 44 45 46 47 48 49 50 51 52 53 54 55 56 57 58 59 60 61 62 63 64 65 66 67 68 69 70 71 72 73 74 @GetMapping("/queryStatus/{orderNo}") public JsonResult<Void> queryOrderStatus (@PathVariable("orderNo") String orderNo) { Map<String,String> map = payLogService.queryOrderStatus(orderNo); log.info("*****查询订单状态map:" + map); if (map == null ) { throw new CommonException (30001 , "支付失败" ); } if ("SUCCESS" .equals(map.get("trade_state" ))){ payLogService.insertDateAndUpdateStatus(map); return new JsonResult <>(true ); } return new JsonResult <>(false ); } @Override public Map<String, String> queryOrderStatus (String orderNo) { try { Map m = new HashMap <>(); m.put("appid" , "wx74862e0dfcf69954" ); m.put("mch_id" , "1558950191" ); m.put("out_trade_no" , orderNo); m.put("nonce_str" , WXPayUtil.generateNonceStr()); HttpClient client = new HttpClient ("https://api.mch.weixin.qq.com/pay/orderquery" ); client.setXmlParam(WXPayUtil.generateSignedXml(m, "T6m9iK73b0kn9g5v426MKfHQH7X8rKwb" )); client.setHttps(true ); client.post(); String xml = client.getContent(); Map<String, String> resultMap = WXPayUtil.xmlToMap(xml); return resultMap; } catch (Exception e) { e.printStackTrace(); } return null ; } @Override public void insertDateAndUpdateStatus (Map<String, String> map) { String orderNo = map.get("out_trade_no" ); QueryWrapper<Order> wrapper = new QueryWrapper <>(); wrapper.eq("order_no" ,orderNo); Order order = orderService.getOne(wrapper); if (order.getStatus() == 1 ) return ; order.setStatus(1 ); orderService.updateById(order); PayLog payLog=new PayLog (); payLog.setOrderNo(order.getOrderNo()); payLog.setPayTime(new Date ()); payLog.setPayType(1 ); payLog.setTotalFee(order.getTotalFee()); payLog.setTradeState(map.get("trade_state" )); payLog.setTransactionId(map.get("transaction_id" )); payLog.setAttr(JSONObject.toJSONString(map)); baseMapper.insert(payLog); }
动态显示观看/购买 1 2 3 4 5 6 7 8 9 10 11 12 13 14 15 16 17 18 19 20 21 @GetMapping("/judgeIsBuyOrNot/{courseId}") public JsonResult<Boolean> judgeIsBuyCourseOrNot (@PathVariable("courseId") String courseId, HttpServletRequest request) { String userId = JwtUtils.getMemberIdByJwtToken(request); Boolean result = orderService.judgeIsBuyCourseOrNot(courseId,userId); return new JsonResult <>(true ,"查询成功" ,result); } @Override public Boolean judgeIsBuyCourseOrNot (String courseId, String userId) { QueryWrapper<Order> wrapper = new QueryWrapper <>(); wrapper.eq("course_id" ,courseId) .eq("member_id" ,userId) .eq("status" ,1 ); Long result = this .baseMapper.selectCount(wrapper); return result != 0 ; }
整合Spring Cloud
微服务是一种架构风格,把一个项目拆分成独立的多个服务,多个服务是单独运行,每个服务占用独立的进程
nacos
①将依赖导入到服务消费者或服务提供者的父类pom中,以便复用
1 2 3 4 5 6 7 8 9 10 11 12 13 14 <dependency > <groupId > com.alibaba.cloud</groupId > <artifactId > spring-cloud-starter-alibaba-nacos-discovery</artifactId > </dependency > <dependency > <groupId > org.springframework.boot</groupId > <artifactId > spring-boot-starter-web</artifactId > </dependency > <dependency > <groupId > org.springframework.boot</groupId > <artifactId > spring-boot-starter-actuator</artifactId > </dependency >
②在yml配置文件加入这些配置
1 2 3 4 5 6 7 8 9 10 11 12 13 14 15 16 17 18 19 spring: application: name: service-edu cloud: nacos: discovery: server-addr: localhost:8848 management: endpoints: web: exposure: include: "*" health: redis: enabled: false
③在启动类上添加@EnableDiscoveryClient注解
openFeign ①将依赖导入到服务消费者8001的pom中,以便复用
1 2 3 4 5 <dependency > <groupId > org.springframework.cloud</groupId > <artifactId > spring-cloud-starter-openfeign</artifactId > </dependency >
②在yml配置文件加入这些配置
1 2 3 4 5 6 ribbon: ReadTimeout: 5000 ConnectTimeout: 5000
③在服务消费者的启动类上添加@EnableFeignClients注解表示开启feign
④在业务层中创建一个接口并添加@FeignClient和@Component注解
1 2 3 4 5 6 7 8 @Component @FeignClient("aliyun-video-upload") public interface OpenFeignDelVideo { @PostMapping("/servicevod/videoDel/{videoSourceId}") public JsonResult<Void> delVideoInAliyun (@PathVariable("videoSourceId") String videoSourceId) ; }
hystrix ①将依赖导入到服务消费者8001的pom中,以便复用
1 2 3 4 5 <dependency > <groupId > org.springframework.cloud</groupId > <artifactId > spring-cloud-starter-netflix-hystrix</artifactId > </dependency >
②在yml配置文件加入这些配置
1 2 3 4 5 6 7 8 9 10 11 12 13 feign: hystrix: enabled: true hystrix: command: default: execution: isolation: thread: timeoutInMilliseconds: 6000
③在服务消费者的启动类上添加@EnableHystrix注解注解表示开启熔断机制
④在业务层中创建一个类并实现feign定义的远程调用接口编写fallback方法
1 2 3 4 5 6 7 8 9 @Slf4j @Component public class OpenFeignDelVideoFallback implements OpenFeignDelVideo { @Override public JsonResult<Void> delVideoInAliyun (String videoSourceId) { log.info("删除阿里云的视频失败,删除失败的视频id是:" + videoSourceId); return new JsonResult <>(false ); } }
⑤在feign定义的远程调用接口上指明降级处理类
1 2 3 4 @Component @FeignClient(value = "aliyun-video-upload",fallback = OpenFeignDelVideoFallback.class) public interface OpenFeignDelVideo {}
执行流程
(1)接口化请求调用
当调用标注@FeignClient注解接口时,框架将请求转换成Feign请求实例feign.Request,交由Feign框架处理
(2)Feign
转化请求Feign是一个http请求调用的轻量级框架,以Java接口注解的方式调用Http请求,封装了Http调用流程。
(3)Hystrix
熔断处理机制 Feign的调用关系,会被Hystrix代理拦截,对每一个Feign调用请求,Hystrix都会将其包装
成HystrixCommand,参与Hystrix的流控和熔断规则。如果请求判断需要熔断,则Hystrix直接熔断,抛出
异常或者使用FallbackFactory返回熔断Fallback结果;如果通过,则将调用请求传递给Ribbon组件。
(4)Ribbon
服务地址选择 当请求传递到Ribbon之后,Ribbon会根据自身维护的服务列表,根据服务的服务质量,
如平均响应时间,Load等,结合特定的规则,从列表中挑选合适的服务实例,选择好机器之后,
然后将机器实例的信息请求传递给Http Client客户端,HttpClient客户端来执行真正的Http接口调用;
(5)HttpClient (Http客户端)
真正执行Http调用根据上层Ribbon传递过来的请求,已经指定了服务地址,HttpClient开始执行真正的Http请求
Gateway ①在online_edu模块下创建子模块online_edu_gateway
②引入所需依赖
1 2 3 4 5 6 7 8 9 10 11 12 13 14 15 16 17 18 19 20 21 22 23 24 25 26 27 28 29 <dependencies > <dependency > <groupId > top.year21.onlineedu</groupId > <artifactId > common_utils</artifactId > <version > 1.0-SNAPSHOT</version > </dependency > <dependency > <groupId > com.alibaba.cloud</groupId > <artifactId > spring-cloud-starter-alibaba-nacos-discovery</artifactId > </dependency > <dependency > <groupId > org.springframework.cloud</groupId > <artifactId > spring-cloud-starter-gateway</artifactId > </dependency > <dependency > <groupId > com.google.code.gson</groupId > <artifactId > gson</artifactId > </dependency > <dependency > <groupId > org.springframework.cloud</groupId > <artifactId > spring-cloud-starter-openfeign</artifactId > </dependency > </dependencies >
③编写yml配置文件
1 2 3 4 5 6 7 8 9 10 11 12 13 14 15 16 17 18 19 server: port: 8010 spring: application: name: online-edu-gateway cloud: nacos: discovery: server-addr: localhost:8848 gateway: discovery: locator: enabled: true routes: - id: service-edu uri: lb://service-edu predicates: - Path=/serviceedu/**
④编写主启动类
1 2 3 4 5 6 7 @SpringBootApplication @EnableDiscoveryClient public class Gateway8010 { public static void main (String[] args) { SpringApplication.run(Gateway8010.class,args); } }
1 2 3 4 5 6 7 8 9 10 11 12 13 14 15 @Configuration public class CrossOriginConfig { @Bean public CorsWebFilter corsFilter () { CorsConfiguration config = new CorsConfiguration (); config.addAllowedMethod("*" ); config.addAllowedOrigin("*" ); config.addAllowedHeader("*" ); UrlBasedCorsConfigurationSource source = new UrlBasedCorsConfigurationSource (new PathPatternParser ()); source.registerCorsConfiguration("/**" , config); return new CorsWebFilter (source); } }
bug总结 1.前端返回的时间数据带T,按照格林威治时间显示,需要修改为按照东八区时间显示
①在实体类中的时间属性上添加注解,这种方法缺点就是需要手动,数据量大就很不方便
1 2 3 4 5 6 7 @JsonFormat(timezone = "GMT+8",pattern="yyyy-MM-dd HH:mm:ss") @ApiModelProperty("创建时间") private LocalDateTime gmtCreate;@JsonFormat(timezone = "GMT+8",pattern="yyyy-MM-dd HH:mm:ss") @ApiModelProperty("更新时间")
②在yml配置文件中设置jackson时间格式
1 2 3 4 5 spring: jackson: date-format: yyyy-MM-dd HH:mm:ss time-zone: GMT+8
2.有可能因为npm或者node的版本过高导致大量error出现,无法根据package.json安装依赖
参考网友的方法即可解决:
方案一:降低npm或者node的版本
方案二:(npm或者node的高版本)
①安装cnpm :npm install cnpm -g
②安装 node-sass: cnpm install node-sass
③继续安装 : cnpm i node-sass -D
④根据package.json安装依赖:cnpm install
⑤启动项目:npm run dev
⑥当控制台出现 Your application is running here: http://localhost:9528 表示启动成功
3.前端页面访问后端容易产生跨域问题,这里记录一下解决方法
①在后端接口上田间@CrossOrigin注解即可
②使用GateWay解决
3.在讲师管理界面点击修改后,当数据成功回显到页面中,再点击添加讲师,发现表单数据没有清空
尝试在created()方法判断当id值为空时,清空表单数据,但没有发挥作用,为什么?
因为在多次路由跳转到同一个页面,在页面中created()方法只会执行第一次,之后的跳转不再执行
1 2 3 4 watch :{ $route(to,from ){ this .init () }
4.在课程信息回显页面,二级课程显示出了id值,而非这个课程的名字。
解决方法:在一级课程数组赋值后,将对应的id一级分类课程下的二级课程分类赋值给二级数组属性
1 2 3 4 5 6 7 8 9 10 11 12 13 14 getAllSubjects ( subject.getSubjectList () .then (resopnse => this .oneSubjects = resopnse.data if (this .$route .params && this .$route .params .id ){ this .courseId = this .$route .params .id this .queryCourseInfoById () } }) },
5.在查询显示最终课程信息的sql语句中需要多次对edu_subject表进行查询title
可以对同张表进行两次左外连接查询,只需要将表的别名设置不同即可
1 2 LEFT JOIN edu_subject s1 ON c.`subject_id` = s1.`id` LEFT JOIN edu_subject s2 ON c.`subject_id` = s2.`id`
6.使用阿里云进行视频上传时,明明端口和接口都正确的情况下依旧报跨域问题,
响应状态码为413,这个状态代表着请求实体太大 (Request entity too large)
①打开nginx配置文件 nginx.conf, 路径一般是:/etc/nginx/nginx.conf。
②在http{}段中加入 client_max_body_size 20m; 20m为允许最大上传的大小。
③保存后重启nginx,问题解决。
7.前端注册页面验证码点击后倒计时效果
使用js的定时器方法
1 2 3 4 5 6 7 8 9 10 11 12 13 14 timeDown ( let result = setInterval (() => { --this .second ; this .codeTest = this .second if (this .second < 1 ) { clearInterval (result); this .sending = true ; this .second = 60 ; this .codeTest = "获取验证码" } }, 1000 ); },
8.在vue框架中可以通过下列指令获取url地址上指定名称的参数值
this.$route.query.参数名
9.created函数内方法执行顺序并不是从上到下的,而是随机的,哪个请求快就先执行哪个
10.在layout中添加了自定义的布局vue,想要生效需要在对应的页面中引入使用
11.在进行远程调用时,发现返回的实体类在服务消费者中不存在,返回的实体类只在服务提供者中存在,
不能在这个模块中生成此实体,以避免造成依赖。
解决方法是:在双方公用的模块中生成和返回实体一致的vo类,也可理解为将服务提供者中的实体类
copy到公共模块中,让服务消费者和服务提供者都使用这个vo类作为返回实体,因为在远程调用中无论
是服务消费者还是服务提供者都必须使用同一个对象作为返回实体才能保证数据的一致性
12.树形结构一般是通过拼凑一个对象封装查询数据得到
1 2 3 4 5 6 7 8 9 10 11 12 13 14 15 16 17 18 19 { id:'' , name:'' , children:[ { id:'' , name:'' , children:[] } ] } public class TreeNode { private String id; private String name; private Treenode[] children; }
13.权限管理整合后登录成功,侧边栏菜单不显示内容,但可以在地址栏上输入对应的路由路径
并能正确访问页面和显示数据。
原因:addRoutes()添加路由之后,this.$router.options.routes()(初始路由列表) 未更新
解决方法:在src下文件夹下的permission.js文件中的 和下方代码示例中的第二行代码后面
添加后两行代码
1 2 3 4 5 6 const accessRoutes = await store.dispatch ('permission/generateRoutes' , roles)let allRoute = constantRoutes.concat (accessRoutes)router.options .routes = allRoute;
14.经过权限管理的bug调试,终于知道为什么要在用户登录的时候去查看用户对应的权限值
并将其携带返回到前端保存在了store对象当中?
因为在前端工程中使用了v-if 调用注册的全局方法hasPerm,再将需要判断的权限值传入
hasPerim(”权限值“),而hasPerm又在main.js文件中被定义成了另外一个判断权限的方法
Vue.prototype.hasPerm = hasBtnPermission ,在这个hasBtnPermission会从store对象
中取出代表button访问权限的数组,经过遍历此数组和当前传入权限值的匹配程度决定了
某个页面上的按钮是否能被此用户所看到
15.前端请求参数有斜杠或反斜杠接口访问不到,前端将此参数base64编码后传递
1 2 let dbPath = window .btoa (path)
1 2 3 4 5 6 7 8 9 10 11 12 13 public static String decode (String code) { String str="" ; try { str=new String (Base64.decodeBase64(code),"utf-8" ); } catch (UnsupportedEncodingException e) { e.printStackTrace(); } return str; }

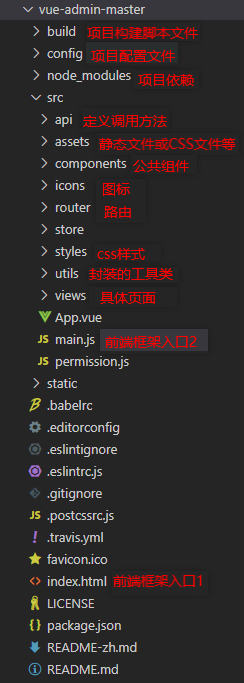
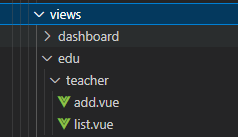

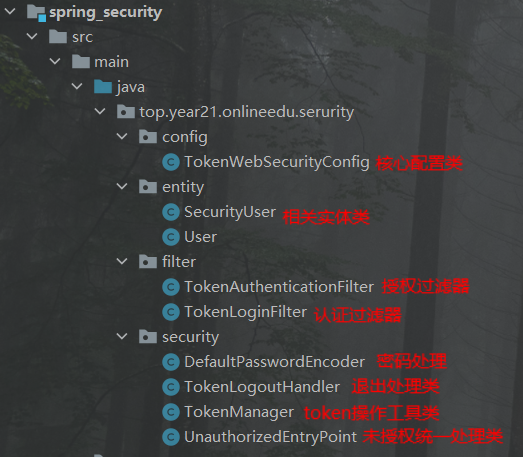
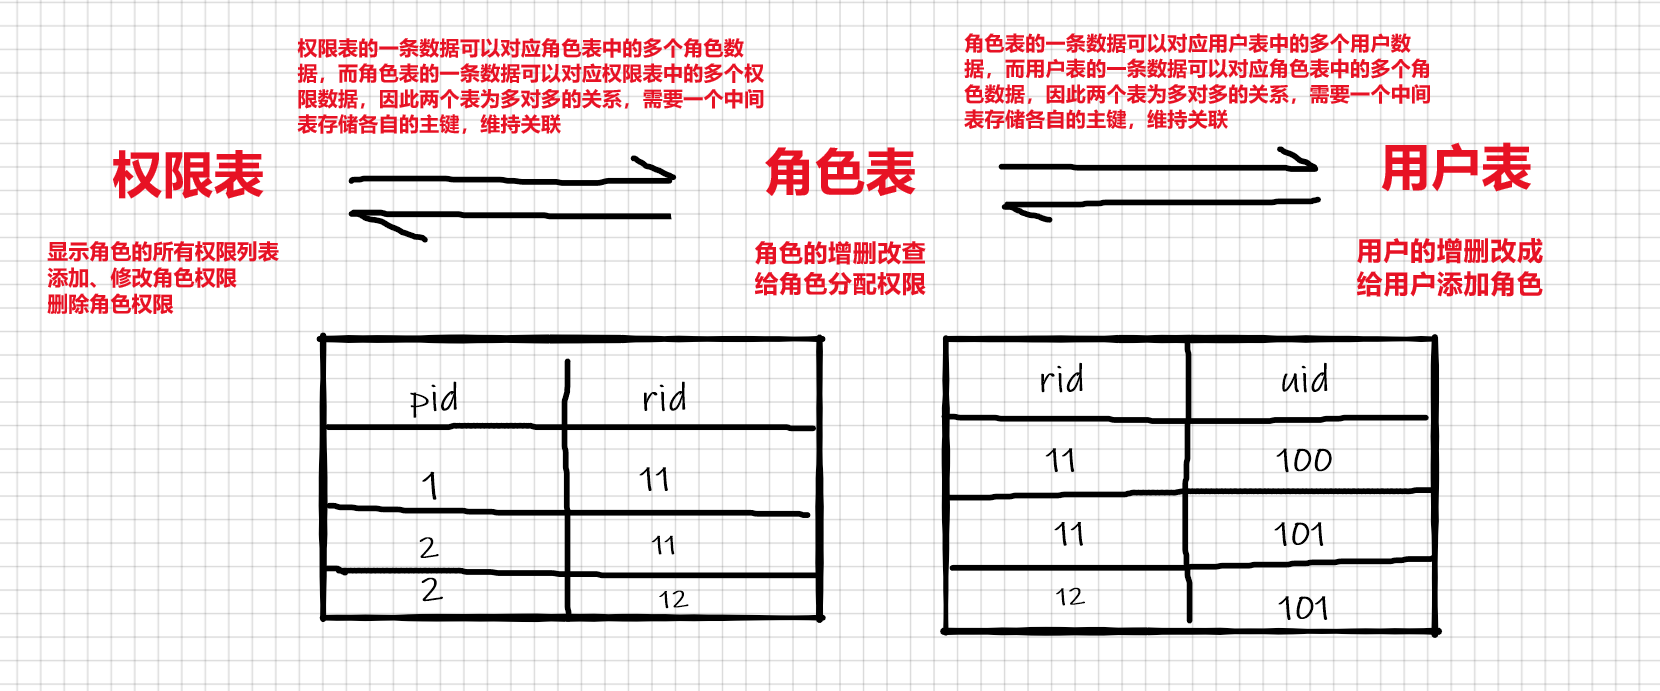
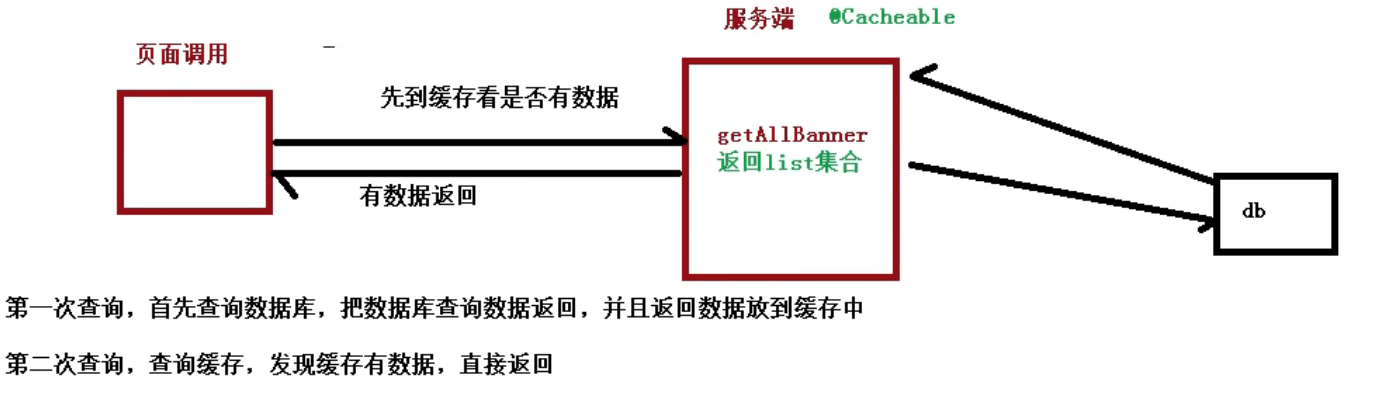
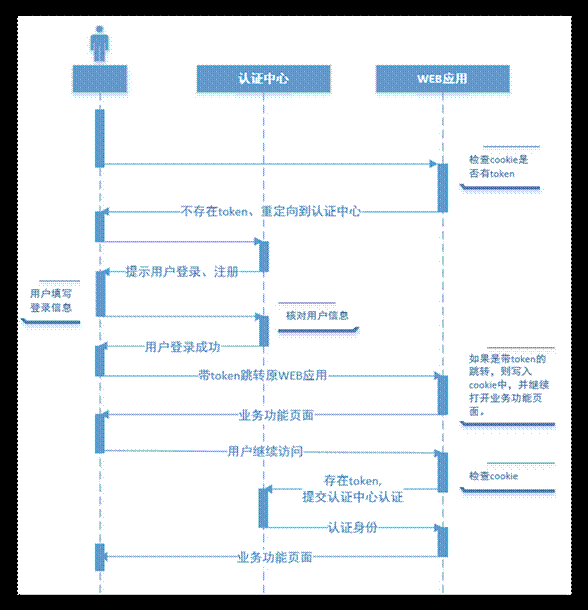
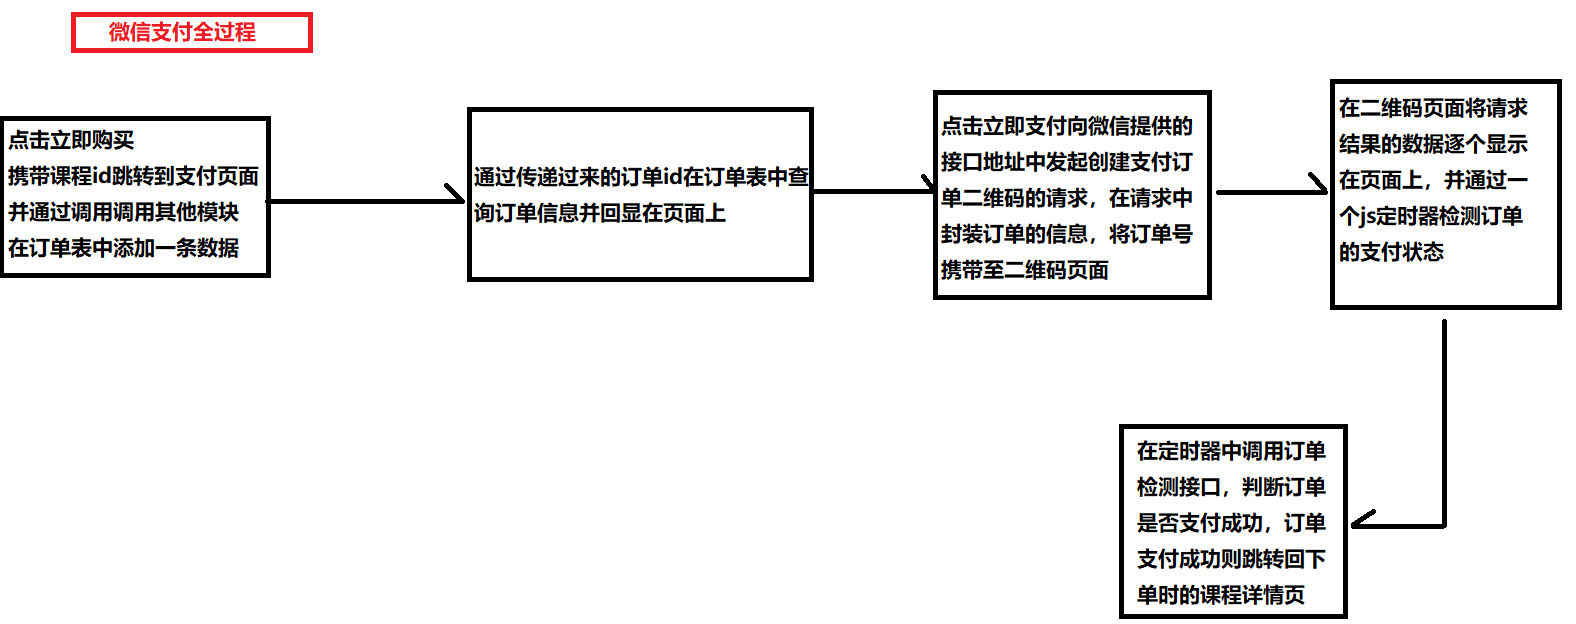
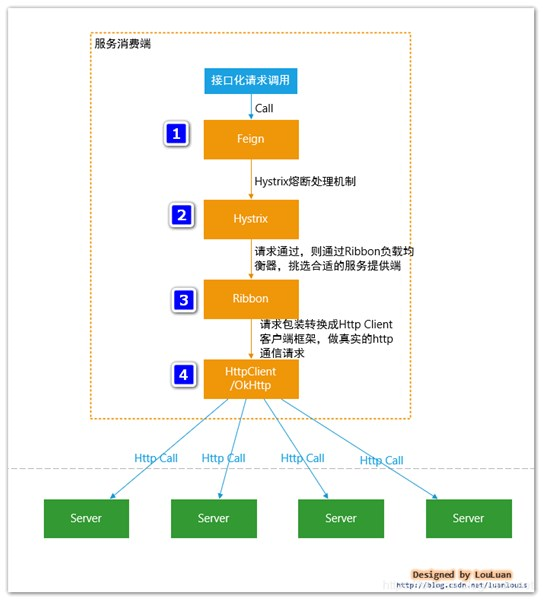
 wechat
 alipay