SpringBoot概述 SpringBoot程序创建 ①对Maven进行设定
1 2 3 4 5 6 7 8 9 10 11 12 13 14 15 16 17 18 19 <mirror > <id > nexus-aliyun</id > <mirrorOf > central</mirrorOf > <name > Nexus aliyun</name > <url > http://maven.aliyun.com/nexus/content/groups/public</url > </mirror > <profile > <id > jdk-1.8</id > <activation > <activeByDefault > true</activeByDefault > <jdk > 1.8</jdk > </activation > <properties > <maven.compiler.source > 1.8</maven.compiler.source > <maven.compiler.target > 1.8</maven.compiler.target > <maven.compiler.compilerVersion > 1.8</maven.compiler.compilerVersion > </properties > </profile >
②创建Maven工程,在pom文件中设置工程的父工程以及导入Springboot的依赖
1 2 3 4 5 6 7 8 9 10 11 12 <parent > <groupId > org.springframework.boot</groupId > <artifactId > spring-boot-starter-parent</artifactId > <version > 2.6.7</version > </parent > <dependencies > <dependency > <groupId > org.springframework.boot</groupId > <artifactId > spring-boot-starter-web</artifactId > </dependency > </dependencies >
③创建主程序类
1 2 3 4 5 6 7 @SpringBootApplication public class MainApplication { public static void main (String[] args) { SpringApplication.run(MainApplication.class,args); } }
④简化配置
⑤测试程序的运行是否成功:只需要启动主程序类的main方法即可
⑥简化部署步骤
插件在没有设置打包方式的情况下,自动打包为jar包
1 2 3 4 5 6 7 8 <build > <plugins > <plugin > <groupId > org.springframework.boot</groupId > <artifactId > spring-boot-maven-plugin</artifactId > </plugin > </plugins > </build >
SpringBoot特点 1.依赖管理
①父项目作为依赖管理,声明了所有开发中常用的依赖的版本号,自动版本仲裁机制,子项目继承父项目不需要填写依赖的版本号
②开发导入starter场景启动器,spring-boot-starter-* : *是某种场景
③可以修改默认的父项目的版本控制
2.自动配置
①自动配置tomcat(引入Tomcat依赖、配置Tomcat)
②自动配置SpringMVC
③自动配置Web常见功能
④默认的包结构
主程序所在包及其下面的所有子包里面的组件都会被默认扫描进来
无需配置之前的包扫描
改变扫描路径,@SpringBootApplication(scanBasePackages=”xxx.xxx”)或者@ComponentScan 指定扫描路径
⑤各种配置拥有默认值
⑥按需加载所有自动配置
注解 1.@Configuration
proxyBeanMethods:代理bean的方法
Full(proxyBeanMethods = true)、【保证每个@Bean方法被调用多少次返回的组件都是单实例的】
Lite(proxyBeanMethods = false)【每个@Bean方法被调用多少次返回的组件都是新创建的】
有组件依赖的情况必须使用Full模式默认。其他默认是否Lite模式
1 2 3 4 Pet tom = config.getBean("pet" ,Pet.class);System.out.println(config.getBean("person" ,Person.class).getPet() == tom);
2.@Import导入容器中的组件默认名字就是全类名
3.@Conditonal 条件装配,满足Condition指定的条件才会进行组件注入
@ConditionalOnBean表示当容器中存在某个bean对象才会执行什么操作
标注在类上则表示要满足才会导入类中的所有组件
标注在方法上则表示要满足才会导入方法内的所有组件
1 2 3 4 5 6 7 8 9 @ConditionalOnBean(name= {"pet"}) @Bean public Person person () { Person person = new Person ("test" , 20 ); person.setPet(pet()); return person; }
4.@ImportResource 导入Spring原生的配置文件
1 @ImportResource("classpath:bean.xml")
5.配置绑定 (使用Java读取到properties文件中的内容,并且把它封装到JavaBean中)
方式一:@ConfigurationProperties
1 2 3 4 5 6 @Component @ConfigurationProperties(value = "car") public class CarProperties {}
方式二:@EnableConfigurationProperties + @ConfigurationProperties(这个方式适用于导入第三方jar包)
@EnableConfigurationProperties 必须标注在配置类上
@ConfigurationProperties标注在进行配置绑定的类上
1 2 3 4 5 6 7 @EnableConfigurationProperties(CarProperties.class) public class TestConfig {}@ConfigurationProperties(value = "car") public class CarProperties {}
自动配置原理 @SpringBootConfiguration 代表这是一个配置类
@ComponentScan 扫描指定包路径下的组件
@EnableAutoConfiguration(重点
1
2
3
4
5
6
@SpringBootApplication @SpringBootConfiguration @EnableAutoConfiguration @ComponentScan(excludeFilters = { @Filter(type = FilterType.CUSTOM, classes = TypeExcludeFilter.class), @Filter(type = FilterType.CUSTOM, classes = AutoConfigurationExcludeFilter.class) })
关于@EnableAutoConfiguration注解的详解
1
2
3
@AutoConfigurationPackage @Import(AutoConfigurationImportSelector.class) public @interface EnableAutoConfiguration {}
@AutoConfigurationPackage注解
1 2 3 4 @Import(AutoConfigurationPackages.Registrar.class) public @interface AutoConfigurationPackage {}
@Import(AutoConfigurationImportSelector.class)注解
虽然在Spring-boot启动时会加载所有默认场景的自动配置类,但最终还是按照条件装配原则@Conditional注解(有些加载了但不生效)
1 2 3 4 5 6 7 8 9 10 11 12 13 14 15 16 17 18 19 20 getAutoConfigurationEntry(){ List<String> configurations = getCandidateConfigurations(annotationMetadata, attributes); Map<String, List<String>> loadSpringFactories (ClassLoader classLoader) { # Auto Configure org.springframework.boot.autoconfigure.EnableAutoConfiguration=\.... } }
按照条件装配的例子之一:
1 2 3 4 5 6 7 8 9 10 11 @Bean @ConditionalOnBean(MultipartResolver.class) @ConditionalOnMissingBean(name = DispatcherServlet.MULTIPART_RESOLVER_BEAN_NAME) public MultipartResolver multipartResolver (MultipartResolver resolver) { return resolver; }
SpringBoot自动配置总结:
①SpringBoot先加载所有的自动配置类(xxxAutoConfiguration)
②每个自动配置类按照条件装配原则来决定是否生效,默认都会绑定配置文件指定的值 xxxxProperties 和 配置文件进行了绑定
③生效的配置类就会给容器中注册很多的组件(只要容器中存在这些组件代表这些功能就能使用)
④SpringBoot底层会装配好所有的组件,但只要用户有将对应的组件重新配置,则优先使用用户配置的
@Bean替换底层的组件
看这个组件是获取的配置文件什么值就去修改。
总的流程就是:场景starter —> xxxxxAutoConfiguration —> 组件 —> xxxxProperties里面拿值 —-> application.properties
部分使用技巧:
①引入场景依赖,官方文档地址
②快速判断哪个组件是否生效:在application.properties配置文件中设置debug=true 生效的(Positive)\不生效的(Negative)
③修改某一项配置
开发小技巧 1.lombok(简化JavaBean开发)
①在pom文件中引入依赖
②在IDEA中安装lombok插件并重启
1
2
3
4
5
6
7
8
9
10
11
12
13
14
15
16
17
18
19
20
@Data @ToString @AllArgsConstructor @NoArgsConstructor @ConfigurationProperties(value = "car") public class CarProperties { private String carName; private int carAge; } @Slf4j @RestController public class TestController { @RequestMapping("/hello") public String TestHello () { log.info("请求已进入" ); return "test success" ; } }
2.dev-tools
Ctrl + F9项目重新编译达到自动重启的目的
1 2 3 4 5 6 <dependency > <groupId > org.springframework.boot</groupId > <artifactId > spring-boot-devtools</artifactId > <optional > true</optional > </dependency >
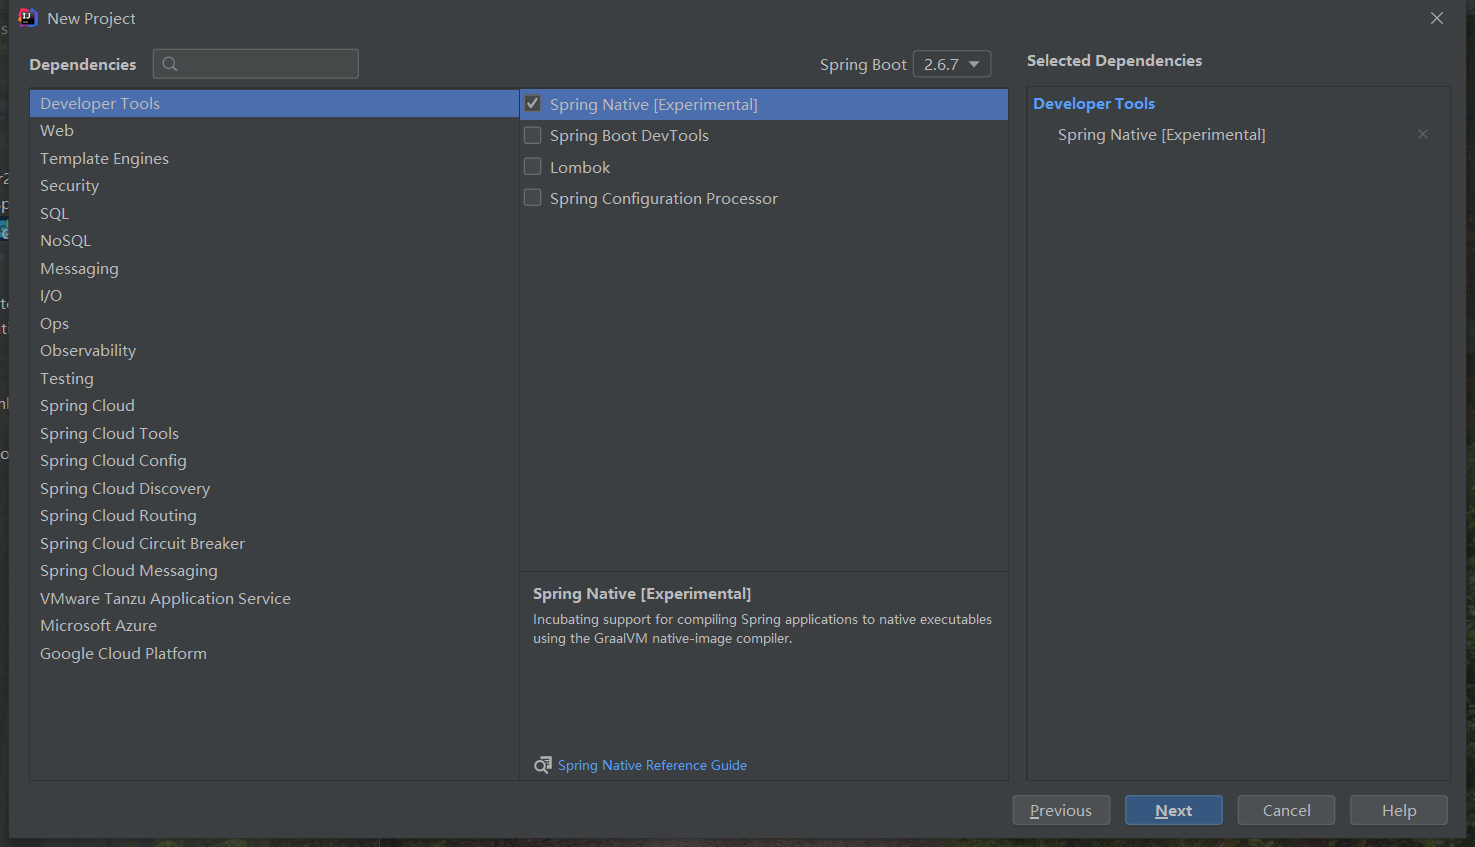
3.Spring Initailizr(项目初始化向导)
1.选择我们需要的开发场景
2.自动依赖引入
1 2 3 4 5 6 7 8 9 10 11 12 13 14 15 16 17 18 19 20 21 22 23 24 25 26 <parent > <groupId > org.springframework.boot</groupId > <artifactId > spring-boot-starter-parent</artifactId > <version > 2.6.7</version > <relativePath /> </parent > <groupId > top.year21</groupId > <artifactId > springboot02</artifactId > <version > 0.0.1-SNAPSHOT</version > <name > SpringBoot02</name > <description > Demo project for Spring Boot</description > <properties > <java.version > 1.8</java.version > </properties > <dependencies > <dependency > <groupId > org.springframework.boot</groupId > <artifactId > spring-boot-starter-web</artifactId > </dependency > <dependency > <groupId > org.springframework.boot</groupId > <artifactId > spring-boot-starter-test</artifactId > <scope > test</scope > </dependency > </dependencies >
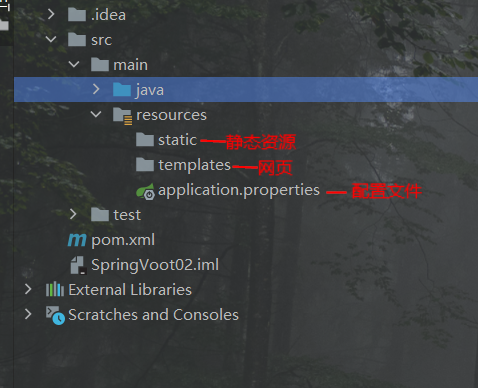
3.自动创建项目结构
4.自动编写好主配置类
1
2
3
4
5
6
@SpringBootApplication public class SpringBoot02Application { public static void main (String[] args) { SpringApplication.run(SpringBoot02Application.class, args); } }
核心功能 配置文件 YAML 是 “YAML Ain’t Markup Language”(YAML 不是一种标记语言)的递归缩写。
在开发的这种语言时,YAML 的意思其实是:”Yet Another Markup Language”(仍是一种标记语言)。
YAML更加关注的是数据本身,
基本语法:
key: value;kv之间有空格
大小写敏感
使用缩进表示层级关系
缩进不允许使用tab,只允许空格
缩进的空格数不重要,只要相同层级的元素左对齐即可
‘#’表示注释
字符串无需加引号,如果要加,’’与””表示字符串内容 会被 转义/不转义
1 2 3 4 5 6 7 8 9 10 11 12 13 14 15 16 17 18 19 20 21 22 23 24 25 26 27 28 29 30 31 32 people: userName: "测试\n人物 " boss: false birth: 2020 /10/9 age: 20 interests: - 画画 - 看书 animal: - 熊猫 - 猫 score: {technical: 85 ,english: 90 } salary: - 2000 - 3500 pet: name: xiaoxiao weight: 20.1 allPets: sick: - {name: xiaoxiao ,weight: 20.5 } - name: xiao1 weight: 25.5 health: - {name: xiaoe ,weight: 25.5 }
可以引入此依赖可以在application.yaml中定义属性显示提示
1 2 3 4 5 <dependency > <groupId > org.springframework.boot</groupId > <artifactId > spring-boot-configuration-processor</artifactId > <optional > true</optional > </dependency >
Web开发 静态资源 静态资源的目录 Ⅰ.静态资源放在类路径下的这些文件夹中: /static (或者 /public 或 /resources 或 /META-INF/resources)
都能通过当前项目根路径/ + 静态资源名 访问
原理: 静态映射/**
Ⅱ.设置静态资源访问前缀
默认无前缀设置
1
2
3
spring: mvc: static-path-pattern: /res/**
设置之后则静态资源的访问路径为:当前项目 + res + 静态资源名字
欢迎页支持 方式一:静态资源路径下 index.html
1
2
3
4
5
6
7
8
9
10
spring: web: resources: static-locations: [classpath:/test/ ] resources: add-mappings: false
自定义 Favicon网页头像 将favicon.ico 放在静态资源目录下即可。
静态资源配置绑定原理
SpringBoot启动默认加载 xxxAutoConfiguration 类(自动配置类)
SpringMVC功能的自动配置类 WebMvcAutoConfiguration,生效
给Servlet容器中注册了那些组件
1
2
3
4
5
@Configuration(proxyBeanMethods = false) @Import(EnableWebMvcConfiguration.class) @EnableConfigurationProperties({ WebMvcProperties.class, WebProperties.class }) @Order(0) public static class WebMvcAutoConfigurationAdapter implements WebMvcConfigurer , ServletContextAware {}
配置文件的相关属性和xxx进行了绑定。WebMvcProperties与spring.mvc、ResourceProperties与spring.web进行绑定
配置类只有一个有参构造器(实际上是在参数位置使用了@Autowired注解,但配置类中只有一个构造器,所有被省略了)
1 2 3 4 5 6 7 8 9 10 11 12 13 14 15 16 17 18 19 20 21 22 public WebMvcAutoConfigurationAdapter (WebProperties webProperties, WebMvcProperties mvcProperties, ListableBeanFactory beanFactory, ObjectProvider<HttpMessageConverters> messageConvertersProvider, ObjectProvider<ResourceHandlerRegistrationCustomizer> resourceHandlerRegistrationCustomizerProvider, ObjectProvider<DispatcherServletPath> dispatcherServletPath, ObjectProvider<ServletRegistrationBean<?>> servletRegistrations) { this .resourceProperties = webProperties.getResources(); this .mvcProperties = mvcProperties; this .beanFactory = beanFactory; this .messageConvertersProvider = messageConvertersProvider; this .resourceHandlerRegistrationCustomizer = resourceHandlerRegistrationCustomizerProvider.getIfAvailable(); this .dispatcherServletPath = dispatcherServletPath; this .servletRegistrations = servletRegistrations; this .mvcProperties.checkConfiguration(); }
资源处理的默认规则 1 2 3 4 5 6 7 8 9 10 11 12 13 14 15 16 17 18 19 @Override public void addResourceHandlers (ResourceHandlerRegistry registry) { if (!this .resourceProperties.isAddMappings()) { logger.debug("Default resource handling disabled" ); return ; } addResourceHandler(registry, "/webjars/**" , "classpath:/META-INF/resources/webjars/" ); addResourceHandler(registry, this .mvcProperties.getStaticPathPattern(), (registration) -> { registration.addResourceLocations(this .resourceProperties.getStaticLocations()); if (this .servletContext != null ) { ServletContextResource resource = new ServletContextResource (this .servletContext, SERVLET_LOCATION); registration.addResourceLocations(resource); } }); }
欢迎页的处理规则 1 2 3 4 5 6 7 8 9 10 11 12 13 14 15 16 17 18 19 20 21 22 23 24 25 26 @Bean public WelcomePageHandlerMapping welcomePageHandlerMapping (ApplicationContext applicationContext, ormattingConversionService mvcConversionService, ResourceUrlProvider mvcResourceUrlProvider) {WelcomePageHandlerMapping welcomePageHandlerMapping = new WelcomePageHandlerMapping (new TemplateAvailabilityProviders (applicationContext), applicationContext, getWelcomePage(), this .mvcProperties.getStaticPathPattern()); welcomePageHandlerMapping.setInterceptors(getInterceptors(mvcConversionService, mvcResourceUrlProvider)); welcomePageHandlerMapping.setCorsConfigurations(getCorsConfigurations()); return welcomePageHandlerMapping; } WelcomePageHandlerMapping(TemplateAvailabilityProviders templateAvailabilityProviders, ApplicationContext applicationContext, Optional<Resource> welcomePage, String staticPathPattern) { if (welcomePage.isPresent() && "/**" .equals(staticPathPattern)) { logger.info("Adding welcome page: " + welcomePage.get()); setRootViewName("forward:index.html" ); } else if (welcomeTemplateExists(templateAvailabilityProviders, applicationContext)) { logger.info("Adding welcome page template: index" ); setRootViewName("index" ); } }
请求参数 请求映射@xxxMapping:指将请求与控制器方法进行绑定
需要一个核心过滤器:HiddenHttpMethodFilter
即使在SpringBoot自动装配了,但需要使用HiddenHttpMethodFilter还需要在application.yaml文件中进行开启
1 2 3 4 5 spring: mvc: hiddenmethod: filter: enabled: true
在SpringBoot中的用法和之前一致:
1.表单提交方式必须是post 方式
2.表单须携带一个 **name=”_method“,value=”当前想要提交的请求方式“ ** 的隐藏域
表单使用Rest风格的原理(与SpringMVC底层的执行是一致的):
①所有请求都会被这个HiddenHttpMethodFilter所拦截
②获取原生的request请求,判断是否为POST提交方法
③获取表单中的_method隐藏域属性的值,将其转换为大写
④判断转换后的请求方式是否在过滤器的放行名单中
⑤存在于名单中,使用包装模式将原生的request进行包装返回,在这个过程中重写了getMethod方法
⑥在过滤器链的放行方法中放行的是被包装后的request
表单中携带的name=”_method“可以通过手动@Bean导入HiddenHttpMethodFilter调用方法修改
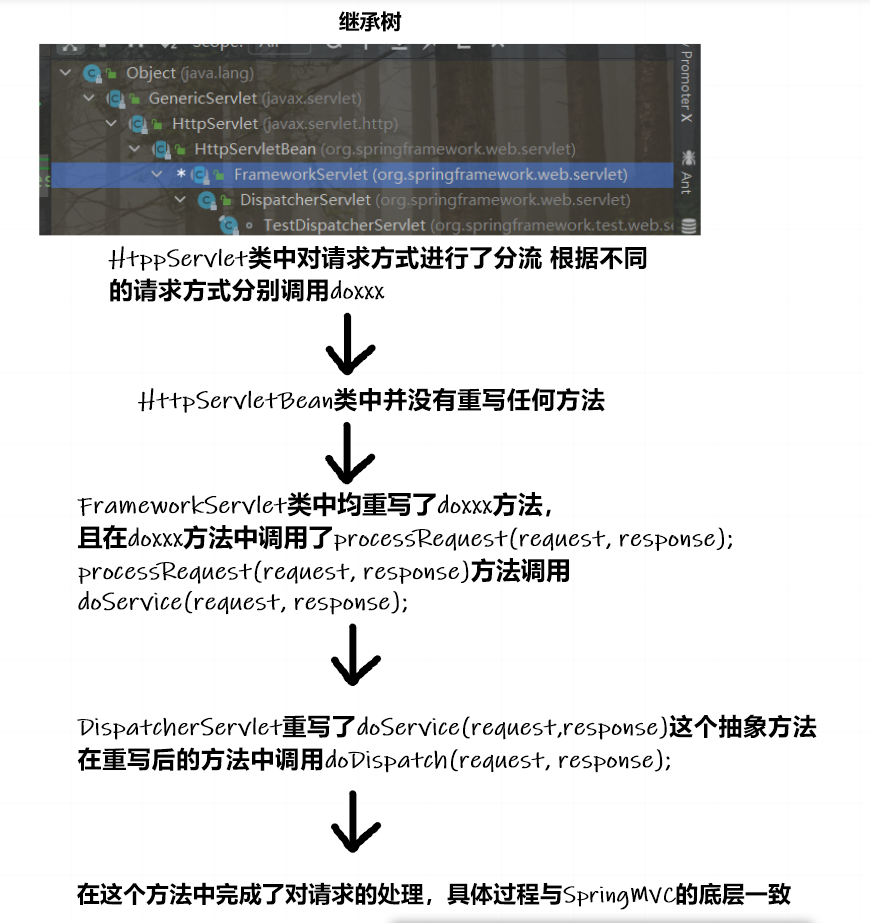
请求映射原理
mappedHandler = getHandler(processedRequest);
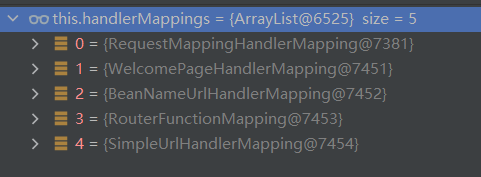
在这个方法中会获取所有的HandlerMapping,逐个寻找每个HandlerMapping的映射规则,
哪个能处理就将对应的HandlerMapping返回
RequestMappingHandlerMapping:保存了所有@RequestMapping和handler的映射规则
SpringBoot获取请求参数 注解获取:@PathVariable、@RequestHeader、@RequestParam、@CookieValue、@RequestBody
1 2 3 4 5 6 7 8 9 10 11 12 13 14 15 16 17 18 19 20 21 22 23 24 25 26 27 28 29 30 31 32 33 @RestController public class ParamController { @GetMapping("/car/{id}/owner/{userName}") public Map<String,Object> map (@PathVariable("id") Integer id, @PathVariable("userName") String userName, @PathVariable Map<String, String> pv,//自动将请求地址中的路径变量封装到这个Map中 @RequestHeader("User-Agent") String userAgent, @RequestHeader Map<String, String> header,//自动将请求行信息封装到这个Map中 @RequestParam("age") Integer age, @RequestParam("inters") List<String> inters, @RequestParam Map<String,String> params,//自动将请求地址中的请求参数封装到这个Map中 @CookieValue("Idea-43f7d2cf") String cookie) { HashMap<String, Object> map = new HashMap <>(); map.put("id" , id); map.put("username" ,userName); map.put("pv" ,pv); map.put("userAgent" ,userAgent); map.put("header" ,header); map.put("age" ,age); map.put("inters" ,inters); map.put("params" ,params); map.put("cookie" ,cookie); return map; } @PostMapping("/save") public Map<String,Object> map (@RequestBody String requestBody) { HashMap<String, Object> map = new HashMap <>(); map.put("requestBody" ,requestBody); return map; } }
@RequestAttribute:从request请求域中获取数据
1 2 3 4 5 6 7 8 9 10 11 12 13 14 15 16 17 18 19 @Controller public class RequestController { @GetMapping("/goto") public String gotoOtherPage (HttpServletRequest request) { request.setAttribute("test" ,"test" ); return "forward:/success" ; } @ResponseBody @GetMapping("/success") public String sout (@RequestAttribute("test") String success) { return success; } }
@MatrixVariable:矩阵变量(可以用于解决cookie被禁用的问题)
矩阵变量使用要求
矩阵变量需要在SpringBoot中手动开启
根据RFC3986的规范,矩阵变量应当绑定在路径变量中
若是有多个矩阵变量,应当使用英文符号;进行分隔。
若是一个矩阵变量有多个值,应当使用英文符号,进行分隔,或者命名多个重复的key
/test/customer;age=20;gender=boy” 矩阵变量示例
url重写就是指把cookie的值使用矩阵变量的方式进行传递 :/test;jsesssionid=xxxx
对于请求路径的处理都是使用UrlPathHelper这个类进行解析,
removeSemicolonContent(移除请求路径;后的内容)用于支持矩阵变量
1 2 3 4 5 6 7 8 9 10 11 12 13 14 15 16 17 18 19 20 21 22 23 24 25 26 27 28 29 30 31 32 33 34 35 36 37 38 39 40 41 42 43 44 45 46 47 48 49 50 * @description : 修改springboot的自动配置机制,实现对矩阵变量的支持 * @date 2022 /5 /13 0 :00 @Configuration(proxyBeanMethods = false) public class WebConfig implements WebMvcConfigurer { @Bean public WebMvcConfigurer webMvcConfigurer () { return new WebMvcConfigurer () { @Override public void configurePathMatch (PathMatchConfigurer configurer) { UrlPathHelper urlPathHelper = new UrlPathHelper (); urlPathHelper.setRemoveSemicolonContent(false ); configurer.setUrlPathHelper(urlPathHelper); } }; } } @GetMapping("/test/{customer}") public Map testMatrixVariable (@MatrixVariable("age") Integer age, @MatrixVariable("inters") List<String> inters, @PathVariable("customer") String path) { HashMap<String, Object> map = new HashMap <>(); map.put("age" ,age); map.put("inters" ,inters); map.put("path" ,path); return map; } @GetMapping("/test/{bossId}/{empId}") public Map test (@MatrixVariable(value = "age",pathVar = "bossId") Integer boosAge, @MatrixVariable(value = "age",pathVar = "empId") Integer empAge) { HashMap<String, Object> map = new HashMap <>(); map.put("boss" ,boosAge); map.put("emp" ,empAge); return map; }
请求参数处理原理 ①获取对应的处理器适配器以执行控制器方法HandlerAdapter ha = getHandlerAdapter(mappedHandler.getHandler())
获取所有的处理器适配器,循环判断哪个处理器适配器能支持当前的方法并返回 此处是(RequestMapping)
0 - 支持方法上标注@RequestMapping的处理器适配器
1 - 支持函数式编程的处理器适配器
…
②根据获得的处理器适配器对象调用目标方法并为目标方法设置参数解析器和返回值解析器
参数解析器和返回值解析器的信息都封装在同一个对象ServletInvocableHandlerMethod invocableMethod中
参数解析器(确定每一个参数的值是什么):判断当前解析器是否支持解析这种参数,支持则调用解析方法
返回值处理器(确定能返回什么类型的结果):判断当前处理器是否支持返回这种类型参数并调用返回处理方法
1 2 3 4 5 6 7 8 9 10 11 12 13 14 15 16 17 18 19 20 21 22 23 24 25 26 27 28 29 30 31 32 33 34 35 36 37 38 39 40 41 42 43 44 45 46 47 48 49 50 51 52 53 54 55 56 57 58 mav = invokeHandlerMethod(request, response, handlerMethod){ ServletInvocableHandlerMethod invocableMethod = createInvocableHandlerMethod(handlerMethod);if (this .argumentResolvers != null ) { invocableMethod.setHandlerMethodArgumentResolvers(this .argumentResolvers); } if (this .returnValueHandlers != null ) { invocableMethod.setHandlerMethodReturnValueHandlers(this .returnValueHandlers); } invocableMethod.invokeAndHandle(webRequest, mavContainer){ Object returnValue = invokeForRequest(webRequest, mavContainer, providedArgs){ Object[] args = getMethodArgumentValues(request, mavContainer, providedArgs); protected Object[] getMethodArgumentValues(NativeWebRequest request, @Nullable ModelAndViewContainer mavContainer,Object... providedArgs) throws Exception { MethodParameter[] parameters = getMethodParameters(); if (ObjectUtils.isEmpty(parameters)) { return EMPTY_ARGS; } Object[] args = new Object [parameters.length]; for (int i = 0 ; i < parameters.length; i++) { MethodParameter parameter = parameters[i]; parameter.initParameterNameDiscovery(this .parameterNameDiscoverer); args[i] = findProvidedArgument(parameter, providedArgs); if (args[i] != null ) { continue ; } if (!this .resolvers.supportsParameter(parameter)) { throw new IllegalStateException (formatArgumentError(parameter, "No suitable resolver" )); } try { args[i] = this .resolvers.resolveArgument(parameter, mavContainer, request, this .dataBinderFactory); } catch (Exception ex) { if (logger.isDebugEnabled()) { String exMsg = ex.getMessage(); if (exMsg != null && !exMsg.contains(parameter.getExecutable().toGenericString())) { logger.debug(formatArgumentError(parameter, exMsg)); } } throw ex; } } return args; } } } }
③确定目标方法的解析器(挨个判断所有参数解析器哪个支持解析当前这个参数)
1 2 3 4 5 6 7 8 9 10 11 private HandlerMethodArgumentResolver getArgumentResolver (MethodParameter parameter) { HandlerMethodArgumentResolver result = this .argumentResolverCache.get(parameter); if (result == null ) { for (HandlerMethodArgumentResolver resolver : this .argumentResolvers) { if (resolver.supportsParameter(parameter)) { result = resolver; this .argumentResolverCache.put(parameter, result); break ; } } }
④解析这个参数的值
调用各自 HandlerMethodArgumentResolver 的 resolveArgument 方法
⑤当目标方法执行完成后会将数据放在ModelAndViewContainer容器中(包含要显示的页面地址view和Model数据)
1 2 3 4 5 6 7 8 9 10 11 return getModelAndView(mavContainer, modelFactory, webRequest){ modelFactory.updateModel(webRequest, mavContainer); ModelMap model = mavContainer.getModel(); ModelAndView mav = new ModelAndView (mavContainer.getViewName(), model, mavContainer.getStatus()); return mav }
⑥处理目标方法执行后返回的结果
1 2 3 4 5 6 7 8 9 10 11 12 13 14 15 16 17 18 19 processDispatchResult(processedRequest, response, mappedHandler, mv, dispatchException); renderMergedOutputModel(mergedModel, getRequestToExpose(request), response){ exposeModelAsRequestAttributes(model, request){ model.forEach((name, value) -> { if (value != null ) { request.setAttribute(name, value); } else { request.removeAttribute(name); } }); } }
Servlet API ServletRequestMethodArgumentResolver参数解析器可以解析的的方法参数
1 2 3 4 5 6 7 8 9 10 11 12 13 14 15 16 @Override public boolean supportsParameter (MethodParameter parameter) { Class<?> paramType = parameter.getParameterType(); return (WebRequest.class.isAssignableFrom(paramType) || ServletRequest.class.isAssignableFrom(paramType) || MultipartRequest.class.isAssignableFrom(paramType) || HttpSession.class.isAssignableFrom(paramType) || (pushBuilder != null && pushBuilder.isAssignableFrom(paramType)) || Principal.class.isAssignableFrom(paramType) || InputStream.class.isAssignableFrom(paramType) || Reader.class.isAssignableFrom(paramType) || HttpMethod.class == paramType || Locale.class == paramType || TimeZone.class == paramType || ZoneId.class == paramType); }
复杂参数 Map、 Model(map、model里面的数据会被共享到域对象中 相当于request.setAttribute
在一个方法中同时使用Map、Model返回的BingdingAwareModelMap对象是同一个
RedirectAttributes( 重定向携带数据) 、ServletResponse(response)
自定义类型参数 封装Bean WebDataBinder binder = binderFactory.createBinder(webRequest, attribute, name);
WebDataBinder :web数据绑定器,将请求参数的值绑定到指定的JavaBean里面
WebDataBinder 利用它里面的 Converters 将请求数据转成指定的数据类型。再次封装到JavaBean中
1 2 3 4 5 6 7 8 9 10 11 12 13 14 15 16 17 18 19 20 21 22 23 24 25 26 27 28 29 30 31 32 33 34 35 36 37 38 39 40 41 @Override public void addFormatters (FormatterRegistry registry) { registry.addConverter(new Converter <String,Pet>() { @Override public Pet convert (String source) { if (StringUtils.hasText(source)){ Pet pet = new Pet (); String[] split = source.split("," ); pet.setName(split[0 ]); pet.setAge(Integer.parseInt(split[1 ])); return pet; } return null ; } }); @Override @Nullable public final Object resolveArgument (MethodParameter parameter, @Nullable ModelAndViewContainer mavContainer,NativeWebRequest webRequest, @Nullable WebDataBinderFactory binderFactory) throws Exception { if (bindingResult == null ) { WebDataBinder binder = binderFactory.createBinder(webRequest, attribute, name); if (binder.getTarget() != null ) { if (!mavContainer.isBindingDisabled(name)) { bindRequestParameters(binder, webRequest); } validateIfApplicable(binder, parameter); if (binder.getBindingResult().hasErrors() && isBindExceptionRequired(binder, parameter)) { throw new BindException (binder.getBindingResult()); } } if (!parameter.getParameterType().isInstance(attribute)) { attribute = binder.convertIfNecessary(binder.getTarget(), parameter.getParameterType(), parameter); } bindingResult = binder.getBindingResult(); } }
响应数据 1.jackson.jar(已由SpringBoot的web场景自动引入spring-boot-starter-json场景)+@ResponseBody(在方法上标注此注解)
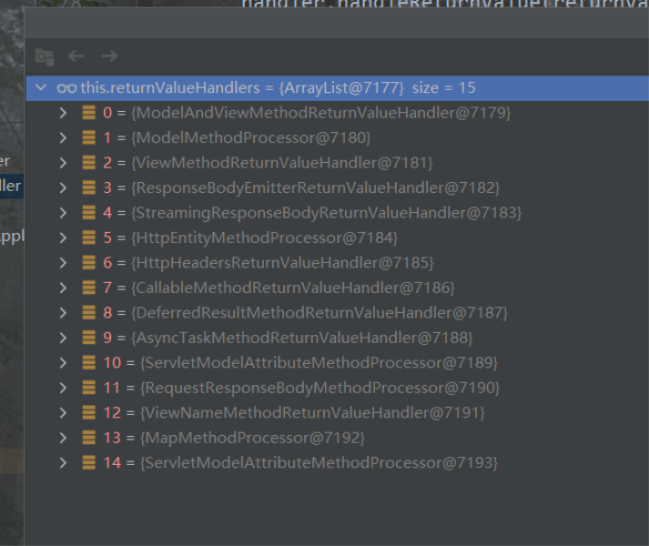
2.利用返回值处理器(处理流程与参数解析器一致)
1 2 3 4 5 6 7 8 9 10 11 12 13 14 15 16 17 18 19 20 21 try {this .returnValueHandlers.handleReturnValue(returnValue, getReturnValueType(returnValue), mavContainer, webRequest){ @Override public void handleReturnValue (@Nullable Object returnValue, MethodParameter returnType, ModelAndViewContainer mavContainer, NativeWebRequest webRequest) throws Exception { HandlerMethodReturnValueHandler handler = selectHandler(returnValue, returnType); if (handler == null ) { throw new IllegalArgumentException ("Unknown return value type: " +returnType.getParameterType().getName());}handler.handleReturnValue(returnValue, returnType, mavContainer, webRequest){ writeWithMessageConverters(returnValue, returnType, inputMessage, outputMessage); } } }
①返回值处理器判断是否支持这种类型返回值 supportReturnType
②返回值处理器调用handleReturnValue()方法进行处理
RequestResponseBodyMethodProcessor可以处理方法标注了@ResponseBody 注解的
③使用MessageConverters进行写出处理,即将返回值显示到前端页面上,将数据转为json
Ⅰ.内容协商(指浏览器通过请求头告知服务器,浏览器可以接受的内容类型)
Ⅱ.服务器最终根据自身的能力,决定产生什么的内容类型
Ⅲ.SpringMVC会逐个遍历容器中所有的HttpMessageConverter,找到能够处理的消息转换器
MappingJackson2HttpMessageConverter可以将对象转为json写出
返回值处理器支持处理的返回值类型
1 2 3 4 5 6 7 8 9 10 11 12 13 14 15 ModelAndView Model View ResponseEntity ResponseBodyEmitter StreamingResponseBody HttpEntity HttpHeaders Callable DeferredResult ListenableFuture CompletionStage WebAsyncTask 有 @ModelAttribute 且为对象类型的 @ResponseBody 注解 ---> RequestResponseBodyMethodProcessor;
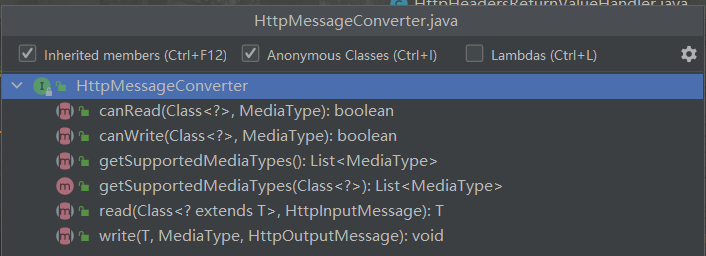
HTTPMessageConverter原理 ①HttpMessageConverter规范:看是否支持将此Class类型的对象转换为MediaType类型的数据
e.g. 将Person对象转为Json字符串(此过程可逆)
当判断某个canWrite为true,则调用write方法将其写出(canRead同理)
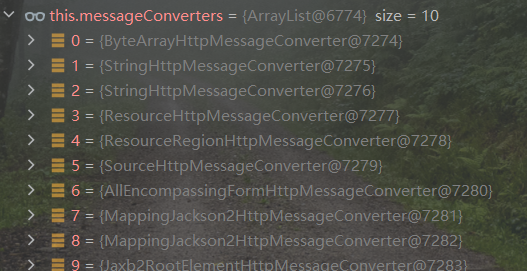
②系统默认的MessageConverter
0 - 只支持返回值是byte类型的
1 - 只支持返回值是String类型的
…
7 - 直接返回true
8 - 直接返回true
下面的2-9以此类推…
最终:使用MappingJackson2HttpMessageConverter将对象转为json,利用底层的jackson的objectMapper
内容协商 根据客户端的接受能力的不同,返回不同媒体类型的数据
1.引入xml依赖
1 2 3 4 <dependency > <groupId > com.fasterxml.jackson.dataformat</groupId > <artifactId > jackson-dataformat-xml</artifactId > </dependency >
2.根据情况修改请求头的accept字段,此字段可以告知服务器,浏览器可以接受的内容类型是什么
内容协商原理 ①判断当前响应头中是否已有确定的响应类型
②获取客户端(postman、浏览器)支持接收的内容类型,可以理解为获取客户端请求头accept字段
contentNegotiationManager:内容协商管理器(默认使用基于请求头的策略)
1 2 3 4 5 6 7 8 9 10 11 12 13 14 @Override public List<MediaType> resolveMediaTypes (NativeWebRequest request) throws HttpMediaTypeNotAcceptableException { for (ContentNegotiationStrategy strategy : this .strategies) { List<MediaType> mediaTypes = strategy.resolveMediaTypes(request); if (mediaTypes.equals(MEDIA_TYPE_ALL_LIST)) { continue ; } return mediaTypes; } return MEDIA_TYPE_ALL_LIST; }
HeaderContentNegotiationStrategy 负责解析Http Request Header中的Accept
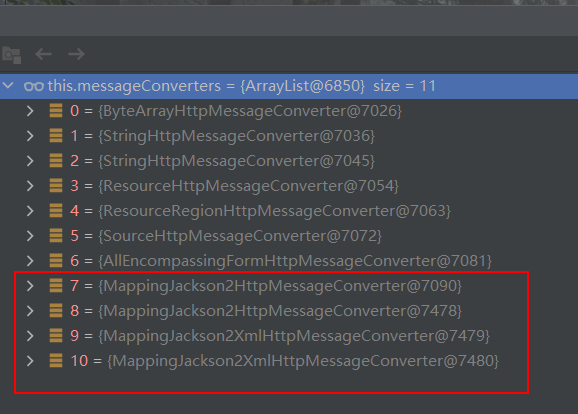
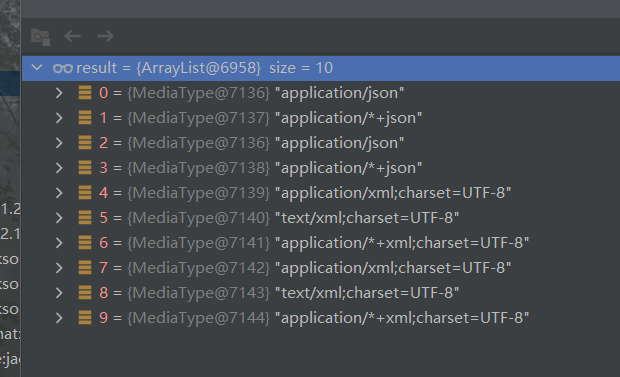
③获取服务器能够产生的内容类型,遍历循环当前容器中的所有HttpMessageConverter,找到支持操作当前
转换对象的报文信息转唤器(converter) ,把这些converter支持的媒体类型进行统计,放进集合中
④得知客户端需要application/xml 的内容类型,服务端可以产生10种(json、xml)内容类型
⑤找到内容协商的最佳匹配的内容类型
⑥用 支持 将对象 转换为最佳匹配的内容类型converter,调用它进行转换。
1 2 3 4 5 6 7 8 9 10 11 12 13 14 15 16 17 18 19 20 21 22 23 24 25 26 27 28 29 30 31 32 33 34 35 36 37 38 39 40 41 42 43 44 45 46 47 48 49 50 51 52 53 54 55 56 57 58 59 60 61 62 63 64 65 66 67 writeWithMessageConverters(returnValue, returnType, inputMessage, outputMessage){ MediaType contentType = outputMessage.getHeaders().getContentType(); acceptableTypes = getAcceptableMediaTypes(request); List<MediaType> producibleTypes = getProducibleMediaTypes(request, valueType, targetType){ List<MediaType> result = new ArrayList <>(); for (HttpMessageConverter<?> converter : this .messageConverters) { if (converter instanceof GenericHttpMessageConverter && targetType != null ) { if (((GenericHttpMessageConverter<?>) converter).canWrite(targetType, valueClass, null )) { result.addAll(converter.getSupportedMediaTypes(valueClass)); } } List<MediaType> mediaTypesToUse = new ArrayList <>(); for (MediaType requestedType : acceptableTypes) { for (MediaType producibleType : producibleTypes) { if (requestedType.isCompatibleWith(producibleType)) { mediaTypesToUse.add(getMostSpecificMediaType(requestedType, producibleType)); } } } MediaType.sortBySpecificityAndQuality(mediaTypesToUse); for (MediaType mediaType : mediaTypesToUse) { if (mediaType.isConcrete()) { selectedMediaType = mediaType; break ; } } if (selectedMediaType != null ) { selectedMediaType = selectedMediaType.removeQualityValue(); for (HttpMessageConverter<?> converter : this .messageConverters) { GenericHttpMessageConverter genericConverter = (converter instanceof GenericHttpMessageConverter ? GenericHttpMessageConverter<?>) converter : null ); if (genericConverter != null ? ((GenericHttpMessageConverter) converter).canWrite(targetType, valueType, selectedMediaType) : converter.canWrite(valueType, selectedMediaType)) { body = getAdvice().beforeBodyWrite(body, returnType, selectedMediaType, (Class<? extends HttpMessageConverter <?>>) converter.getClass(), inputMessage, outputMessage); if (body != null ) { Object theBody = body; LogFormatUtils.traceDebug(logger, traceOn -> "Writing [" + LogFormatUtils.formatValue(theBody, !traceOn) + "]" ); addContentDispositionHeader(inputMessage, outputMessage); if (genericConverter != null ) { genericConverter.write(body, targetType, selectedMediaType, outputMessage); } }
开启浏览器参数内容协商功能 只需要在application.yml文件中设置为true开启即可,默认设置为false
1 2 3 spring: contentnegotiation: favor-parameter: true
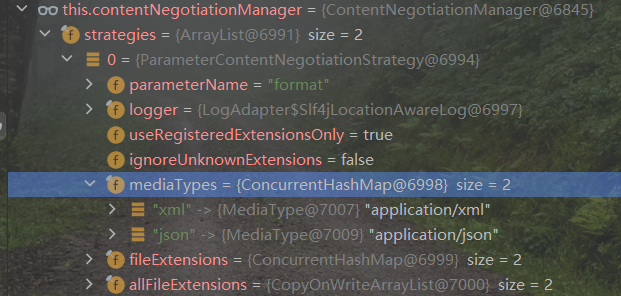
开启之后会在内容协商管理器中添加一个ParameterContentNegotiationStrategy 的内容解析策略,
这个策略支持解析xml和json的内容类型
导入了jackson处理xml的包,xml的converter就会自动加载进来
1 2 3 4 5 6 7 8 9 10 WebMvcConfigurationSupport jackson2XmlPresent = ClassUtils.isPresent("com.fasterxml.jackson.dataformat.xml.XmlMapper" , classLoader);if (jackson2XmlPresent) { Jackson2ObjectMapperBuilder builder = Jackson2ObjectMapperBuilder.xml(); if (this .applicationContext != null ) { builder.applicationContext(this .applicationContext); } messageConverters.add(new MappingJackson2XmlHttpMessageConverter (builder.build())); }
自定义MessageConverter 1.处理流程:
①@ResponseBody 响应数据出去 调用 RequestResponseBodyMethodProcessor 处理
②Processor 处理方法返回值。通过 MessageConverter 处理
③所有 MessageConverter 合起来可以支持各种媒体类型数据的操作(读、写)
④内容协商找到最终的 messageConverter ;
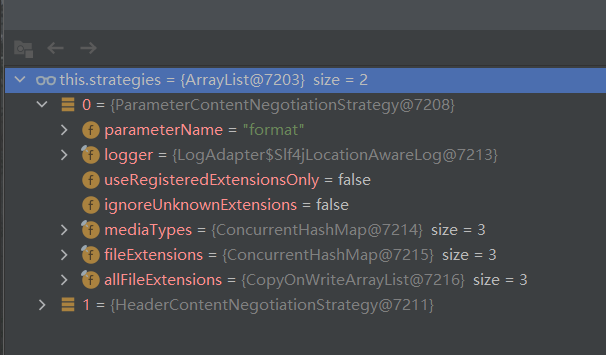
2.自定义配置内容协商管理器的内容协商策略以满足浏览器请求参数携带format访问回显指定的内容类型
1 2 3 4 5 6 7 8 9 10 11 12 13 14 15 16 17 18 19 20 21 22 23 @Override public void extendMessageConverters (List<HttpMessageConverter<?>> converters) { converters.add(new TestMessageConverter ()); } @Override public void configureContentNegotiation (ContentNegotiationConfigurer configurer) { HashMap<String, MediaType> map = new HashMap <>(); map.put("json" ,MediaType.APPLICATION_JSON); map.put("xml" ,MediaType.APPLICATION_ATOM_XML); map.put("test" ,MediaType.parseMediaType("application/tt" )); ParameterContentNegotiationStrategy strategy = new ParameterContentNegotiationStrategy (map);HeaderContentNegotiationStrategy headerStrategy = new HeaderContentNegotiationStrategy ();configurer.strategies(Arrays.asList(strategy,headerStrategy)); }
视图解析 1.视图解析原理
①目标方法处理的过程,所有的数据都会被放在ModelAndViewContainer中,包括数据和视图地址
②方法的参数是一个自定义类型对象(从请求参数中确定的),都会把它放在ModelAndViewContainer中
③任何目标方法在执行完成之后都会返回一个ModelAndView对象
④processDispatchResult(); 处理方法返回的结果
Ⅰ.render(mv, request, response); 进行页面渲染
根据方法返回值得到视图View对象(定义了页面的渲染的逻辑)
所有的视图解析器尝试是否能根据当前返回值得到View对象
根据redirect:/index.html返回值得到了一个由Thymeleaf创建的 RedirectView对象
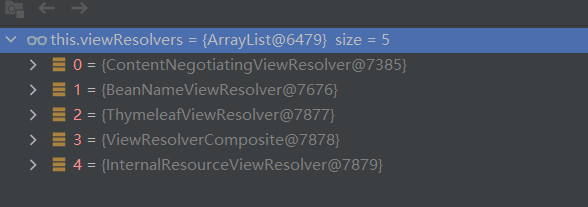
注意:ContentNegotiationViewResolver 里面包含了下面1-4的视图解析器,其内部还是通过遍历1-4解析器,
判断哪个能解析从而得到视图对象
⑤通过得到的视图对象View调用其对应的渲染方法 view.render(mv.getModelInternal(), request, response);
2.视图解析的不同情况:
返回值以forward开始:会 new InternalResourceView(forwardUrl) –> 底层就是原生的转发
返回值以redirect开始:会 new RedirectView() –> 底层就是原生的重定向
返回值以普通字符串开始:会 new ThymeleafView()
视图解析:视图解析器根据返回的不同规则得到不同的视图,通过视图调用对应的渲染方法得到对应的视图页面
模板引擎 Thymeleaf:现代化、服务端Java模板引擎 ,有网络时动态获取标签元素内的文本,没有网络时显示预先设置的静态值
表达式名字
语法
用途
变量取值
${…}
获取请求域、session域、对象等值
选择变量
*{…}
获取上下文对象值
消息
#{…}
获取国际化等值
链接
@{…}
生成链接
片段表达式
~{…}
jsp:include 作用,引入公共页面片段
变量取值行内写法(不需要写在标签内):[[${session.loginUser.username}]]
thymeleaf引入公共部分的区别
1 2 3 4 5 6 7 8 9 10 11 12 13 14 15 <footer th:fragment ="copy" > © 2011 The Good Thymes Virtual Grocery </footer > <body > ... <div th:insert ="footer :: copy" > </div > <div th:replace ="footer :: copy" > </div > <div th:include ="footer :: copy" > </div > </body >
这三者的不同 th:insert(将公共部分及标签插入到原标签) th:replace(将原标签全部替代) th:include(将公共部分插入原标签中)
1 2 3 4 5 6 7 8 9 10 11 12 13 14 15 16 17 18 19 <body > ... <div > <footer > © 2011 The Good Thymes Virtual Grocery </footer > </div > <footer > © 2011 The Good Thymes Virtual Grocery </footer > <div > © 2011 The Good Thymes Virtual Grocery </div > </body >
拦截器 1.添加拦截器
①自定义类 实现 HandlerInterceptor 接口,重写拦截器的三个方法
②通过定制WebMVC,即自定义配置类 实现WebMvcConfigurer接口,将拦截器添加到容器中
③指定拦截规则【如果是拦截所有,静态资源也会被拦截】
1 2 3 4 5 6 7 8 9 @Configuration public class AdminWebConfig implements WebMvcConfigurer { @Override public void addInterceptors (InterceptorRegistry registry) { registry.addInterceptor(new LoginInterceptor ()) .addPathPatterns("/**" ) .excludePathPatterns("/" ,"/login" ,"/css/**" ,"/fonts/**" ,"/images/**" ,"/js/**" ); } }
2.拦截器原理
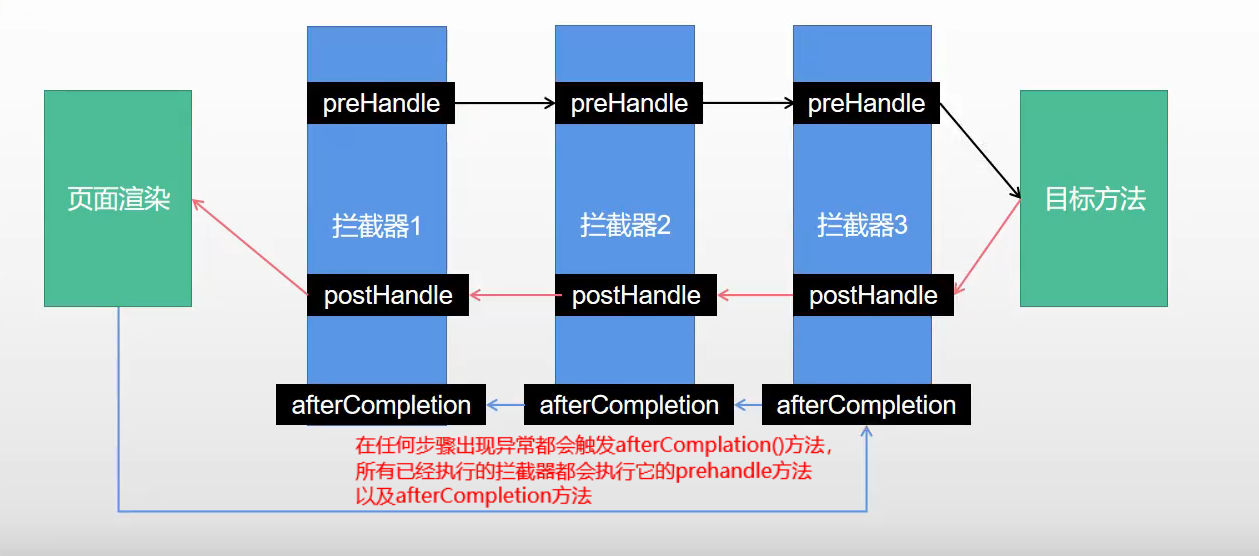
①根据当前的请求,找到处理器执行链对象(其中包括了处理器方法、拦截器链、拦截器索引)
②执行顺序:
情况一:a>若每个拦截器的preHandle()都返回true
此时多个拦截器的执行顺序和拦截器在SpringMVC的配置文件的配置顺序有关:
preHandle()会按照拦截器在配置中的正序执行,
而postHandle()和afterComplation()会按照拦截器在配置中的反序执行
情况二:b>若某个拦截器的preHandle()返回了false
preHandle()返回false和它之前的拦截器的preHandle()都会执行,
postHandle()都不执行,当前这个返回false的拦截器 之前的所有拦截器的afterComplation()都会倒序执行
③如果任何一个拦截器返回false,直接结束,不执行目标方法
④在这之前的任何步骤出现异常都会触发afterComplation()方法
文件上传
1 2 3 4 5 6 7 8 9 10 11 12 13 14 15 16 17 18 19 20 21 22 23 24 25 26 27 28 29 30 31 32 33 34 35 @PostMapping("/upload") public String uploadPhoto (@RequestParam("email") String email, @RequestParam("username") String username, @RequestPart("userImg") MultipartFile file, @RequestPart("photos") MultipartFile[] photos) throws IOException { log.info("邮箱:" + email + "\n" + "用户名:" + username + "\n" + "头像:" + file.getSize() + "\n" + "文件封面:" + photos.length + "\n" ); if (!file.isEmpty()){ String originalFilename = file.getOriginalFilename(); String suffixName = originalFilename.substring(originalFilename.lastIndexOf("." )); String name = UUID.randomUUID().toString(); String photoName = name + suffixName; file.transferTo(new File ("D:\\baidu\\" + photoName)); } if (photos.length > 0 ){ for (MultipartFile photo : photos){ if (!photo.isEmpty()){ String originalFilename = photo.getOriginalFilename(); photo.transferTo(new File ("D:\\baidu\\" + originalFilename) ); } } } return "index" ; }
文件上传的原理:
文件上传自动配置类:MultipartAutoConfiguration - MultipartProperties
在配置类中自动配置了文件上传解析器(StandardServletMultipartResolver)
原理步骤:
①当请求进入使用文件解析器判断(isMultipart) 并用(resolveMultipart方法)封装文件上传请求,
返回一个 MultipartHttpServletRequest请求对象
②参数解析器来解析请求中文件内容封装成MultipartFile
③底层将request中的文件信息封装到一个Map(MultiValueMap《String,MultipararFile》)
④最后通过FileCopyUtils工具类实现文件流的拷贝
异常处理 1.默认规则
默认情况下,Spring Boot提供 /error处理所有错误的映射
对于机器客户端,它将生成JSON响应,其中包含错误,HTTP状态和异常消息的详细信息。
对于浏览器客户端,响应一个“ whitelabel”错误视图,以HTML格式呈现相同的数据
2.自定义错误视图
①要对其进行自定义,添加 View 解析为 error
②要完全替换默认行为,可以实现 ErrorController 并注册该类型的Bean定义,
或添加ErrorAttributes类型的组件以使用现有机制但替换其内容。
③error/下的4xx,5xx页面会被自动解析
3.定制错误处理逻辑
①自定义错误页
error/404.html error/5xx.html;有精确的错误状态码页面就匹配精确,没有就找 4xx.html;如果都没有就触发白页
②@ControllerAdvice+@ExceptionHandler处理全局异常;底层是 ExceptionHandlerExceptionResolver 支持的
③@ResponseStatus+自定义异常 ;底层是 ResponseStatusExceptionResolver ,把responsestatus注解的信息
底层调用 response.sendError(statusCode, resolvedReason);向tomcat发送的/error
④Spring底层的异常,如 参数类型转换异常;DefaultHandlerExceptionResolver 处理框架底层的异常。
response.sendError():这个方法只有一个作用,即立即结束此次请求的处理,让tomcat发送/error请求
response.sendError(HttpServletResponse.SC_BAD_REQUEST, ex.getMessage());
⑤自定义实现 HandlerExceptionResolver 处理异常;在设置order优先级之后,可以作为默认的全局异常处理规则
ErrorViewResolver 最底层的异常处理解析器, 实现自定义处理异常(一般不自定义覆盖这个);
response.sendError 。/error请求就会转给BasicErrorcontroller
异常没有进行任何处理。tomcat底层 response.sendError。error请求就会转给BasicErrorcontroller
basicErrorController 要去的页面地址是 ErrorViewResolver 解析器进行解析的 ;
4.异常处理的自动配置原理
5.异常处理的流程
①执行目标方法,在目标方法允许期间,出现任何异常都会被catch且标注当前请求结束,并被dispatchException封装
②进入视图解析流程(页面渲染)
③处理handler执行方法的异常,处理完成之后返回mv对象
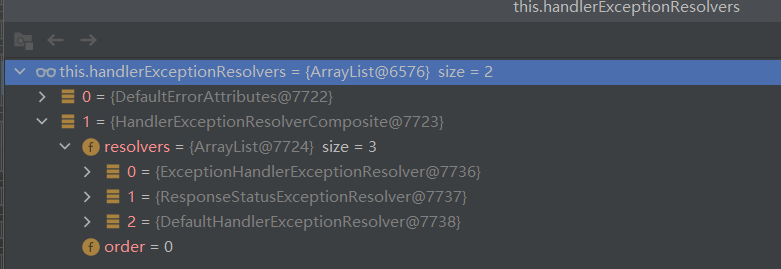
Ⅰ.遍历所有的handlerExceptionResolvers,找到能处理当前异常的解析器
Ⅱ.DefaultErrorAttributes先来处理异常,将异常的信息保存到request域中并返回null
Ⅲ.在系统默认设置的处理器异常解析器中没有解析器能处理,所有异常会被抛出
Ⅳ.由于异常没有处理则会由Servlet在底层再次请求转发(保存在request域中的数据会被携带过去),发起一个/error的请求
Ⅴ.这个/error则被自动配置的BasicErrorController控制器进行处理
Ⅵ.在BasicErrorController的请求处理方法根据请求行的accpet进行内容协商调用对应方法
Ⅶ.在对应的处理方法中resolveErrorView()中遍历所有的ErrorViewResolver,找到能够处理的解析器
Ⅷ.则会调用系统自动装配的DefaultErrorResolver进行解析(原理同异常处理自动装配的解释),
DefaultErrorResolver的作用是把响应状态码作为错误页的地址,error/500.html
Ⅸ.最终由模板引擎Thymeleaf响应这个页面 error/500.html
1 2 3 4 5 6 7 8 9 10 11 12 13 14 15 16 17 18 19 20 21 22 23 24 25 26 27 28 29 30 31 32 33 34 35 36 37 38 39 40 41 42 43 44 webRequest.requestCompleted(); processDispatchResult(processedRequest, response, mappedHandler, mv, dispatchException){ mv = processHandlerException(request, response, handler, exception){ ModelAndView exMv = null ; if (this .handlerExceptionResolvers != null ) { for (HandlerExceptionResolver resolver : this .handlerExceptionResolvers) { exMv = resolver.resolveException(request, response, handler, ex); if (exMv != null ) { break ; } } } } @RequestMapping(produces = MediaType.TEXT_HTML_VALUE) public ModelAndView errorHtml (HttpServletRequest request, HttpServletResponse response) { HttpStatus status = getStatus(request); Map<String, Object> model = Collections .unmodifiableMap(getErrorAttributes(request, getErrorAttributeOptions(request, MediaType.TEXT_HTML))); response.setStatus(status.value()); ModelAndView modelAndView = resolveErrorView(request, response, status, model); return (modelAndView != null ) ? modelAndView : new ModelAndView ("error" , model); } @RequestMapping public ResponseEntity<Map<String, Object>> error (HttpServletRequest request) { HttpStatus status = getStatus(request); if (status == HttpStatus.NO_CONTENT) { return new ResponseEntity <>(status); } Map<String, Object> body = getErrorAttributes(request, getErrorAttributeOptions(request, MediaType.ALL)); return new ResponseEntity <>(body, status); }
Web原生组件注入
(Servlet、Filter、Listener的注入)
@WebListener、
@WebServlet(urlPatterns = “/myServlet”)
@WebFilter(urlPatterns = {“/css/“, “/images/ “})
加上在主程序类上标注扫描这三大组件所在包注册进ioc容器中
1.使用原生的Servlet API
1 2 3 4 5 6 7 8 9 10 11 12 13 14 15 16 17 18 19 20 21 @ServletComponentScan(basePackages = "top.year21.springboot.servlet") @SpringBootApplication public class SpringbootAdminApplication { public static void main (String[] args) { SpringApplication.run(SpringbootAdminApplication.class, args); } @WebServlet(urlPatterns = "/myServlet") public class MyServlet extends HttpServlet {} @WebFilter(urlPatterns = {"/css/*", "/images/*"}) public class CustomizeFilter implements Filter {} @WebListener public class CustomizeListener implements ServletContextListener {}
2.使用RegistrationBean
通过xxxRegistrationBean组件 + @Bean注解将原生的三大组件注册进ioc容器中
1 2 3 4 5 6 7 8 9 10 11 12 13 14 15 16 17 18 19 20 21 22 23 24 25 26 27 @Configuration(proxyBeanMethods = true) public class RegistrationBeanConfig { @Bean public ServletRegistrationBean myServlet () { MyServlet myServlet = new MyServlet (); return new ServletRegistrationBean <>(myServlet,"/myServlet" ); } @Bean public FilterRegistrationBean myFilter () { CustomizeFilter filter = new CustomizeFilter (); FilterRegistrationBean theFilter = new FilterRegistrationBean (filter); theFilter.addUrlPatterns("/myServlet" ,"/css/*" ); return theFilter; } @Bean public ServletListenerRegistrationBean myListener () { CustomizeListener listener = new CustomizeListener (); return new ServletListenerRegistrationBean (listener); } }
扩展:DispatchServlet注册进ioc容器的过程
①容器中自动配置了DispatcherServlet,将这个组件的属性和WebMvcProperties.class进行绑定;
对应的配置文件配置项是spring.mvc。
②通过使用@Bean + ServletRegistrationBean< DispatcherServlet.> 把DisparcherServlet 进行配置
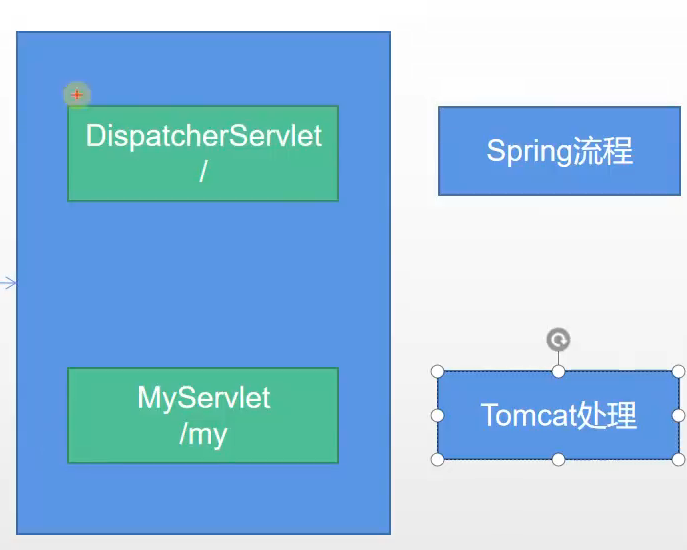
访问其他Servlet的请求不被DispatcherServlet拦截的原因:
精确优先原则:当多个Servlet都能处理同一层路径,用最匹配的进行处理;比如下方访问/my会原先匹配MyServlet
嵌入式Servlet容器 SpringBoot底层默认有很多的WebServer工厂:TomcatServletWebServerFactory 、
JettyServletWebServerFactory 、
UndertowServletWebServerFactory
因此需要切换web服务器只需要在pom文件中引入相关的start场景
1.原理:
每个ioc容器在启动时都会先调用父类所有的refresh方法()进行刷新,再执行当前容器的refresh()方法,
在执行到onrefresh()方法中,通过createWebServer()创建默认的内嵌Servlet容器
①SpringBoot应用启动是发现当前的是web应用,web应用会创建一个web版本的ioc容器 ServletwebServletApplicationContext
②在 ServletwebServletApplicationContext 启动时会寻找 ServletWebServletFactory (Servlet的web服务器工厂)
底层直接会有一个自动配置类(ServletWebServerFactoryAutoConfiguration)
③ServletWebServerFactoryAutoConfiguration导入了ServletWebServerFactoryConfiguration(配置类)`
④ServletWebServerFactoryConfiguration 配置类 根据动态判断系统中到底导入了那个Web服务器的包。
(默认是web-starter导入tomcat包),容器中就有 TomcatServletWebServerFactory`
⑤TomcatServletWebServerFactory 创建出Tomcat服务器并启动;
TomcatWebServer 的构造器拥有初始化方法initialize—this.tomcat.start();`
总结:内嵌服务器,就是手动把启动服务器的代码调用(tomcat核心jar包存在)`
2、定制Servlet容器
实现 WebServerFactoryCustomizer<ConfigurableServletWebServerFactory.>
把配置文件的值和 ServletWebServerFactory 进行绑定
修改配置文件 server.xxx
直接自定义 ConfigurableServletWebServerFactory
xxxxxCustomizer:定制化器,可以改变xxxx的默认规则
1 2 3 4 5 6 7 8 9 10 11 12 13 import org.springframework.boot.web.server.WebServerFactoryCustomizer;import org.springframework.boot.web.servlet.server.ConfigurableServletWebServerFactory;import org.springframework.stereotype.Component;@Component public class CustomizationBean implements WebServerFactoryCustomizer <ConfigurableServletWebServerFactory> { @Override public void customize (ConfigurableServletWebServerFactory server) { server.setPort(9000 ); } }
定制化原理 定制化的常见方式
①编写自定义配置类 + @Bean替换、增加容器中默认组件(视图解析器、异常解析器)等
②修改配置文件
③xxxxxCustomizer:定制化器
④web应用开发,自定义一个配置类 实现 WebMvcConfigurer 接口可定制化web功能 + @Bean给容器中再扩展一些组件
⑤@EnableWebMvc + WebMvcConfigurer —— @Bean 可以全面接管SpringMVC,但存在个别问题
虽然实现定制和扩展功能但会导致WebMvcAutoConfiguration自动配置类配置的底层组件全部失效
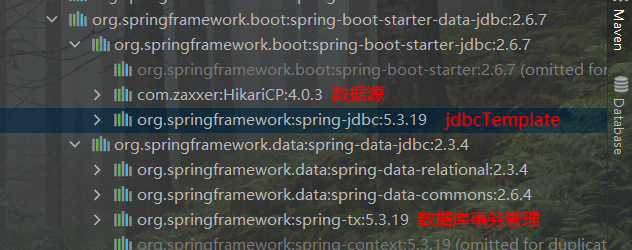
数据访问 SQL 1.根据开发场景导入对应的starter场景
在导入的starter场景中自动导入了数据源,数据库事务管理,以及封装了原生的jdbc操作的jdbcTemplate模板
至于jdbc驱动(数据库驱动)没有导入是因为数据库众多,springboot没法判断使用的是哪个,需手动导入pom文件
2.导入的自动配置类的分析
1 2 3 4 5 6 7 @Configuration(proxyBeanMethods = false) @Conditional(PooledDataSourceCondition.class) @ConditionalOnMissingBean({ DataSource.class, XADataSource.class }) @Import({ DataSourceConfiguration.Hikari.class, DataSourceConfiguration.Tomcat.class, DataSourceConfiguration.Dbcp2.class, DataSourceConfiguration.OracleUcp.class, DataSourceConfiguration.Generic.class, DataSourceJmxConfiguration.class }) protected static class PooledDataSourceConfiguration
DataSourceTransactionManagerAutoConfiguration: 事务管理器的自动配置
JdbcTemplateAutoConfiguration: JdbcTemplate的自动配置,可以来对数据库进行crud
JndiDataSourceAutoConfiguration: jndi的自动配置
XADataSourceAutoConfiguration: 分布式事务相关的
3.修改配置类以使用
1 2 3 4 5 6 7 8 9 spring: datasource: url: jdbc:mysql://localhost:3306/fruit_db?characterEncoding=utf8&useSSL=false&serverTimezone=UTC&rewriteBatchedStatements=true username: root password: root driver-class-name: com.mysql.cj.jdbc.Driver jdbc: template: query-timeout: 3
4.测试配置是否正常
1 2 3 4 5 6 7 @Autowired JdbcTemplate jdbcTemplate; @Test void contextLoads () { Long count = jdbcTemplate.queryForObject("select count(*) from t_fruit" , Long.class); log.info("查询的数据是:" + count); }
Druid数据源 可以采用两种方式:1.自定义方式(在springboot-admin包下查看) 2.引入官方starter场景的依赖包
1.自动配置的分析
扩展配置项 spring.datasource.druid
DruidSpringAopConfiguration.class, 监控SpringBean的;配置项:spring.datasource.druid.aop-patterns
DruidStatViewServletConfiguration.class, 监控页的配置:spring.datasource.druid.stat-view-servlet;默认开启
DruidWebStatFilterConfiguration.class, web监控配置;spring.datasource.druid.web-stat-filter;默认开启
DruidFilterConfiguration.class}) 所有Druid自己filter的配置
1 2 3 4 5 6 7 8 private static final String FILTER_STAT_PREFIX = "spring.datasource.druid.filter.stat" ;private static final String FILTER_CONFIG_PREFIX = "spring.datasource.druid.filter.config" ;private static final String FILTER_ENCODING_PREFIX = "spring.datasource.druid.filter.encoding" ;private static final String FILTER_SLF4J_PREFIX = "spring.datasource.druid.filter.slf4j" ;private static final String FILTER_LOG4J_PREFIX = "spring.datasource.druid.filter.log4j" ;private static final String FILTER_LOG4J2_PREFIX = "spring.datasource.druid.filter.log4j2" ;private static final String FILTER_COMMONS_LOG_PREFIX = "spring.datasource.druid.filter.commons-log" ;private static final String FILTER_WALL_PREFIX = "spring.datasource.druid.filter.wall" ;
2.采用配置文件进行配置
1 2 3 4 5 6 7 8 9 10 11 12 13 14 15 16 17 18 19 20 21 22 23 24 25 26 27 spring: datasource: url: jdbc:mysql://localhost:3306/fruit_db?characterEncoding=utf8&useSSL=false&serverTimezone=UTC&rewriteBatchedStatements=true username: root password: root driver-class-name: com.mysql.cj.jdbc.Driver druid: aop-patterns: top.year21.springboot filters: stat,wall stat-view-servlet: enabled: true login-username: root login-password: root reset-enable: false web-stat-filter: enabled: true url-pattern: /* exclusions: '*.js,*.gif,*.jpg,*.png,*.css,*.ico,/druid/*' filter: stat: slow-sql-millis: 1000 log-slow-sql: true enabled: true wall: enabled: true config: update-allow: false
整合MyBatis 1.引入mybats的starter场景依赖
补充一下:spring官方的启动场景为 spring-boot-starter-*
第三方的启动场景为 *-spring-boot-starter
1 2 3 4 5 <dependency > <groupId > org.mybatis.spring.boot</groupId > <artifactId > mybatis-spring-boot</artifactId > <version > 2.2.2</version > </dependency >
2.配置模式
全局配置文件中导入的组件
SqlSessionFactory: 负责创建sqlsession
SqlSession:提供java程序与数据库交互的连接
@Import(AutoConfiguredMapperScannerRegistrar .class );
Mapper: 负责操作数据库的mapper接口只要标注 @Mapper 注解就会被自动扫描进来
1 2 3 4 5 6 @EnableConfigurationProperties(MybatisProperties.class) : @AutoConfigureAfter({ DataSourceAutoConfiguration.class, MybatisLanguageDriverAutoConfiguration.class }) public class MybatisAutoConfiguration {}@ConfigurationProperties(prefix = "mybatis") public class MybatisProperties
配置模式下,整合mybats场景进行crud的前置操作:
①导入mybatis官方starter场景依赖
②编写mapper接口。mapper接口一定要标准@Mapper注解
③编写mapper接口的映射文件并绑定mapper接口
1 2 3 4 5 6 7 8 9 10 <?xml version="1.0" encoding="UTF-8" ?> <!DOCTYPE mapper PUBLIC "-//mybatis.org//DTD Mapper 3.0//EN" "http://mybatis.org/dtd/mybatis-3-mapper.dtd" > <mapper namespace="top.year21.springboot.dao.FruitMapper"> <!-- Fruit queryOneById(Integer id);--> <select id="queryOneById" resultType="top.year21.springboot.bean.Fruit"> select * from t_fruit where fid = </select> </mapper>
④在application.yaml中指定Mapper配置文件的位置,以及指定全局配置文件的信息
建议不要写全局配置文件,所有全局配置文件的配置都放在configuration配置项中即可
1 2 3 4 5 6 7 8 mybatis: mapper-locations: classpath:mybatis/mapper/*.xml configuration: map-underscore-to-camel-case: true
3.注解模式
1 2 3 4 5 6 7 8 9 10 11 12 13 14 15 @Insert(" insert into city(name,state,country) values(#{name},#{state},#{country})") @Options(useGeneratedKeys = true,keyColumn = "id") public void saveCity (City city) { cityMapper.insertCity(city); }
整合MyBatis-plus 1.引入MyBatis-plus的starter场景依赖
注:在这个stater中也自动引入了jdbc和mybatis的场景,因此上面两个的整合依赖就不需要再引入,但jdbc驱动依赖必须引入
1 2 3 4 5 <dependency> <groupId>com.baomidou</groupId> <artifactId>mybatis-plus-boot-starter</artifactId> <version>3.5 .1 </version> </dependency>
2.自动配置分析
MybatisPlusAutoConfiguration 配置类,MybatisPlusProperties 配置项绑定。mybatis-plus:xxx 就是对mybatis-plus的定制
SqlSessionFactory 自动配置好。底层是容器中默认的数据源
mapperLocations 自动配置好且有默认值(classpath*:/mapper/* /*.xml)。
即任意包的类路径下的所有mapper文件夹下任意路径下的所有xml都是sql映射文件。
容器中也自动配置好了 SqlSessionTemplate
@Mapper 标注的接口也会被自动扫描;可以@MapperScan(“xxx.xxx”)批量扫描就行
最大特点:自定义mapper继承BaseMapper就直接拥有了crud能力
1 2 3 4 5 6 7 8 9 10 11 12 13 @Mapper public interface UserMapper extends BaseMapper <User> {}public interface UserService extends IService <User> {}@Service public class UserServiceImpl extends ServiceImpl <UserMapper,User> implements UserService {}
3.测试整合效果
1 2 3 4 5 6 7 8 9 10 11 12 13 14 15 @Configuration @MapperScan("top.year21.springboot.dao") public class PageHelperConfig { @Bean public MybatisPlusInterceptor mybatisPlusInterceptor () { MybatisPlusInterceptor interceptor = new MybatisPlusInterceptor (); PaginationInnerInterceptor paginationInnerInterceptor = new PaginationInnerInterceptor (DbType.H2); paginationInnerInterceptor.setOverflow(true ); paginationInnerInterceptor.setMaxLimit(500L ); interceptor.addInnerInterceptor(paginationInnerInterceptor); return interceptor; } }
1 2 3 4 5 6 7 8 9 10 11 12 13 14 15 16 17 18 19 20 21 22 23 24 25 @RequestMapping("/dynamic") public String dynamicTable (@RequestParam(value = "pageNum",defaultValue = "1",required = false) Integer pageNum, Model model) { Page<User> page = new Page <>(pageNum, 2 ); Page<User> pageInfo = userService.page(page,null ); model.addAttribute("pageInfo" ,pageInfo); return "table/dynamic_table" ; } @GetMapping("/deleteUser/{id}") public String delete (@PathVariable("id") Integer id, @RequestParam("pageNum") Integer pageNum,//被携带的参数 RedirectAttributes redirectAttributes ) { userService.removeById(id); redirectAttributes.addAttribute("pageNum" ,pageNum); return "redirect:/dynamic" ; }
thymeleaf使用注意点:
1 2 3 4 5 6 7 8 9 10 11 12 13 14 15 <a th:href ="@{/dynamic(pageNum=${num})}" > [[${num}]]</a > <a class ="btn btn-danger btn-sm" th:href ="@{/deleteUser/{id}(id=${user.id})}" > 删除</a > <tr th:each ="user,state:${pageInfo.records}" > <td th:text ="${state.count}" > Trident</td > <td th:text ="${user.id}" > Trident</td > <td th:text ="${user.name}" > Internet Explorer 4.0</td > <td th:text ="${user.age}" > Win 95+</td > <td th:text ="${user.email}" > 4</td > </tr >
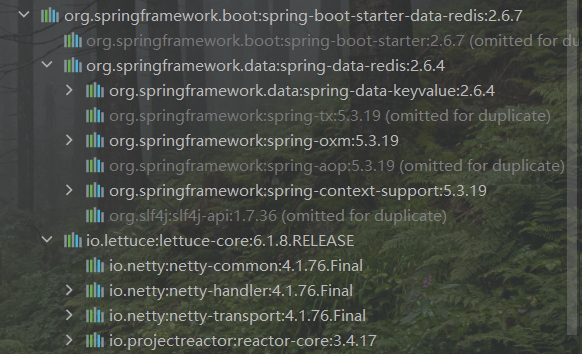
整合Redis 1.stater场景引入的依赖
2.自动配置的分析
RedisAutoConfiguration 自动配置类。RedisProperties 属性类 –> spring.redis.xxx是对redis的配置
连接工厂是准备好的。LettuceConnectionConfiguration、JedisConnectionConfiguration
自动注入了RedisTemplate<Object, Object> : xxxTemplate;
自动注入了StringRedisTemplate;k:v都是String
底层使用 StringRedisTemplate、RedisTemplate两者其中之一就可以操作redis
3.切换为Jedis
默认导入的是LettuceConnectionConfiguration,切换导入为JedisConnectionConfiguration
需要引入jedis依赖和配置文件修改客户端类型
1 2 3 4 5 <dependency > <groupId > redis.clients</groupId > <artifactId > jedis</artifactId > </dependency >
1 2 3 4 5 6 7 redis: host: 192.168 .231 .133 port: 6379 client-type: jedis jedis: pool: max-active: 10
4.测试
注意:使用了spring容器中的组件的对象不能自己手动new,必须自动装配,从容器中获取
1 2 3 4 5 6 7 8 9 10 11 12 13 14 15 16 17 18 19 20 21 22 23 24 25 26 27 28 29 30 31 32 33 34 35 36 37 38 39 40 41 42 43 @GetMapping("/index.html") public String getIndex (HttpSession session, Model model) { ValueOperations<String, String> opsForValue = redisTemplate.opsForValue(); String index = opsForValue.get("/index.html" ); String sql = opsForValue.get("/sql" ); model.addAttribute("index" ,index); model.addAttribute("sql" ,sql); return "index" ; } @Component public class RedisInterceptor implements HandlerInterceptor { @Autowired StringRedisTemplate redisTemplate; @Override public boolean preHandle (HttpServletRequest request, HttpServletResponse response, Object handler) throws Exception { String uri = request.getRequestURI(); redisTemplate.opsForValue().increment(uri); return true ; } } @Configuration public class AdminWebConfig implements WebMvcConfigurer { @Autowired RedisInterceptor redisInterceptor; @Override public void addInterceptors (InterceptorRegistry registry) { registry.addInterceptor(redisInterceptor) .addPathPatterns("/**" ) .excludePathPatterns("/" ,"/login" ,"/css/**" ,"/fonts/**" ,"/images/**" ,"/js/**" ); }
Junit单元测试 1.引入junit5的starter场景依赖
2.SpringBoot整合Junit以后。
①编写测试方法:@Test标注(注意需要使用junit5版本的注解)
②Junit类具有Spring的功能,@Autowired、比如 @Transactional 标注测试方法,测试完成后自动回滚
常用Junit5注解测试
**@Test :**表示方法是测试方法。
**@ParameterizedTest :**表示方法是参数化测试
**@RepeatedTest :**表示方法可重复执行
**@DisplayName :**为测试类或者测试方法设置展示名称
**@BeforeEach :**表示在每个单元测试之前执行
**@AfterEach :**表示在每个单元测试之后执行
**@BeforeAll :**表示在所有单元测试之前执行
**@AfterAll :**表示在所有单元测试之后执行
**@Tag :**表示单元测试类别,类似于JUnit4中的@Categories
**@Disabled :**表示测试类或测试方法不执行,类似于JUnit4中的@Ignore
**@Timeout :**表示测试方法运行如果超过了指定时间将会返回错误
**@ExtendWith :**为测试类或测试方法提供扩展类引用
1 2 3 4 5 6 7 8 9 10 11 12 13 14 15 16 17 18 19 20 21 22 23 24 25 26 27 28 29 30 31 32 33 34 35 36 37 38 39 40 41 42 43 44 45 46 47 48 49 50 51 52 53 54 55 56 @SpringBootTest @DisplayName("junit5功能测试") public class Junit5Test { @DisplayName("测试DisplayName注解") @Test void testDisplayName () { System.out.println(1 ); } @Disabled @DisplayName("测试方法2") @Test void testMethod2 () { System.out.println(2 ); } @RepeatedTest(5) @Test void testRepeatedTest () { System.out.println(5 ); } @Test @Timeout(value = 500,unit = TimeUnit.MILLISECONDS) @DisplayName("测试方法的超时") void testTimeOut () throws InterruptedException { Thread.sleep(2000 ); System.out.println("测试已经超时" ); } @BeforeEach void testBeforeEach () { System.out.println("test will started" ); } @AfterEach void testAfterEach () { System.out.println("test will stoped" ); } @BeforeAll static void testBeforeAll () { System.out.println("all test will started " ); } @AfterAll static void testAfterAll () { System.out.println("all test will stoped " ); } }
断言机制 断言(assertions)机制是测试方法中的核心部分,用来对测试需要满足的条件进行验证。
方法
说明
assertEquals
判断两个对象或两个原始类型是否相等
assertNotEquals
判断两个对象或两个原始类型是否不相等
assertSame
判断两个对象引用是否指向同一个对象
assertNotSame
判断两个对象引用是否指向不同的对象
assertTrue
判断给定的布尔值是否为 true
assertFalse
判断给定的布尔值是否为 false
assertNull
判断给定的对象引用是否为 null
assertNotNull
判断给定的对象引用是否不为 null
1 2 3 4 5 6 7 8 9 10 11 12 13 14 15 16 17 18 19 20 21 22 23 24 25 26 27 28 29 30 31 32 33 34 35 36 37 38 39 40 41 42 43 44 45 46 47 48 49 50 51 52 53 54 55 56 57 @SpringBootTest public class AssertionsTest { @Test @DisplayName("测试简单断言") void testSimpleAssertions () { int num = count(1 , 5 ); assertEquals(6 ,num,"逻辑出现问题" ); String a1 = "test" ; String a2 = "test1" ; assertSame(a1,a2,"地址引用不一致" ); } int count (int a,int b) { int num = a + b; return num; } @Test @DisplayName("测试数组断言") void testArrayAssertions () { int [] a1 = new int []{1 ,2 }; int [] a2 = new int []{2 ,1 }; assertArrayEquals(a1,a2,"两个数组不一样" ); } @Test @DisplayName("测试组合断言") void TestAllAssertions () { assertAll("Math" , () -> assertEquals(2 , 1 + 1 ), () -> assertTrue(-1 > 0 )); } @Test @DisplayName("测试异常断言") public void TestExceptionAssertions () { assertThrows( ArithmeticException.class, () -> {int i= 10 / 2 ;}); } @Test @DisplayName("测试快速失败") public void TestshouldFailAssertions () { if (1 == 2 ){ fail("应该抛出快速失败的异常" ); } } }
前置条件 前置条件(assumptions与断言不同之处在于不满足的断言会使得测试方法失败 ,而不满足的前置条件只会使得测试方法的执行终止。
前置条件可以看成是测试方法执行的前提,当该前提不满足时,就没有继续执行的必要。
1 2 3 4 5 6 @Test @DisplayName("测试前置条件") void testAssumptions () { Assumptions.assumeTrue(false ,"结果不是true" ); System.out.println("**********" ); }
嵌套测试 JUnit 5 可以通过 Java 中的内部类和@Nested 注解实现嵌套测试,从而可以更好的把相关的测试方法组织在一起。
在内部类中可以使用@BeforeEach 和@AfterEach 注解,而且嵌套的层次没有限制。
1 2 3 4 5 6 7 8 9 10 11 12 13 14 15 16 17 18 19 20 21 22 23 24 25 26 27 28 29 30 31 32 33 34 35 36 37 38 39 40 41 42 43 44 45 46 47 48 49 50 51 52 53 54 55 56 57 58 59 60 61 62 63 64 65 66 67 68 69 70 71 72 73 74 75 76 77 78 79 80 @SpringBootTest public class TestingAStackDemo { Stack<Object> stack; @Test @DisplayName("new Stack()") void isInstantiatedWithNew () { new Stack <>(); assertNull(stack); } @Nested @DisplayName("when new") class WhenNew { @BeforeEach void createNewStack () { stack = new Stack <>(); } @Test @DisplayName("is empty") void isEmpty () { assertTrue(stack.isEmpty()); } @Test @DisplayName("throws EmptyStackException when popped") void throwsExceptionWhenPopped () { assertThrows(EmptyStackException.class, stack::pop); } @Test @DisplayName("throws EmptyStackException when peeked") void throwsExceptionWhenPeeked () { assertThrows(EmptyStackException.class, stack::peek); } @Nested @DisplayName("after pushing an element") class AfterPushing { String anElement = "an element" ; @BeforeEach void pushAnElement () { stack.push(anElement); } @Test @DisplayName("it is no longer empty") void isNotEmpty () { assertFalse(stack.isEmpty()); } @Test @DisplayName("returns the element when popped and is empty") void returnElementWhenPopped () { assertEquals(anElement, stack.pop()); assertTrue(stack.isEmpty()); } @Test @DisplayName("returns the element when peeked but remains not empty") void returnElementWhenPeeked () { assertEquals(anElement, stack.peek()); assertFalse(stack.isEmpty()); } } } }
参数化测试 @ValueSource: 为参数化测试指定入参来源,支持八大基础类以及String类型,Class类型
@NullSource: 表示为参数化测试提供一个null的入参
@EnumSource: 表示为参数化测试提供一个枚举入参
@CsvFileSource:表示读取指定CSV文件内容作为参数化测试入参
@MethodSource:表示读取指定方法的返回值作为参数化测试入参(注意方法返回需要是一个流)
1 2 3 4 5 6 7 8 9 10 11 12 13 14 15 16 17 @ParameterizedTest @DisplayName("参数化测试") @ValueSource(ints = {1,5,6,7}) void testParameterized (int num) { System.out.println(num); } @ParameterizedTest @DisplayName("参数化测试2") @MethodSource("stringProvider") void testParameterized (String string) { System.out.println(string); } static Stream<String> stringProvider () { return Stream.of("apple" , "banana" ); }
指标监控 SpringBoot Actuator
对每个微服务快速引用即可获得生产级别的应用监控、审计等功能。
1.使用步骤
①引入场景
②访问 http://localhost:8080/actuator/ **
③暴露所有监控信息为HTTP
1 2 3 4 5 <dependency > <groupId > org.springframework.boot</groupId > <artifactId > spring-boot-starter-actuator</artifactId > </dependency >
1 2 3 4 5 6 7 8 management: endpoints: enabled-by-default: true web: exposure: include: '*'
2.常用端点
最常用的Endpoint:
Health:监控状况
Metrics:运行时指标
Loggers:日志记录
Health Endpoint 健康检查端点一般用于在云平台,平台会定时的检查应用的健康状况,
重要的几点:
Metrics Endpoint 提供详细的、层级的、空间指标信息,这些信息可以被pull(主动推送)或者push(被动获取)方式得到;
由于目前水平过低,接触较少,留个印象吧,即使不知道以后是否能够有机会从事计算机行业
剩下的内容 <— 点击这里
Profile功能
1.条件装配@@Profile
@@Profile可以使用在类或者方法上
1 2 3 4 5 6 7 8 9 10 11 12 13 14 15 16 @Configuration(proxyBeanMethods = false) @Profile("pro") public class ProductionConfiguration { } @Configuration public class TestConfig { @Bean @Profile("pro") public Man getMan () { return new Man (); } }
2.profile分组
1 2 3 4 5 6 7 8 9 spring.profiles.active =pro spring.profiles.group.pro[0] =grp spring.profiles.group.pro[1] =pro spring.profiles.group.test[0] =test
外部化配置 1.配置来源:常用来源(Java属性文件、YAML文件、环境变量、命令行参数)
2.配置文件查找位置
①classpath 根路径
②classpath 根路径下config目录
③jar包当前目录
④jar包当前目录的config目录
⑤/config子目录的直接子目录(这一个只会在linux中生效)
3.配置文件的加载顺序
①当前jar包内部的application.properties和application.yml
②当前jar包内部的application-{profile}.properties 和 application-{profile}.yml
③引用的外部jar包的application.properties和application.yml
④引用的外部jar包的application-{profile}.properties 和 application-{profile}.yml
自定义starter
customize-spring-boot-starter
customize-spring-boot-starter-autoconfigurer
编写自动配置类 xxxAutoConfiguration -> xxxxProperties
@Configuration
@Conditional
@EnableConfigurationProperties
@Bean
starter启动原理 ①starter场景引入了starter-autoconfigure依赖
①在每一次启动都会找到autoconfigure依赖中的META-INF/spring.factories 文件中
②根据这个文件的EnableAutoConfiguration的值,使得项目启动加载指定的自动配置类
③根据配置类的生效规则完成注入
引入starter — xxxAutoConfiguration — 容器中放入组件 —- 绑定xxxProperties —- 配置项
SpringBoot原理 启动过程 ①创建SpringApplication
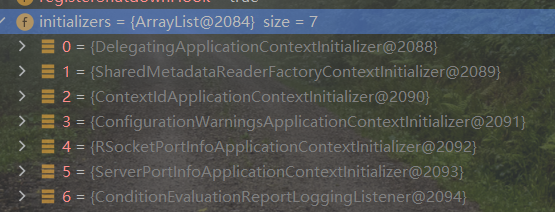
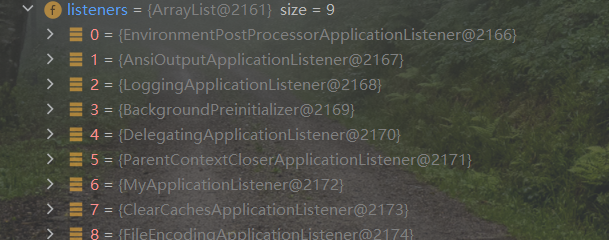
在启动过程会到spring.factories文件中查找这三个类
BootstrapRegistryInitializer(由于没有任何配置类注册这个组件,所有这里为0)
ApplicationContextInitializer
ApplicationListener
1 2 3 4 5 6 7 8 9 10 11 12 13 14 15 16 this .primarySources = new LinkedHashSet <>(Arrays.asList(primarySources));this .webApplicationType = WebApplicationType.deduceFromClasspath();this .bootstrapRegistryInitializers = new ArrayList <>( getSpringFactoriesInstances(BootstrapRegistryInitializer.class)); setInitializers((Collection) getSpringFactoriesInstances(ApplicationContextInitializer.class)); setListeners((Collection) getSpringFactoriesInstances(ApplicationListener.class));
②运行SpringApplication
1 2 3 4 5 6 7 8 9 10 11 12 13 14 15 16 17 18 19 20 21 22 23 24 25 26 27 28 29 30 31 32 33 34 35 36 37 38 39 40 41 42 43 44 45 46 47 48 49 50 51 52 53 54 55 56 57 58 59 60 61 62 63 64 65 66 67 68 69 70 71 72 73 74 75 76 77 78 79 80 81 82 83 84 85 86 87 88 89 90 91 92 93 94 95 96 97 98 99 100 101 102 103 104 105 106 107 108 109 110 111 112 113 114 115 116 117 118 119 120 121 122 123 124 125 126 127 128 long startTime = System.nanoTime();createBootstrapContext(){ DefaultBootstrapContext bootstrapContext = new DefaultBootstrapContext (); this .bootstrapRegistryInitializers.forEach((initializer) -> initializer.initialize(bootstrapContext)); return bootstrapContext; } configureHeadlessProperty(); getRunListeners(args){ getSpringFactoriesInstances() } listeners.starting(bootstrapContext, this .mainApplicationClass); ApplicationArguments applicationArguments = new DefaultApplicationArguments (args);prepareEnvironment(listeners...){ ConfigurableEnvironment environment = getOrCreateEnvironment(); configureEnvironment(environment, applicationArguments.getSourceArgs(); ConfigurationPropertySources.attach(environment); listeners.environmentPrepared(bootstrapContext, environment); } context = createApplicationContext(); prepareContext(bootstrapContext, context, environment, listeners, applicationArguments, printedBanner){ context.setEnvironment(environment); postProcessApplicationContext(context); applyInitializers(context); listeners.contextPrepared(context); listeners.contextLoaded(context); } refreshContext(context); afterRefresh(context, applicationArguments); listeners.started(context, timeTakenToStartup); callRunners(context, applicationArguments){ runners.addAll(context.getBeansOfType(ApplicationRunner.class).values()); runners.addAll(context.getBeansOfType(CommandLineRunner.class).values()); AnnotationAwareOrderComparator.sort(runners); for (Object runner : new LinkedHashSet <>(runners)) { if (runner instanceof ApplicationRunner) { callRunner((ApplicationRunner) runner, args); } if (runner instanceof CommandLineRunner) { callRunner((CommandLineRunner) runner, args); } } } try { .... } catch { listeners.failed(context, exception); } listeners.ready(context, timeTakenToReady); try { .... } catch { }
读取spring.factories的三个组件 https://docs.spring.io/spring-boot/docs/current/reference/html/spring-boot-features.html#boot-features-application-events-and-listeners
ApplicationContextInitializer
ApplicationListener
SpringApplicationRunListener
容器中的两个runner 1 2 3 4 5 6 7 8 9 10 11 12 13 14 15 16 17 18 @Component public class MyCommandLineRunner implements CommandLineRunner { @Override public void run (String... args) throws Exception { System.out.println("自定义CommandLineRunner... run" ); } } @Component public class MyApplicationRunner implements ApplicationRunner { @Override public void run (ApplicationArguments args) throws Exception { System.out.println("自定义ApplicationRunner ... run" ); } }
