Demo简介 技术点 开发环境:SSM框架+MySql8.0+JDK1.8+Tomcat8.0+Maven3.6+bootstrap框架
开发工具:IDEA2020+SQLyog
功能点
实现访问同一个地址,根据不同的请求方式实现对资源的不同操作
基础环境搭建
使用IDEA创建Maven工程,并将Maven的打包方式设置为war
引入相关依赖
spring、springMVC、mabatis、数据库连接池、mysql驱动包、其他
引入bootstap前端框架
编写SSM整合的关键配置文件
web.xml、spring、springMVC
1
2
3
4
5
6
7
8
9
10
11
12
13
14
15
16
17
18
19
20
21
22
23
24
25
26
27
28
29
30
31
32
33
34
35
36
37
38
39
40
41
42
43
44
45
46
47
48
49
50
51
52
53
54
55
56
57
58
59
60
61
<?xml version="1.0" encoding="UTF-8" ?> <web-app xmlns ="http://xmlns.jcp.org/xml/ns/javaee" xmlns:xsi ="http://www.w3.org/2001/XMLSchema-instance" xsi:schemaLocation ="http://xmlns.jcp.org/xml/ns/javaee http://xmlns.jcp.org/xml/ns/javaee/web-app_4_0.xsd" version ="4.0" > <context-param > <param-name > contextConfigLocation</param-name > <param-value > classpath:spring.xml</param-value > </context-param > <listener > <listener-class > org.springframework.web.context.ContextLoaderListener</listener-class > </listener > <filter > <filter-name > CharacterEncodingFilter</filter-name > <filter-class > org.springframework.web.filter.CharacterEncodingFilter</filter-class > <init-param > <param-name > encoding</param-name > <param-value > UTF-8</param-value > </init-param > <init-param > <param-name > forceResponseEncoding</param-name > <param-value > true</param-value > </init-param > </filter > <filter-mapping > <filter-name > CharacterEncodingFilter</filter-name > <url-pattern > /*</url-pattern > </filter-mapping > <filter > <filter-name > HiddenHttpMethodFilter</filter-name > <filter-class > org.springframework.web.filter.HiddenHttpMethodFilter</filter-class > </filter > <filter-mapping > <filter-name > HiddenHttpMethodFilter</filter-name > <url-pattern > /*</url-pattern > </filter-mapping > <servlet > <servlet-name > DispatcherServlet</servlet-name > <servlet-class > org.springframework.web.servlet.DispatcherServlet</servlet-class > <init-param > <param-name > contextConfigLocation</param-name > <param-value > classpath:springMVC.xml</param-value > </init-param > <load-on-startup > 1</load-on-startup > </servlet > <servlet-mapping > <servlet-name > DispatcherServlet</servlet-name > <url-pattern > /</url-pattern > </servlet-mapping > </web-app >
1
2
3
4
5
6
7
8
9
10
11
12
13
14
15
16
17
18
19
20
21
22
23
24
25
26
27
28
29
30
31
32
33
34
35
36
37
38
39
40
41
42
43
44
45
46
47
48
49
50
51
52
53
54
55
56
57
58
59
60
61
62
63
64
65
66
67
68
69
70
71
72
73
74
75
76
77
78
79
80
81
82
83
84
85
86
87
<?xml version="1.0" encoding="UTF-8" ?> <beans xmlns ="http://www.springframework.org/schema/beans" xmlns:xsi ="http://www.w3.org/2001/XMLSchema-instance" xmlns:context ="http://www.springframework.org/schema/context" xmlns:aop ="http://www.springframework.org/schema/aop" xmlns:tx ="http://www.springframework.org/schema/tx" xsi:schemaLocation ="http://www.springframework.org/schema/beans http://www.springframework.org/schema/beans/spring-beans.xsd http://www.springframework.org/schema/context http://www.springframework.org/schema/context/spring-context.xsd http://www.springframework.org/schema/aop http://www.springframework.org/schema/aop/spring-aop.xsd http://www.springframework.org/schema/tx http://www.springframework.org/schema/tx/spring-tx.xsd" > <context:component-scan base-package ="ssm_crud.service" /> <context:component-scan base-package ="ssm_crud" use-default-filters ="false" > <context:exclude-filter type ="annotation" expression ="org.springframework.stereotype.Controller" /> </context:component-scan > <context:property-placeholder location ="classpath:jdbc.properties" /> <bean id ="pooledDataSource" class ="com.mchange.v2.c3p0.ComboPooledDataSource" > <property name ="driverClass" value ="${jdbc.driverClass}" /> <property name ="jdbcUrl" value ="${jdbc.jdbcUrl}" /> <property name ="user" value ="${jdbc.user}" /> <property name ="password" value ="${jdbc.password}" /> </bean > <bean id ="sqlSessionFactory" class ="org.mybatis.spring.SqlSessionFactoryBean" > <property name ="configLocation" value ="classpath:mybatis-config.xml" /> <property name ="dataSource" ref ="pooledDataSource" /> <property name ="mapperLocations" value ="classpath:mybatis/mapper/*.xml" /> </bean > <bean class ="org.mybatis.spring.mapper.MapperScannerConfigurer" > <property name ="basePackage" value ="ssm_crud.dao" /> </bean > <bean id ="sessionTemplate" class ="org.mybatis.spring.SqlSessionTemplate" > <constructor-arg name ="sqlSessionFactory" ref ="sqlSessionFactory" /> <constructor-arg name ="executorType" value ="BATCH" /> </bean > <bean id ="transactionManager" class ="org.springframework.jdbc.datasource.DataSourceTransactionManager" > <property name ="dataSource" ref ="pooledDataSource" /> </bean > <tx:advice id ="txadvice" > <tx:attributes > <tx:method name ="*" /> <tx:method name ="get*" read-only ="true" /> </tx:attributes > </tx:advice > <aop:config > <aop:pointcut id ="txPoint" expression ="execution(* ssm_crud.service..*(..))" /> <aop:advisor advice-ref ="txadvice" pointcut-ref ="txPoint" /> </aop:config > </beans >
1
2
3
4
5
6
7
8
9
10
11
12
13
14
15
16
17
18
19
20
21
22
23
24
25
26
27
28
29
<?xml version="1.0" encoding="UTF-8" ?> <beans xmlns ="http://www.springframework.org/schema/beans" xmlns:xsi ="http://www.w3.org/2001/XMLSchema-instance" xmlns:context ="http://www.springframework.org/schema/context" xmlns:mvc ="http://www.springframework.org/schema/mvc" xsi:schemaLocation ="http://www.springframework.org/schema/beans http://www.springframework.org/schema/beans/spring-beans.xsd http://www.springframework.org/schema/context http://www.springframework.org/schema/context/spring-context.xsd http://www.springframework.org/schema/mvc http://www.springframework.org/schema/mvc/spring-mvc.xsd" > <context:component-scan base-package ="ssm_crud" use-default-filters ="false" > <context:include-filter type ="annotation" expression ="org.springframework.stereotype.Controller" /> </context:component-scan > <bean class ="org.springframework.web.servlet.view.InternalResourceViewResolver" > <property name ="prefix" value ="/WEB-INF/templates/" /> <property name ="suffix" value =".jsp" /> </bean > <mvc:default-servlet-handler /> <mvc:annotation-driven /> </beans >
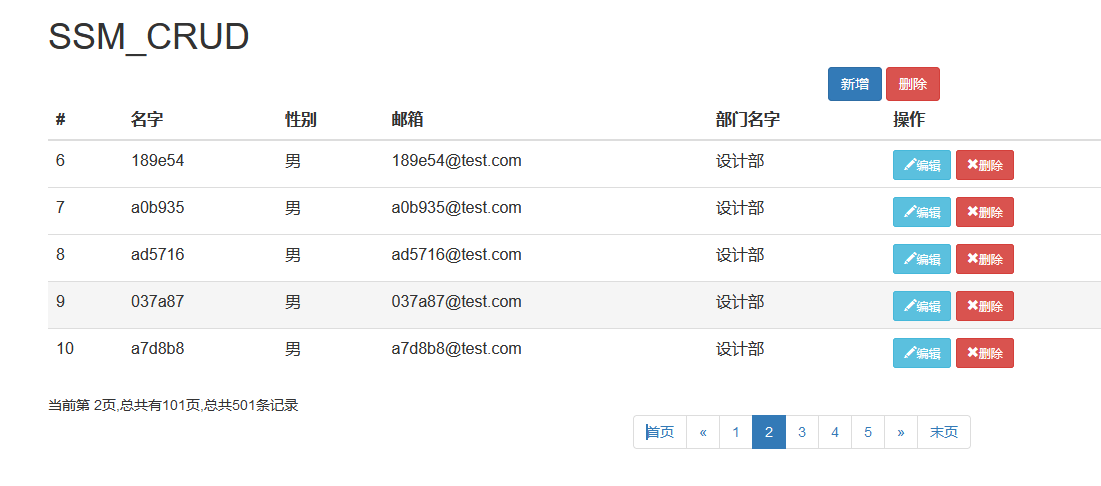
查询功能 1.直接让index界面向服务器发起查询的ajax请求
2.控制层组件处理index的请求,使用注解@ResponseBody将查询方法的返回值作为响应体返回
新造一个Message类给予相关提示,里面包含了状态码、提示信息以及用户想要的数据
3.在jackson依赖的作用下直接将数据转换为json字符串回传给客户端
4.客户端将接受到的json字符串解析为json对象
5.使用此json对象对页面需要的信息进行填充
解析并显示员工数据、解析并显示分页信息、解析并显示分页条都是在第4、5步完成的
使用的是JQuery的each函数遍历封装在json对象中的分页条和员工信息,
通过从外到内先利用$()和addClass()创建相应的标签及设置标签样式,
再通过append()方法进行内容设置以及attr()方法进行自定义属性的设置。
利用分页插件封装的数据给分页条绑定点击的ajax事件
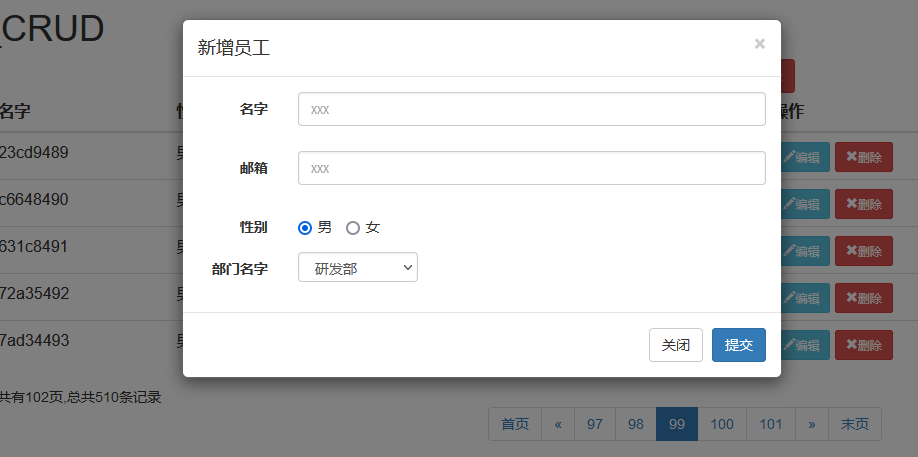
增加功能 1.采用bootstrap框架提供的模拟框提供填写的表单
2.为新增选项绑定单击事件,发起ajax请求,查询所有部门的姓名并显示在下拉框中
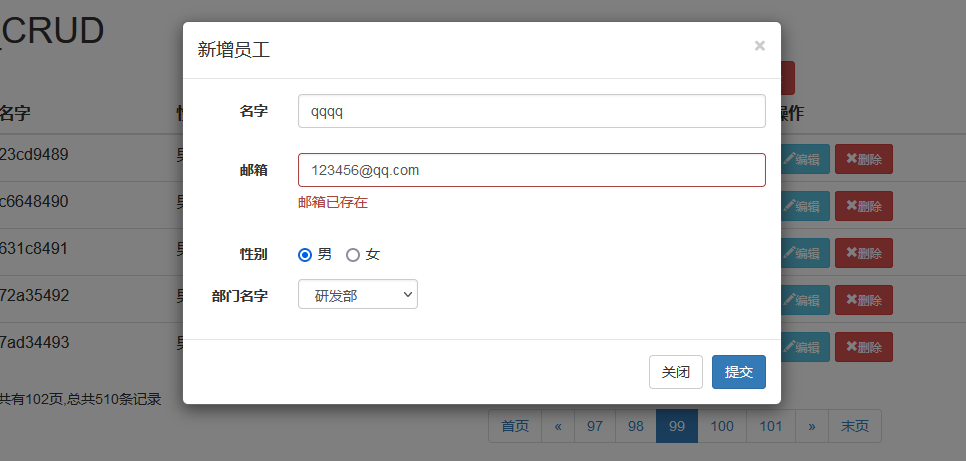
3.为提交选项绑定单击事件,在发起保存请求之前对添加的数据进行前端JQuery校验和ajax请求后端校验邮箱是否可用 ,
表单数据使用JQuery的serialize()方法实现序列化并发送给服务器,针对重要的数据后端使用JSR303 完成双端验证
4.提交完成后由bootstrap框架提供的$(‘#myModal’).modal(‘hide’)自动关闭模拟框
5.模拟框关闭后再次发起ajax请求访问最后一页
第5步没有采用pageHelper提供的限制只能访问最大页数的功能,仅是在js中定义一个全局变量,记录总记录数
根据查询接口返回的pageInfo封装的数据,判断当总记录数 / 每页显示数据 是否大于 0 来决定全局变量是否需要 +1
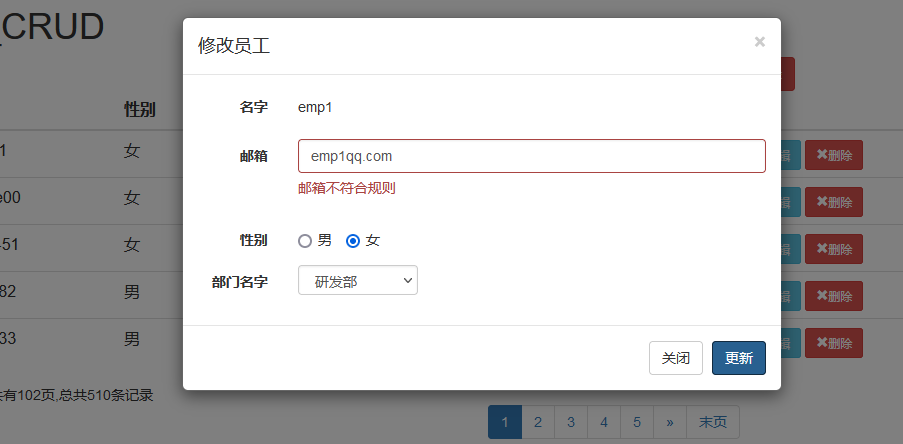
修改功能 1.采用bootstrap框架提供的模拟框提供填写的表单
2.为新增选项绑定单击事件,发起ajax请求查询指定员工的信息,回显在表单中
3.为提交选项绑定单击事件,在发起修改请求之前对添加的数据进行前端JQuery校验校验邮箱是否符合规则
校验完成之后表单数据使用JQuery的serialize()方法实现序列化并发送给服务器,
4.提交完成后由bootstrap框架提供的$(‘#myModal’).modal(‘hide’)自动关闭模拟框
5..模拟框关闭后再次发起ajax请求访问数据修改时所在的页码
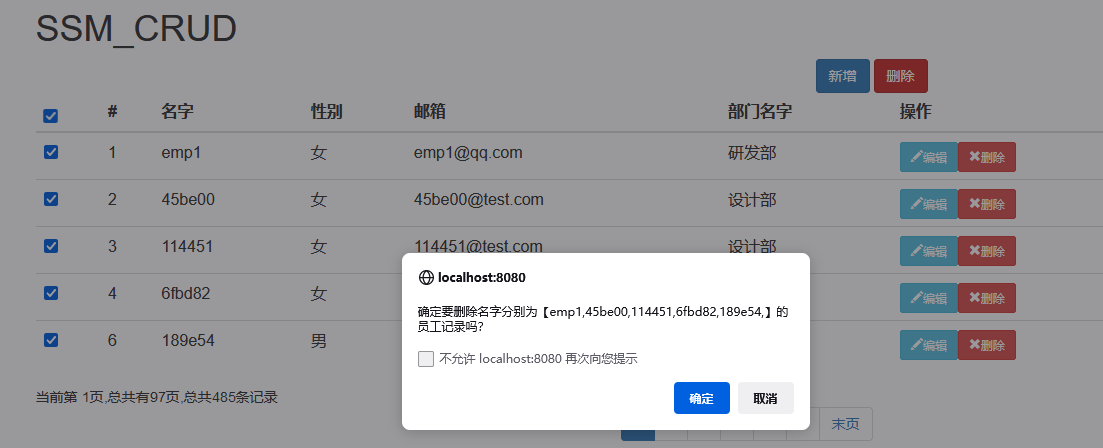
删除功能 1.为删除按钮绑定单击事件,根据confirm()函数的选择状态决定是否发送ajax请求删除数据
2.添加全选或者全不选的功能
$(“.check_item:checked”).length可以获取状态处于选中的选项框的个数
选择prop()函数可以获取选项框的状态(true或者false),不使用attr()函数的原因是只会返回(undefined)
3.给第一行的删除绑定统一删除的功能,通过$(this).parents(“tr”).find(“td:eq(1)”).text()寻找当前dom对象的祖父元素中的tr元素后
再获取子元素中的第二个td元素的文本值,封装成json字符串由ajax请求发往服务器
4.服务器利用jackson 依赖转换字符串为map集合对象,获取map集合中的被删除id并将利用String的split()分割每一个数字获取一个String数组
5.将String数组的元素逐个遍历转换为数字调用service层进行删除
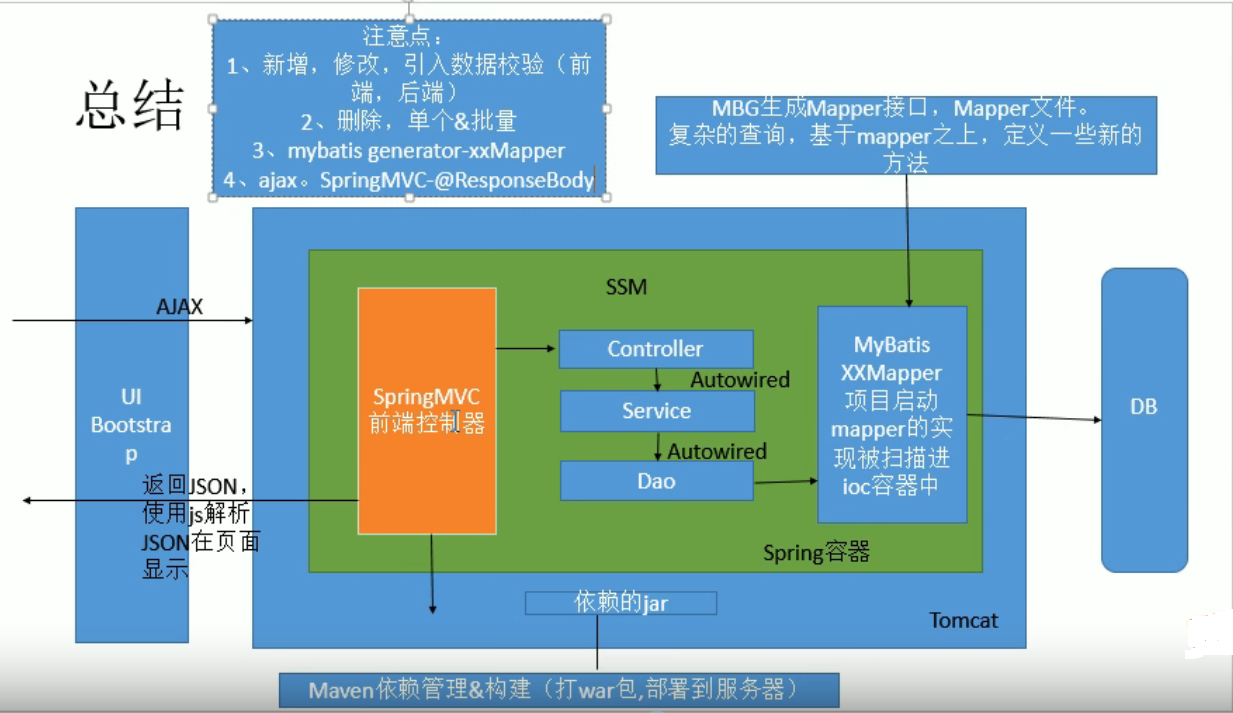
SSM-CRUD总结

 wechat
 alipay